Skip to Content

Help

Visits and the calendar

Book, open, move and complete visits

  1. Open «Bookings → Calendar»: the calendar of visits. The button at the top left switches between day, week and month; the arrows move through the dates and «Today» brings you back. On the right there is a small calendar to jump to any date, and the specialists: untick someone to hide their visits.
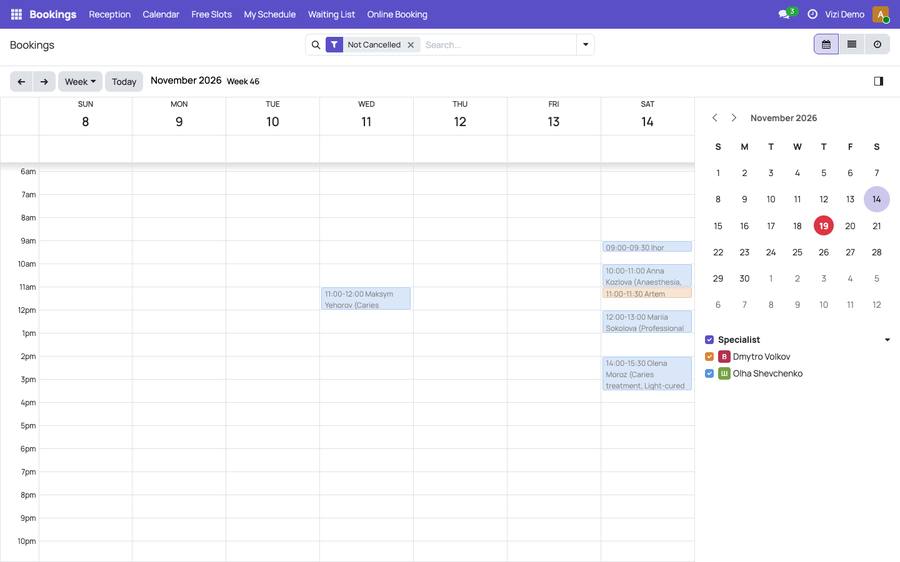
    Open «Bookings → Calendar»: the calendar of visits. The button at the top left switches between day, week and month; the arrows move through the dates and «Today» brings you back. On the right there i
  2. In the week or the month, click a day: it opens hour by hour.
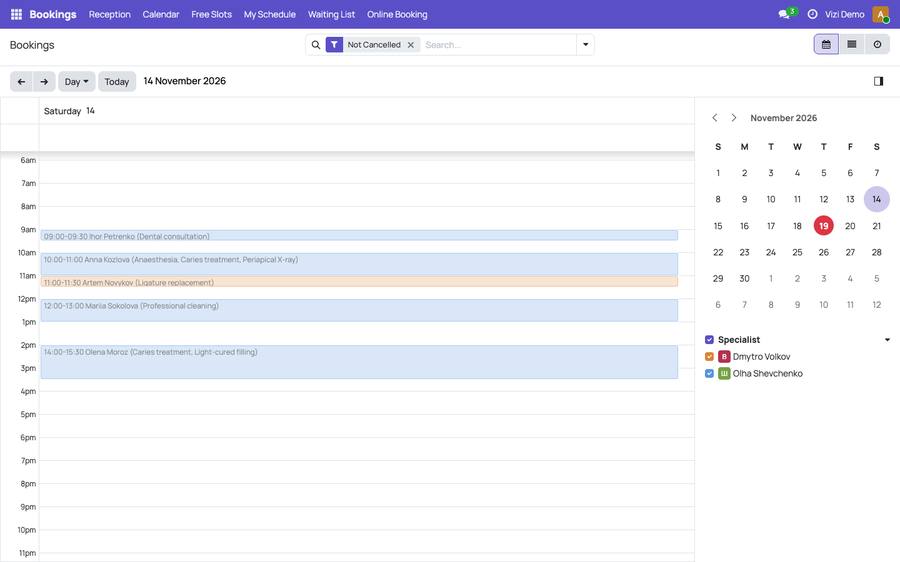
    In the week or the month, click a day: it opens hour by hour.
  3. In the day, click a free time: a new visit opens at that time. Choose who comes, the specialist and the services (the «Select services» button), then press «Save».
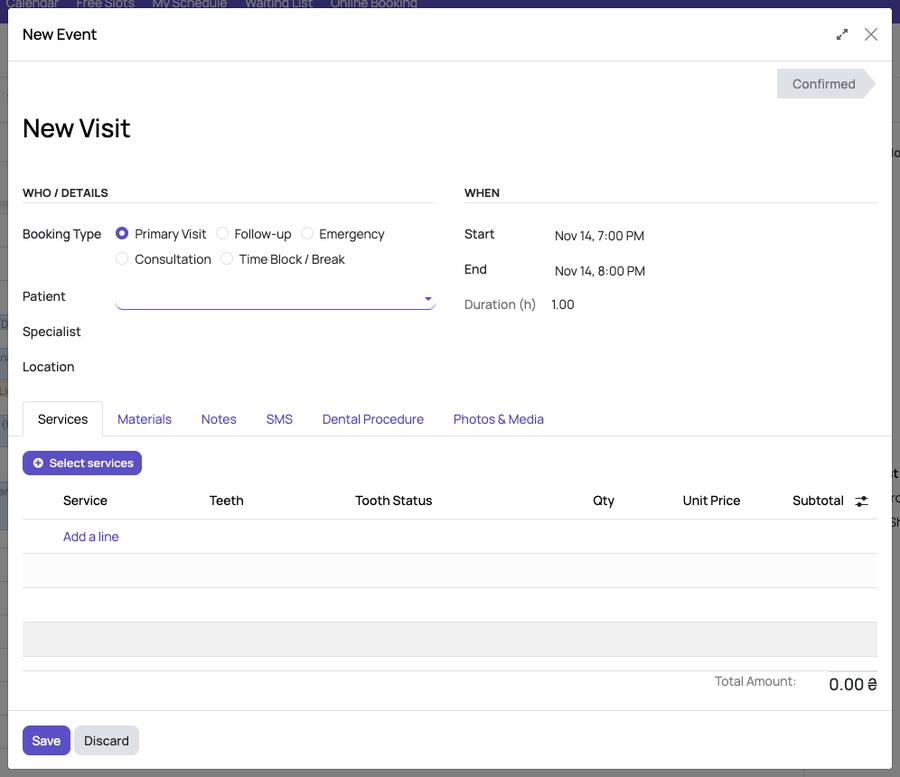
    In the day, click a free time: a new visit opens at that time. Choose who comes, the specialist and the services (the «Select services» button), then press «Save».
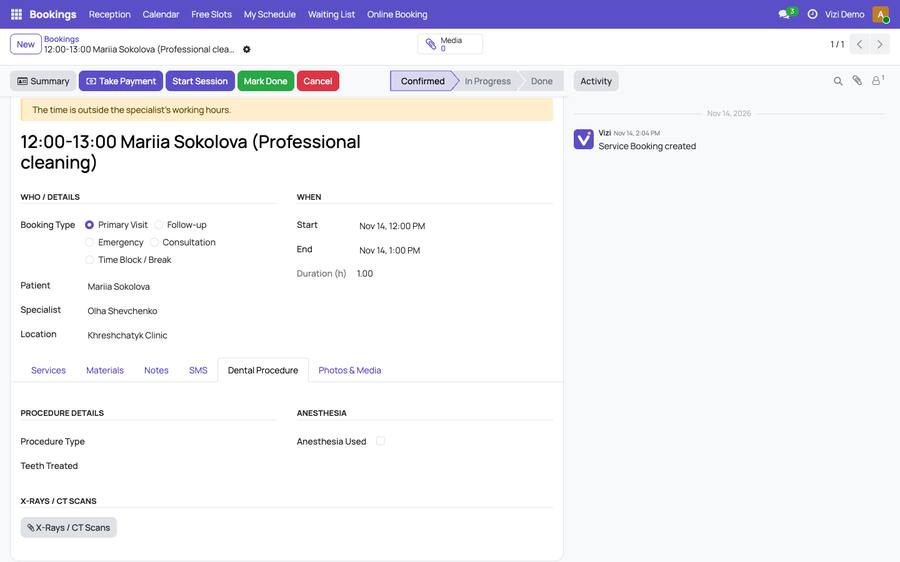
  4. Click a visit in the calendar to open it. A yellow line at the top warns when the time is outside the specialist's working hours or overlaps another visit: you can still save it.
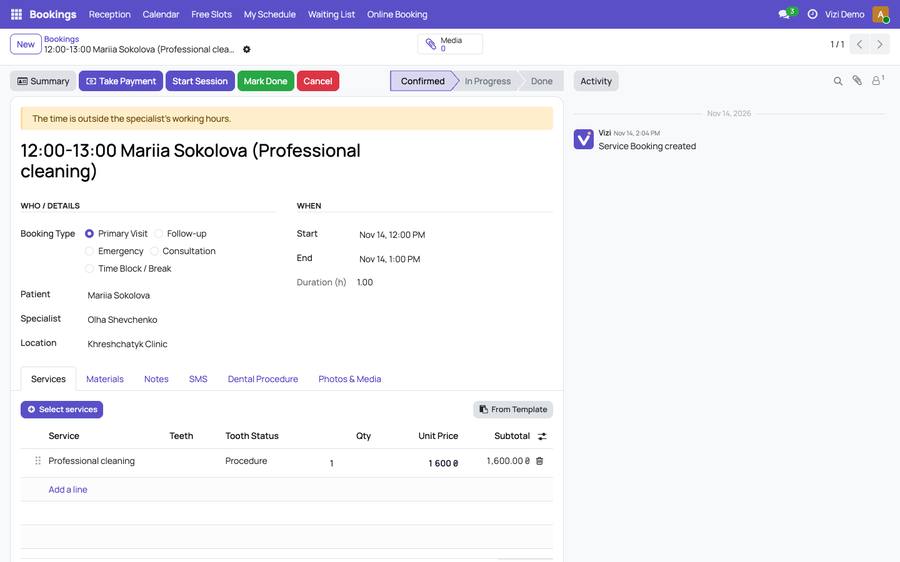
    Click a visit in the calendar to open it. A yellow line at the top warns when the time is outside the specialist's working hours or overlaps another visit: you can still save it.
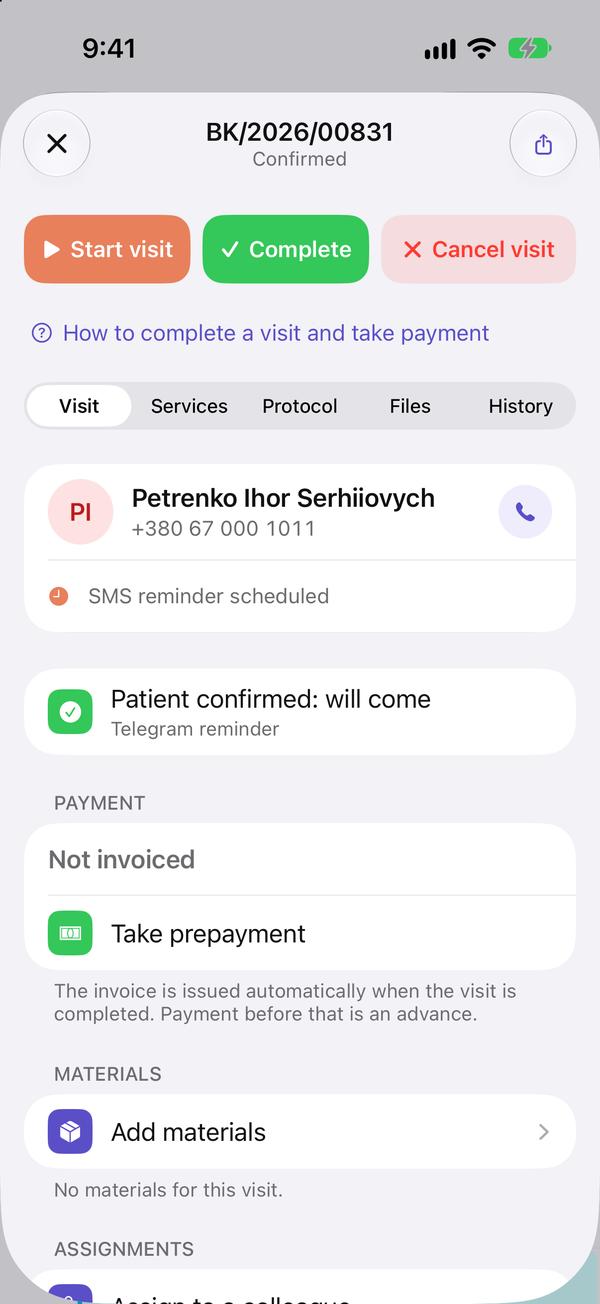
  5. When the person has come, press «Start Session» at the top; when the visit is over, «Mark Done». «Take Payment» is right there too.

    When the person has come, press «Start Session» at the top; when the visit is over, «Mark Done». «Take Payment» is right there too.

To move a visit, drag it to another time in the calendar, or open it and change «Start».

A specialist changes only their own visits; the managers change any.

The app shows the same calendar: what you change here is in the app at once.
↑ To the top

Reception board

Every specialist's day side by side

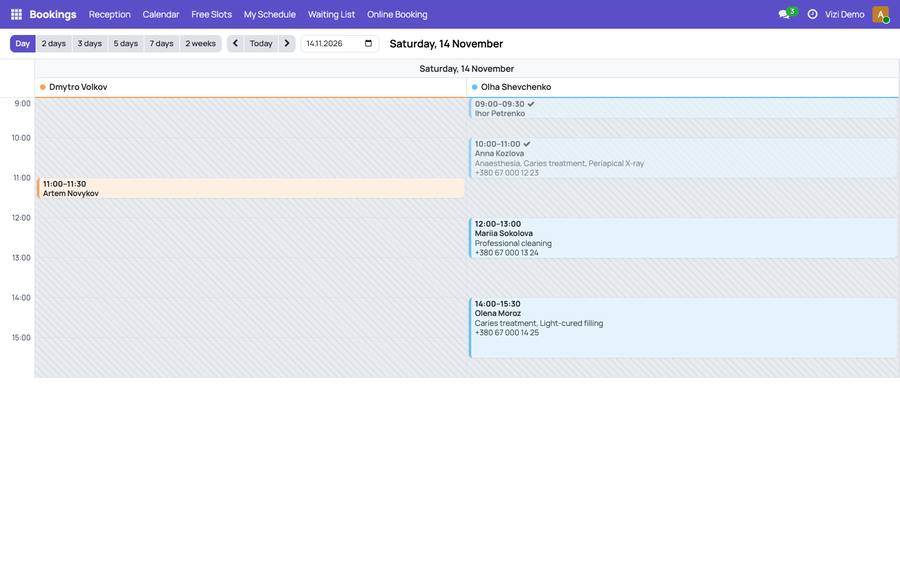
  1. «Bookings → Reception»: the days side by side, and in each day a column for every specialist who works then, with their working hours, visits and breaks. The buttons on the left choose how many days you see, from one day to two weeks; the arrows and «Today» move through them.

    «Bookings → Reception»: the days side by side, and in each day a column for every specialist who works then, with their working hours, visits and breaks. The buttons on the left choose how many days y
  2. Click a free time in a specialist's column: a new visit opens with the specialist, the time and the branch filled in. Click a visit to open it.

Hatched hours are outside the specialist's working hours.

↑ To the top

Free time

Who is free when, and booking in a click

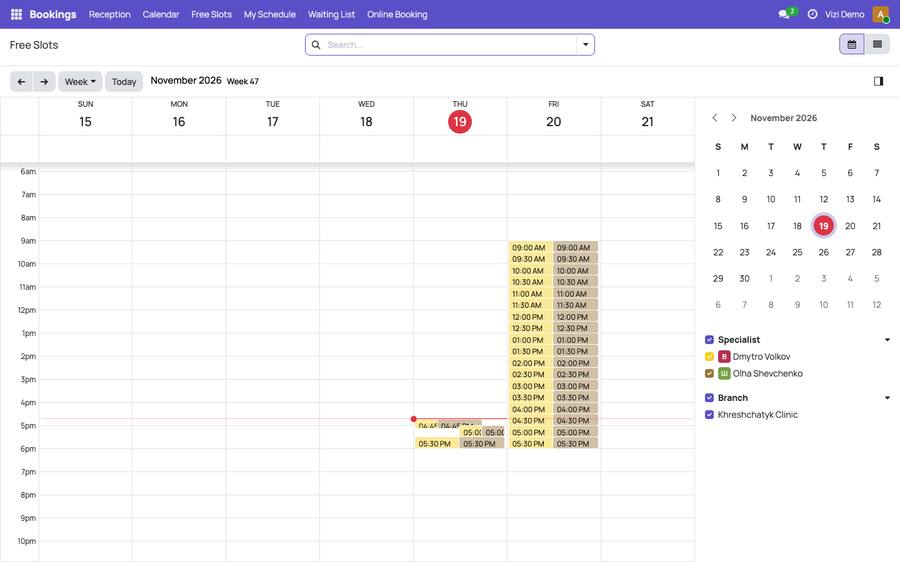
  1. «Bookings → Free Slots»: the specialists' free time in a calendar like the visits' one: their working hours minus the visits and the time off. «Day», «Week», «Month», the arrows and «Today» work the same way; on the right, untick a specialist or a branch to hide them.

    «Bookings → Free Slots»: the specialists' free time in a calendar like the visits' one: their working hours minus the visits and the time off. «Day», «Week», «Month», the arrows and «Today» work the s
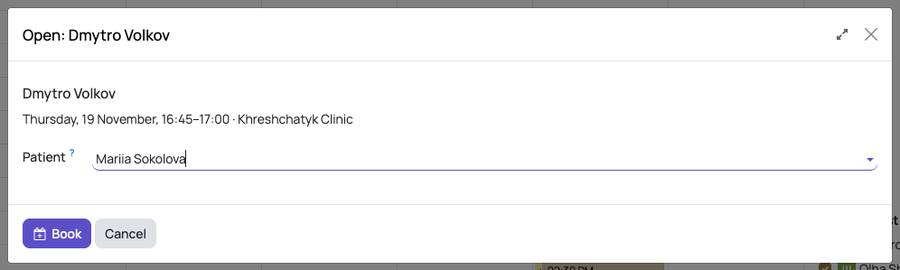
  2. Click a free time: it opens with the specialist, the day and the branch. Choose who comes (or leave it empty and choose in the visit) and press «Book».

    Click a free time: it opens with the specialist, the day and the branch. Choose who comes (or leave it empty and choose in the visit) and press «Book».
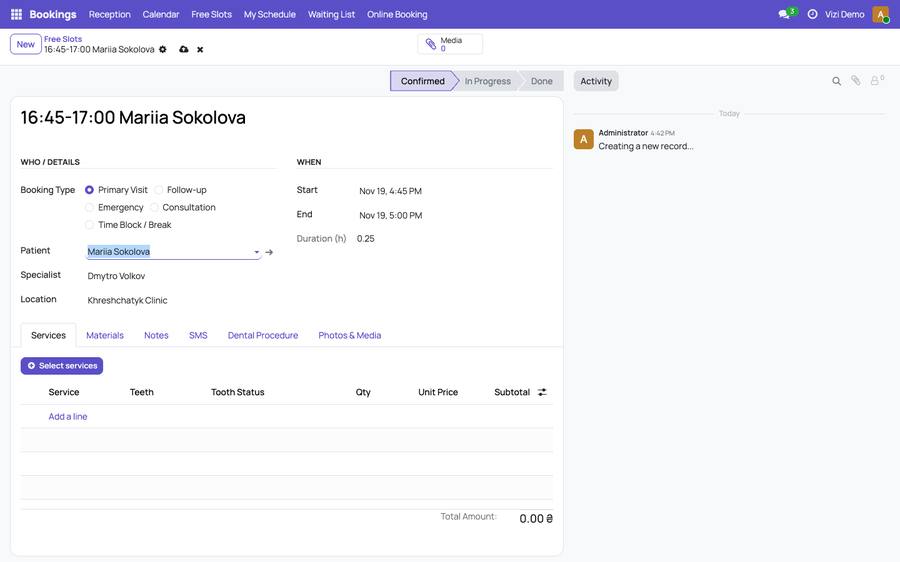
  3. The visit opens with the specialist, the branch and the time filled in. Add the services and press «Save».

    The visit opens with the specialist, the branch and the time filled in. Add the services and press «Save».

The list button at the top right shows the same free time as a list, with «Book» on each line.

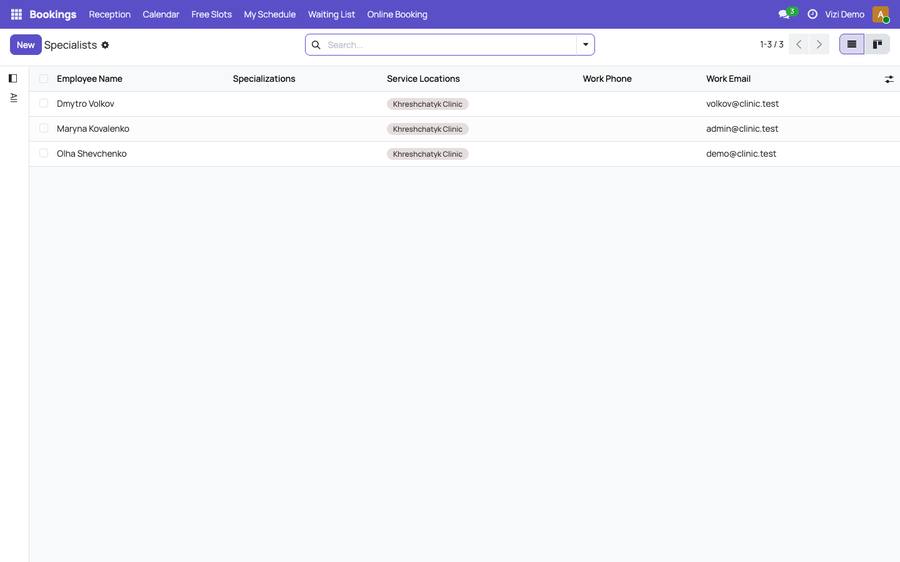
Nobody is free? Their working hours are not set yet: «Bookings → My Schedule» for oneself, «Team → Specialists» for the managers.

↑ To the top

Patient cards

Everyone who comes to you, with their history

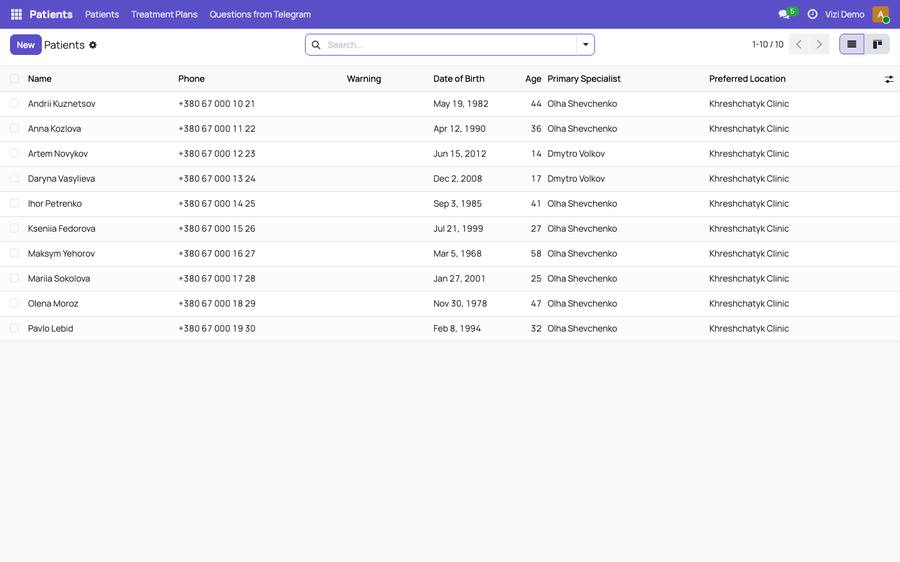
  1. «Patients → Patients»: everyone who comes to you. Find a person by name or phone in the search field; «New» adds a person.

    «Patients → Patients»: everyone who comes to you. Find a person by name or phone in the search field; «New» adds a person.
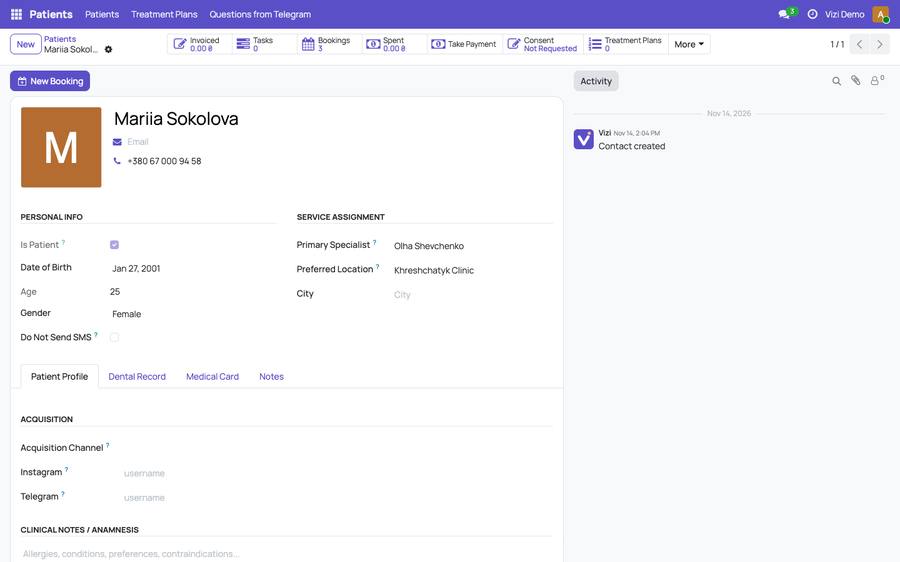
  2. The card: contacts, the main specialist and the branch, notes. The buttons at the top show the visits and the money, and open the payments, the plans and the consents of this person; «Book» makes a new visit for them.

    The card: contacts, the main specialist and the branch, notes. The buttons at the top show the visits and the money, and open the payments, the plans and the consents of this person; «Book» makes a ne
↑ To the top

Payments and the cash desk

Take money, give an advance back, see the day

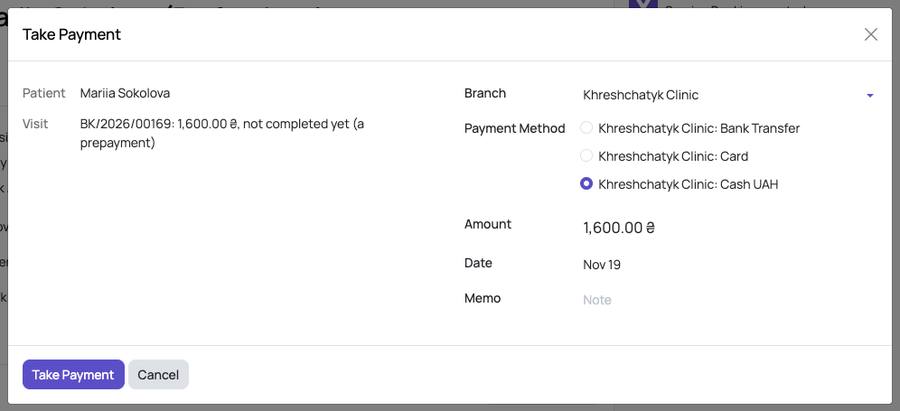
  1. Press «Take Payment» on the visit (at the top) or on the card. Vizi suggests the amount due; choose the payment method (the cash desk is chosen already), check the amount and the date and press «Take Payment».

    Press «Take Payment» on the visit (at the top) or on the card. Vizi suggests the amount due; choose the payment method (the cash desk is chosen already), check the amount and the date and press «Take
  2. Money taken before the visit is completed is an advance: it pays for the visit when the visit is completed. On the card the «Take Payment» button shows the debt or the advance.

  3. To give an advance back, press «Give Back» on the card: it is there only when there is an advance.

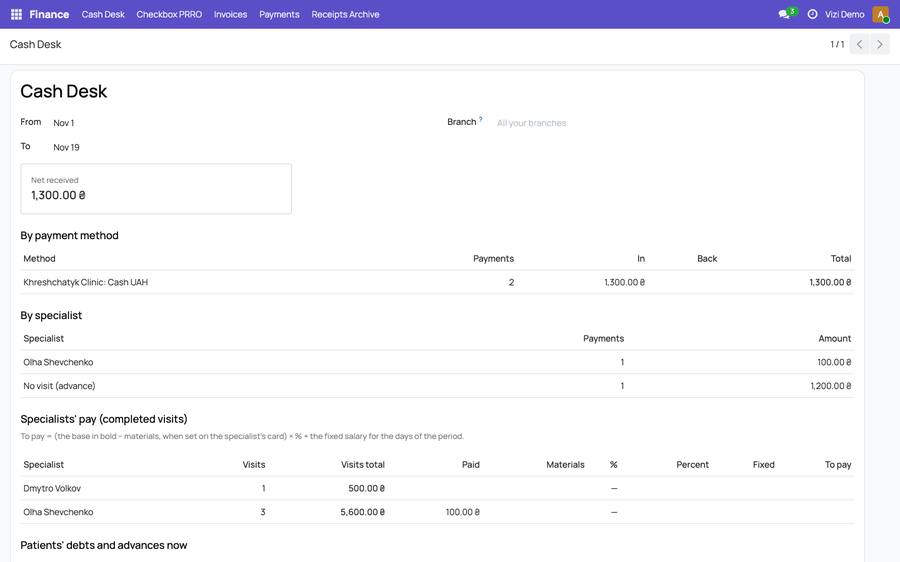
  4. «Finance → Cash Desk»: what came in and what went back for the days you choose: the totals, by payment method, by specialist, the specialists' percent and the debts.

    «Finance → Cash Desk»: what came in and what went back for the days you choose: the totals, by payment method, by specialist, the specialists' percent and the debts.

Specialists see the money they took and what was paid for their own visits; managers see everything.

↑ To the top

Payment by QR

Pay from any bank app: to a FOP or to a card

  1. «Configuration → General Settings» → «Acts of Completed Work»: tick the payment QR and choose the account type, «FOP or Company Account» or «Private Person's Card»; then the IBAN, the recipient and the ЄДРПОУ / РНОКПП. Unpaid acts then carry the QR.

  2. A branch or a specialist with their own account (a separate FOP or a personal card): fill in «Payment Requisites (QR)» on the branch's card (the «Billing» tab) or on the specialist's card (the «Commission» tab). The QR of their visits then pays to them.

  3. The patient scans the QR on the act with the camera or the bank app: the recipient, IBAN, amount and purpose are filled in. When the money has come, take the payment with the bank transfer method.

A private person's card suits a master without a FOP: the QR tops the card up, with «Account top-up» as the purpose. With a regular income a FOP is safer.

The app shows the QR on the screen too (in the visit's payment, and on the card for the debt) with a link to send. There the owner sets the requisites up by pasting the link from the bank's app: Profile → Settings → Payment requisites.

↑ To the top

Fiscal receipts (Checkbox)

A receipt for every payment, the shift and the Z-report

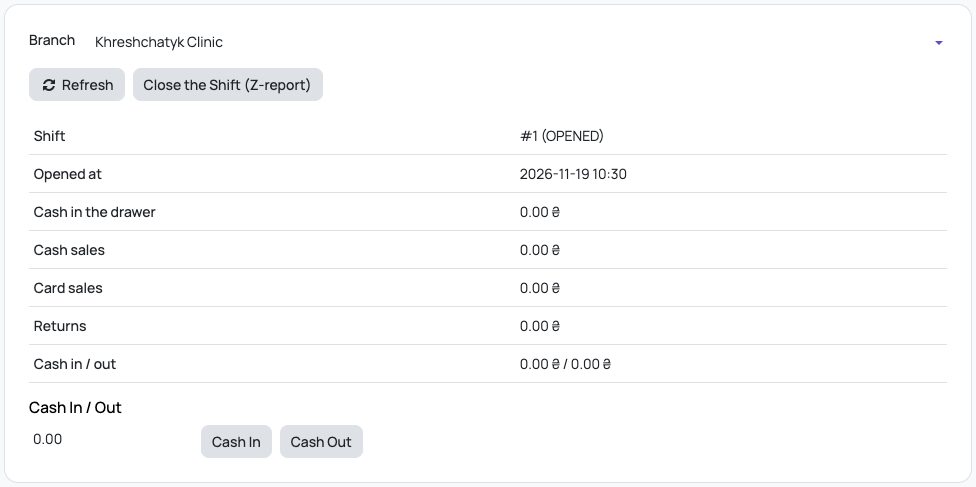
  1. «Finance → Checkbox PRRO»: the cash register of each branch and its shift. «Open the Shift» starts the day (Vizi can open it by itself with the first payment); «Close the Shift (Z-report)» ends it.

  2. A payment taken in Vizi gets its fiscal receipt from Checkbox; the receipt's link is on the payment. «Finance → Receipts Archive» lists every receipt.

↑ To the top

Treatment plans

Stages with prices, accepted by the patient's signature

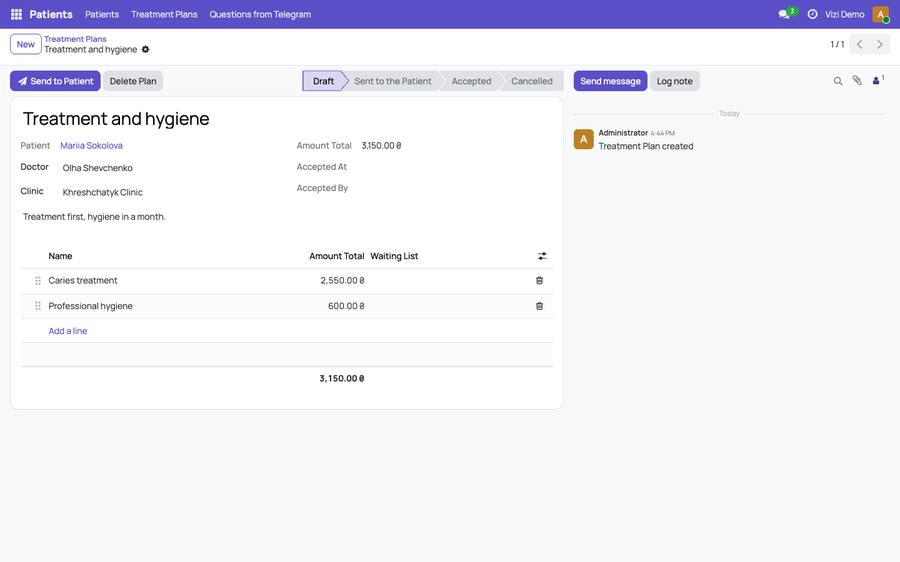
  1. On the patient's card press «Treatment Plans», then «New» (or open «Patients → Treatment Plans»). The doctor and the clinic are filled in from the patient.

    On the patient's card press «Treatment Plans», then «New» (or open «Patients → Treatment Plans»). The doctor and the clinic are filled in from the patient.
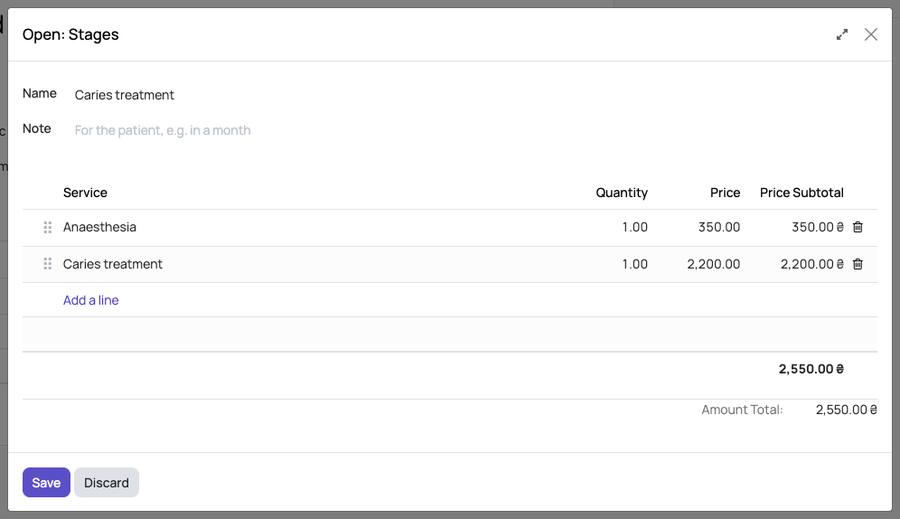
  2. Under «Stages» press «Add a line»: a stage opens. Give it a name, a note for the patient if needed, and the services: the price comes from the clinic's price list, the quantity and the price can be changed. Save the stage, then the plan.

    Under «Stages» press «Add a line»: a stage opens. Give it a name, a note for the patient if needed, and the services: the price comes from the clinic's price list, the quantity and the price can be ch
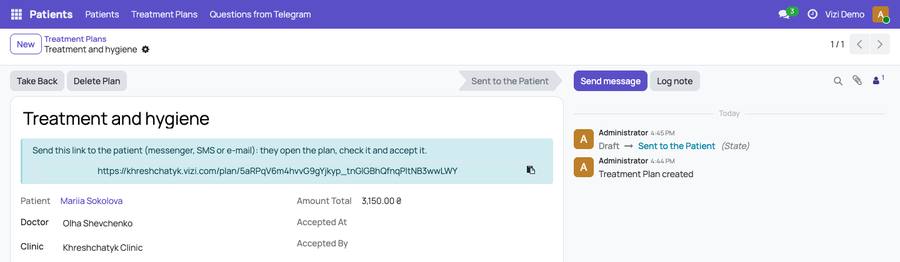
  3. Press «Send to Patient»: the link appears. Copy it (the button next to it) and send it by messenger, SMS or e-mail.

    Press «Send to Patient»: the link appears. Copy it (the button next to it) and send it by messenger, SMS or e-mail.
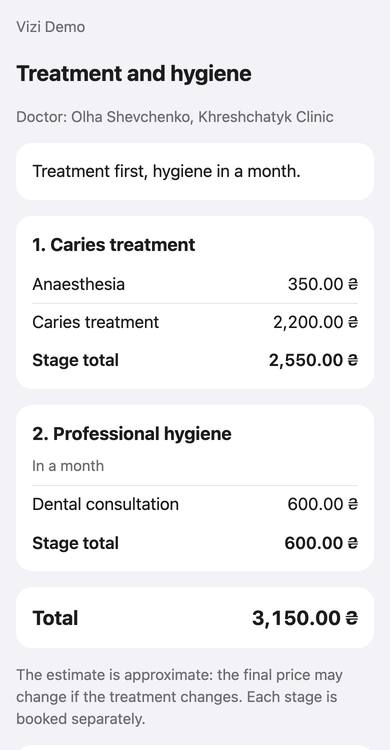
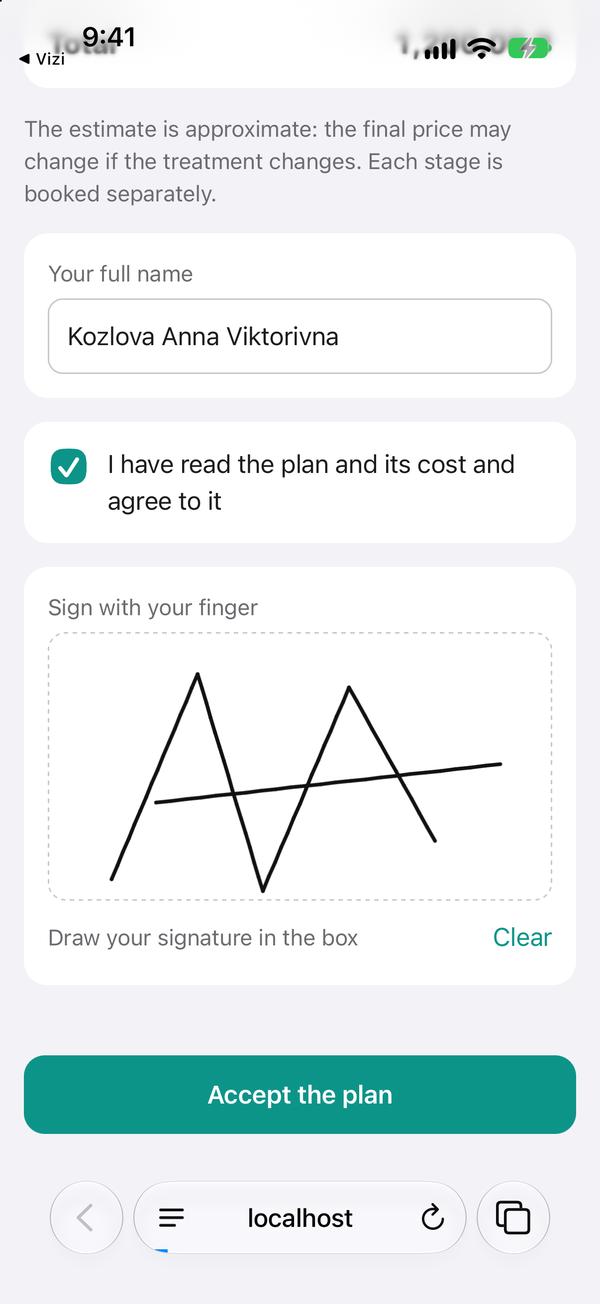
  4. The patient opens the link on the phone, checks the stages and the prices, types the name, ticks the consent and signs with a finger.

    The patient opens the link on the phone, checks the stages and the prices, types the name, ticks the consent and signs with a finger.
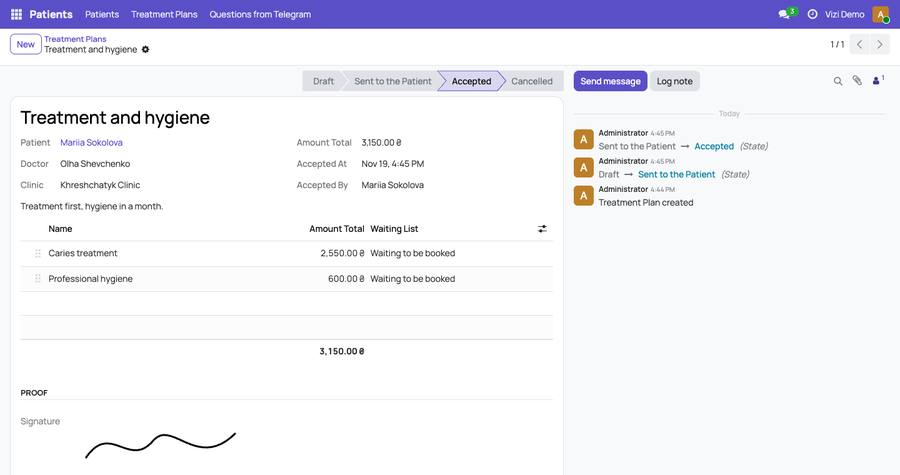
  5. Signed: the plan becomes «Accepted» with the signature, and each stage goes to the doctor's «Bookings → Waiting List» to be booked. An accepted plan cannot be changed: it is a document.

    Signed: the plan becomes «Accepted» with the signature, and each stage goes to the doctor's «Bookings → Waiting List» to be booked. An accepted plan cannot be changed: it is a document.

Changed a plan after sending it? The old link stops working: press «Send to Patient» again and send the new one.

«Delete Plan» removes a plan that is not accepted yet.

↑ To the top

Dental chart

The teeth on the card and in the visit

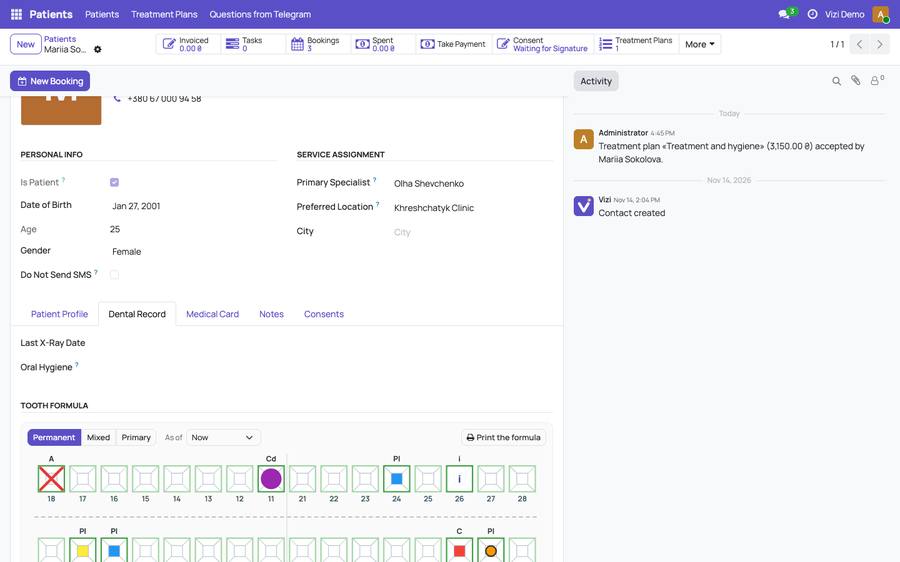
  1. On the patient's card, the «Dental Record» tab: the tooth chart (form 043/o) and every tooth's status. The marks go on a tooth or on its surfaces.

    On the patient's card, the «Dental Record» tab: the tooth chart (form 043/o) and every tooth's status. The marks go on a tooth or on its surfaces.
  2. In a visit, the «Dental Procedure» tab: the teeth treated in this visit and what was done; the services can be linked to teeth.

    In a visit, the «Dental Procedure» tab: the teeth treated in this visit and what was done; the services can be linked to teeth.

The app has the same chart: mark the surfaces with a finger.

↑ To the top

My schedule

Your working hours and time off

  1. «Bookings → My Schedule»: the length of one slot, how many months ahead people can book you, and your colour in the calendar.

    «Bookings → My Schedule»: the length of one slot, how many months ahead people can book you, and your colour in the calendar.
  2. «Working Hours»: a line for each day and branch, with the hours. Two lines on one day give a break between them. «Time Off»: holidays and days off; empty hours mean the whole day.

  3. Press «Save»: the online booking and the free time follow your hours at once.
Managers set everyone's hours on the specialists' cards: «Team → Specialists».

↑ To the top

Waiting list

Who waits for a time

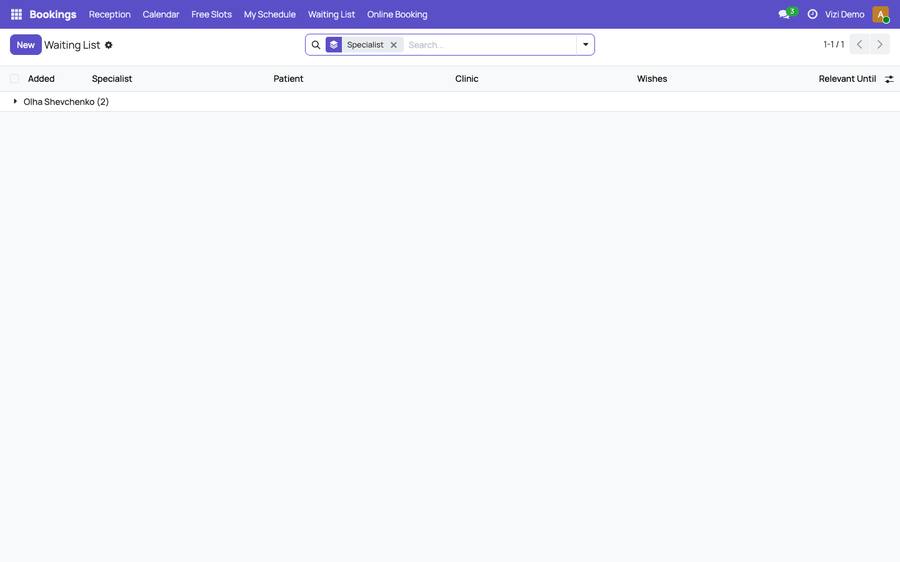
  1. «Bookings → Waiting List»: who wants a visit as soon as a time frees up, and the stages of accepted plans, with their services.

    «Bookings → Waiting List»: who wants a visit as soon as a time frees up, and the stages of accepted plans, with their services.
  2. Find a time in «Bookings → Free Slots» and book them there.

↑ To the top

Visit templates

Services and text of a usual visit in one click

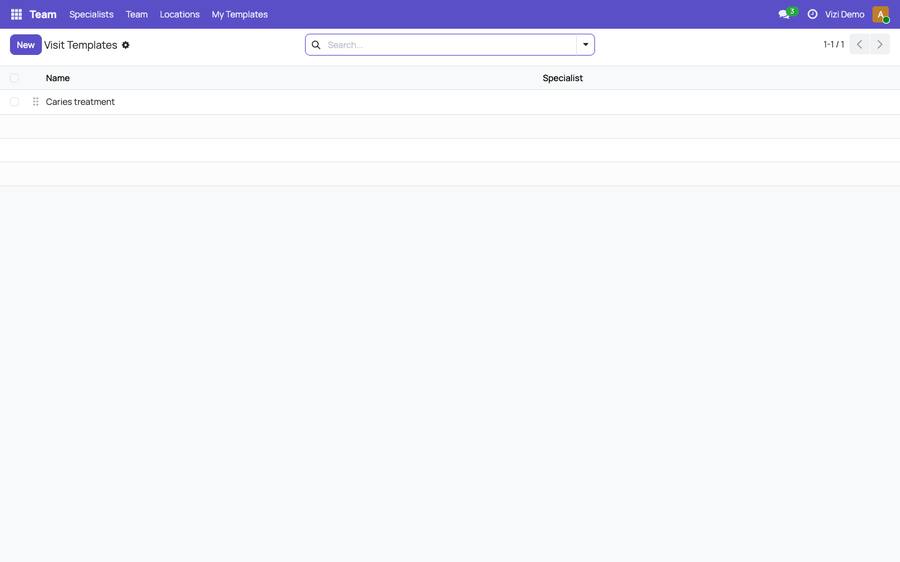
  1. «Team → My Templates»: the services and the protocol text a visit of one kind usually has. Your own templates and the shared ones.

    «Team → My Templates»: the services and the protocol text a visit of one kind usually has. Your own templates and the shared ones.
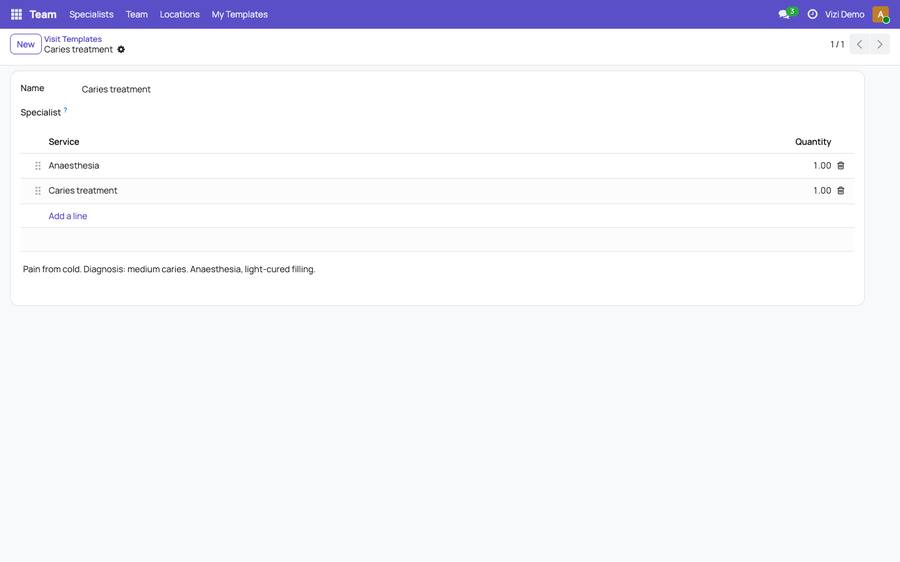
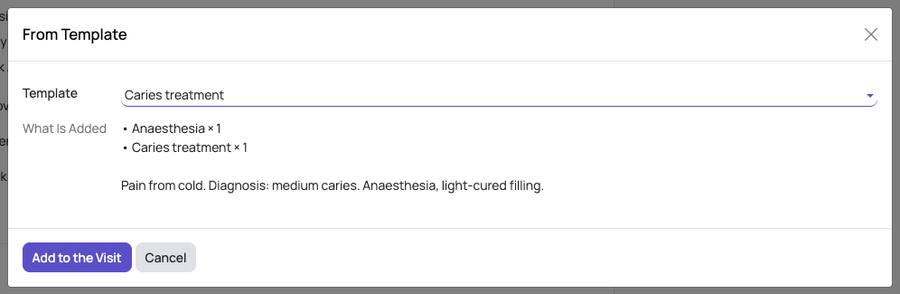
  2. «New»: the name (for example «Caries treatment»), the services with their quantities and the protocol text.

    «New»: the name (for example «Caries treatment»), the services with their quantities and the protocol text.
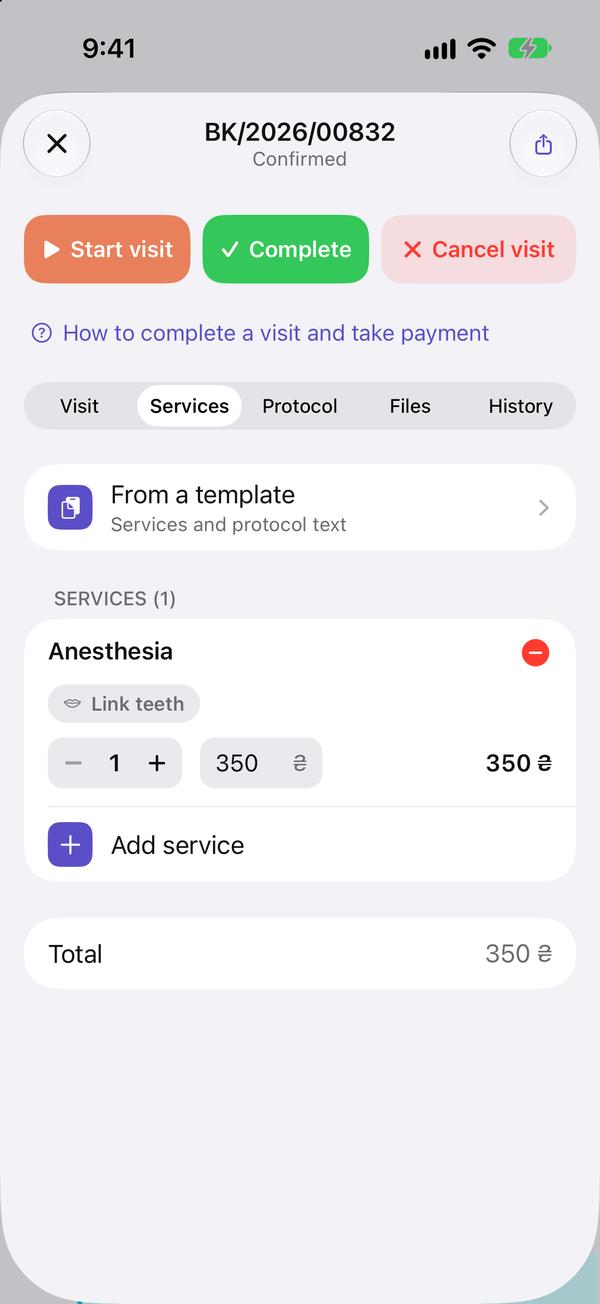
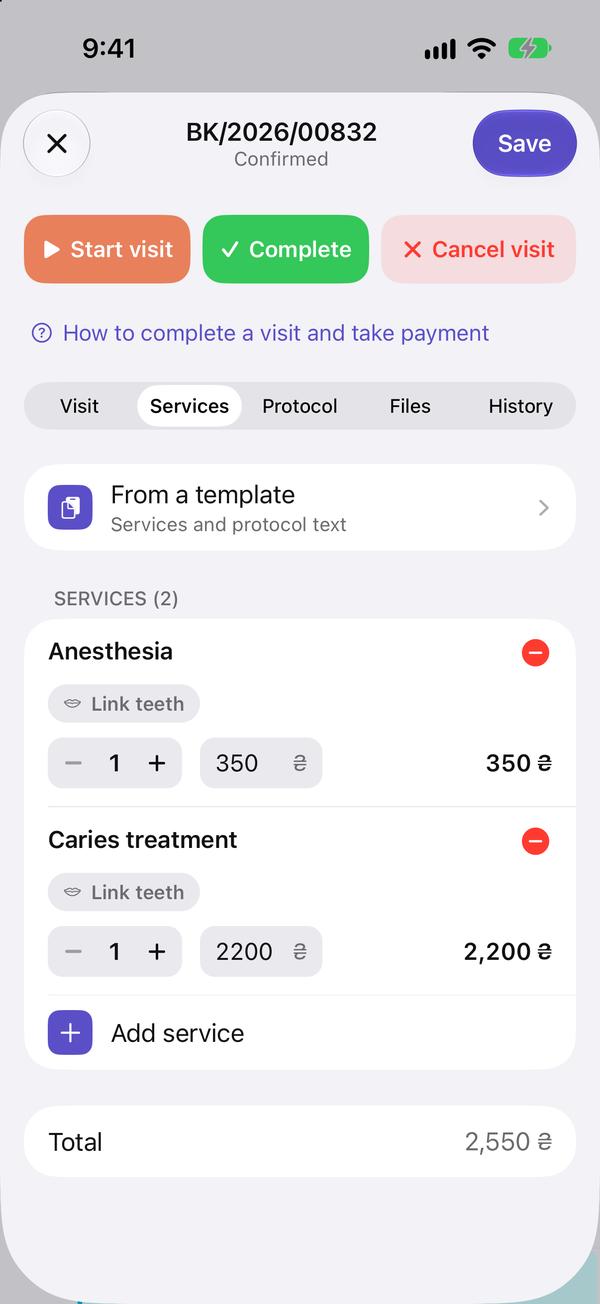
  3. In a visit, on the «Services» tab press «From Template», choose the template and press «Add to the Visit»: the services are added at your prices, the text goes to the visit's notes.

    In a visit, on the «Services» tab press «From Template», choose the template and press «Add to the Visit»: the services are added at your prices, the text goes to the visit's notes.

The managers' templates are shared with everyone; yours are only yours.

↑ To the top

Tasks

Who does what by when

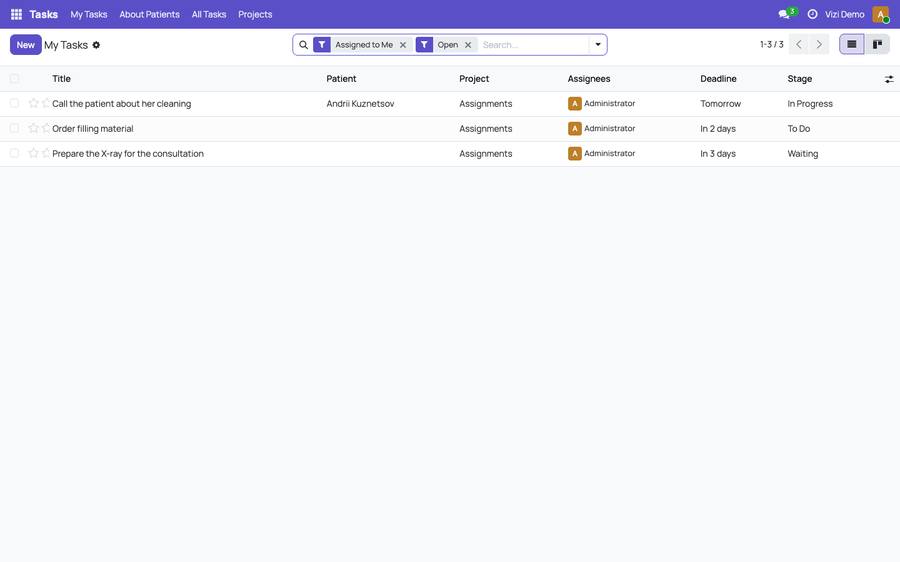
  1. «Tasks → My Tasks»: the tasks given to you, with their deadline and stage.

    «Tasks → My Tasks»: the tasks given to you, with their deadline and stage.
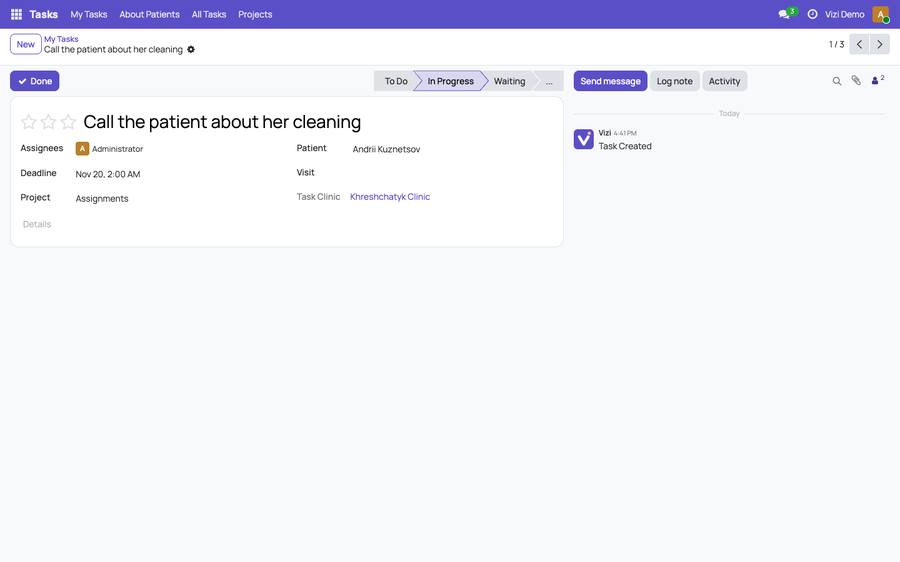
  2. Open a task: who does it, the deadline, the patient or the visit it is about, and the discussion. Its stage is one of four: to do, in progress, waiting, done; «Done» closes it.

    Open a task: who does it, the deadline, the patient or the visit it is about, and the discussion. Its stage is one of four: to do, in progress, waiting, done; «Done» closes it.
  3. «Tasks → About Patients»: the tasks about patients and visits (given from a card or a visit with «Assign to a colleague» in the app).

  4. «Tasks → All Tasks»: everyone's tasks, for the managers.

A new task or a reply comes to the app as a notification.

↑ To the top

Materials

Stock, receiving and write-off

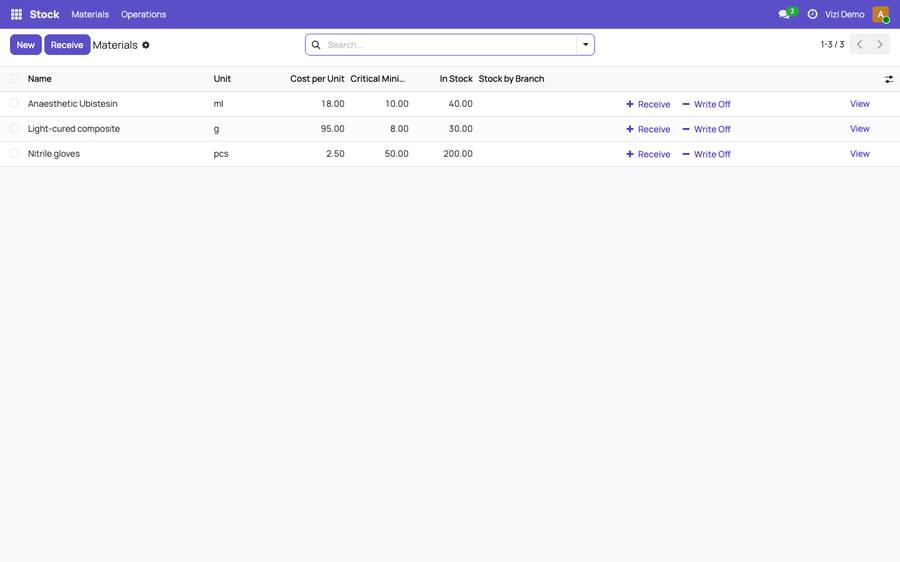
  1. «Stock → Materials»: every material with its unit, cost per unit, the critical minimum and the stock in each branch.

    «Stock → Materials»: every material with its unit, cost per unit, the critical minimum and the stock in each branch.
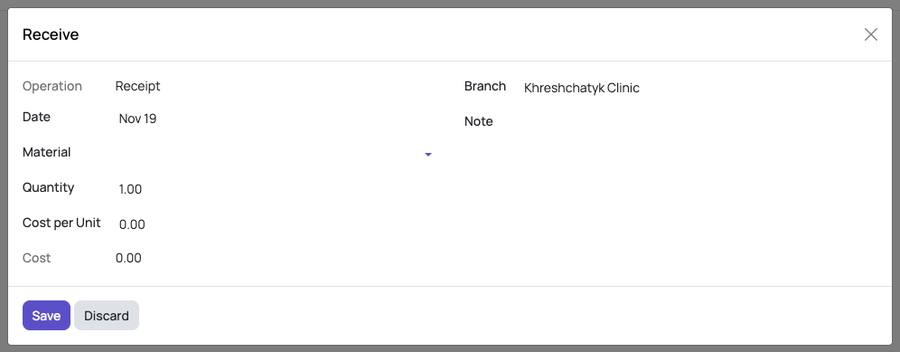
  2. «Receive»: choose the material (or type a new one), the quantity and the price per unit, and press «Save». «Write Off» takes away what was used up or spoiled; «Transfer» moves stock to another branch.

    «Receive»: choose the material (or type a new one), the quantity and the price per unit, and press «Save». «Write Off» takes away what was used up or spoiled; «Transfer» moves stock to another branch.
  3. A service can have a norm of materials (on the service's card): adding the service to a visit adds its materials to the visit's «Materials» tab, and they are written off when the visit is completed.

  4. «Stock → Operations»: every receipt, write-off and transfer.

↑ To the top

Analytics

How the business is doing

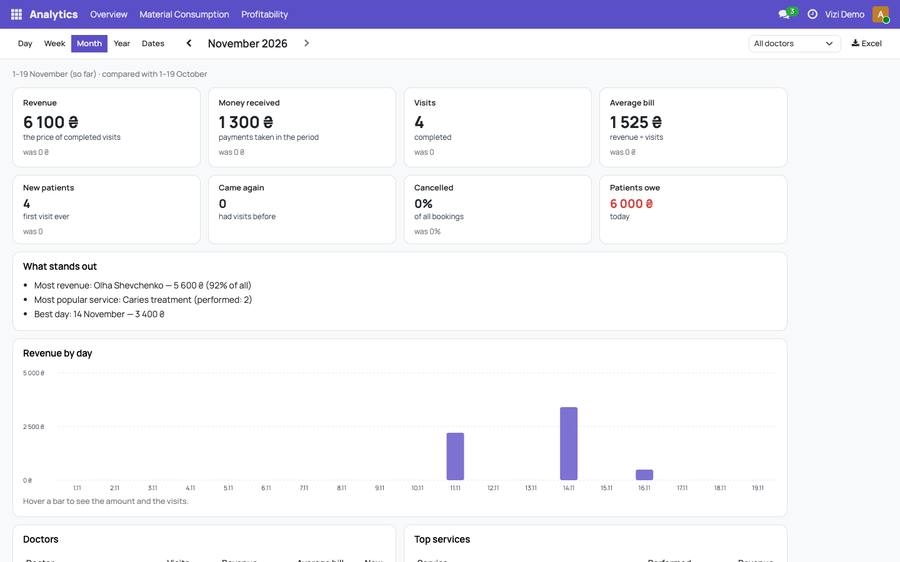
  1. «Analytics → Overview»: revenue, payments, visits, the average bill, new and returning patients, cancellations and debts for the period, each compared with the same period before. Choose a day, week, month, year or your own dates at the top; the arrows move through the periods; filter by branch and specialist on the right.

    «Analytics → Overview»: revenue, payments, visits, the average bill, new and returning patients, cancellations and debts for the period, each compared with the same period before. Choose a day, week,
  2. Below: revenue by day (point at a bar to see the sum and the visits), the specialists and the popular services. «Excel» downloads it all.

  3. «Analytics → Material Consumption»: which materials went where; «Analytics → Profitability»: what each service brings after its materials.

↑ To the top

Online booking

People book themselves

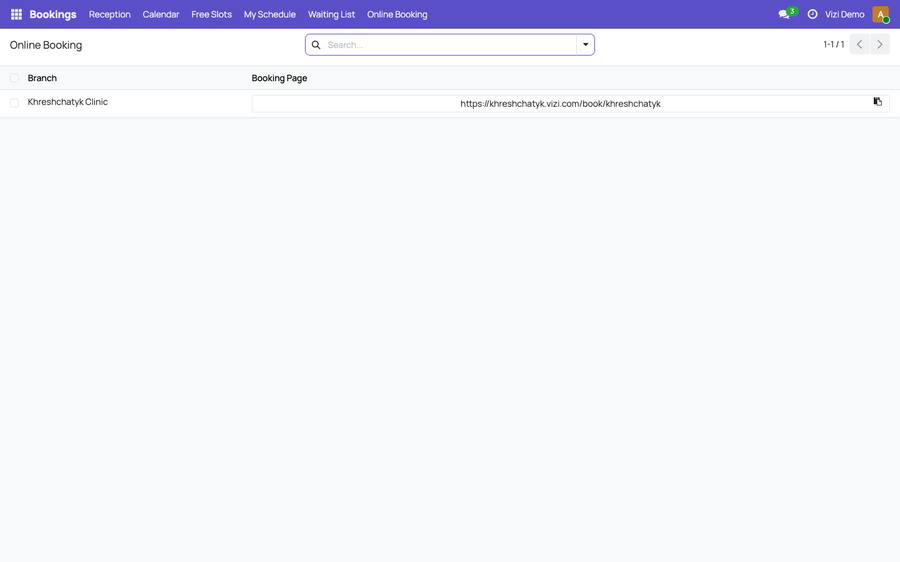
  1. «Bookings → Online Booking»: the booking page of each of your branches. Copy a link (the button on the right) to Instagram, Google Maps, your website or a messenger.

    «Bookings → Online Booking»: the booking page of each of your branches. Copy a link (the button on the right) to Instagram, Google Maps, your website or a messenger.
  2. People choose a service, a specialist and a free time themselves; the visit appears in «Bookings → Calendar» at once.
↑ To the top

The Vizi app

Everything in your phone, with notifications

  1. Everything here is in the Vizi app for iPhone and Android too, with the camera, notifications and Face ID. Install it from the App Store or Google Play and sign in with the same login and password.

  2. The app has its own illustrated help: Profile → Help.

↑ To the top

The Telegram bot

Reminders, answers, booking and moving visits in Telegram

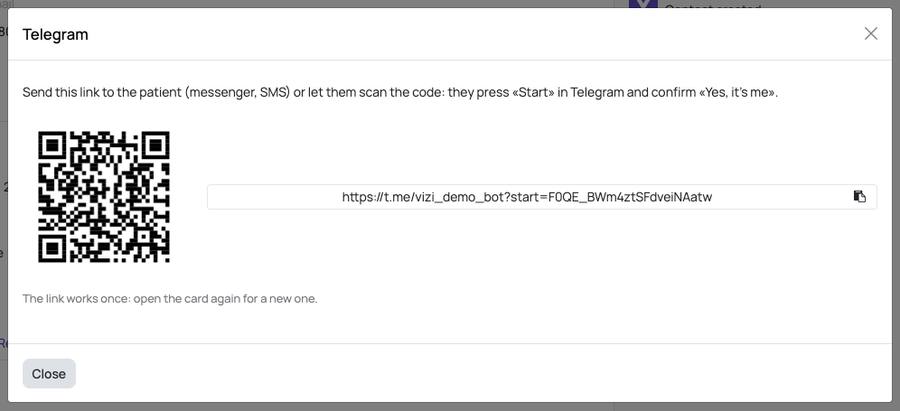
  1. On the card press «Telegram»: send the patient the link or let them scan the QR code. They press «Start» in Telegram and confirm «Yes, it's me»; the button then says «Connected».

    On the card press «Telegram»: send the patient the link or let them scan the QR code. They press «Start» in Telegram and confirm «Yes, it's me»; the button then says «Connected».
  2. The bot reminds about the visit the day before, with «I'll come» and «Reschedule». In its menu the patient sees the next visit, «Questions» and, if you allow it, «Book».

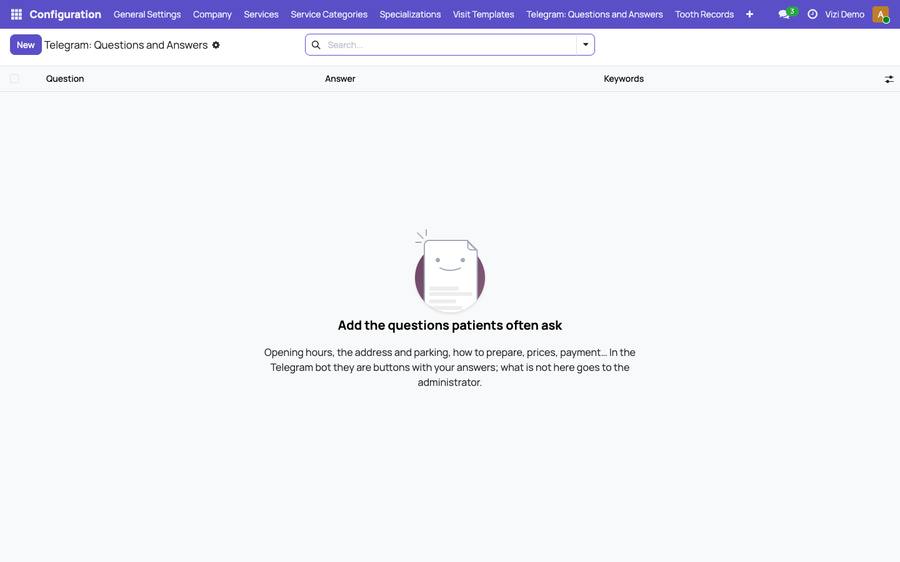
  3. «Configuration → Telegram: Questions and Answers»: the questions and answers the bot gives by itself (opening hours, the address, how to prepare…). The patient's own words are matched against them too.

    «Configuration → Telegram: Questions and Answers»: the questions and answers the bot gives by itself (opening hours, the address, how to prepare…). The patient's own words are matched against them too
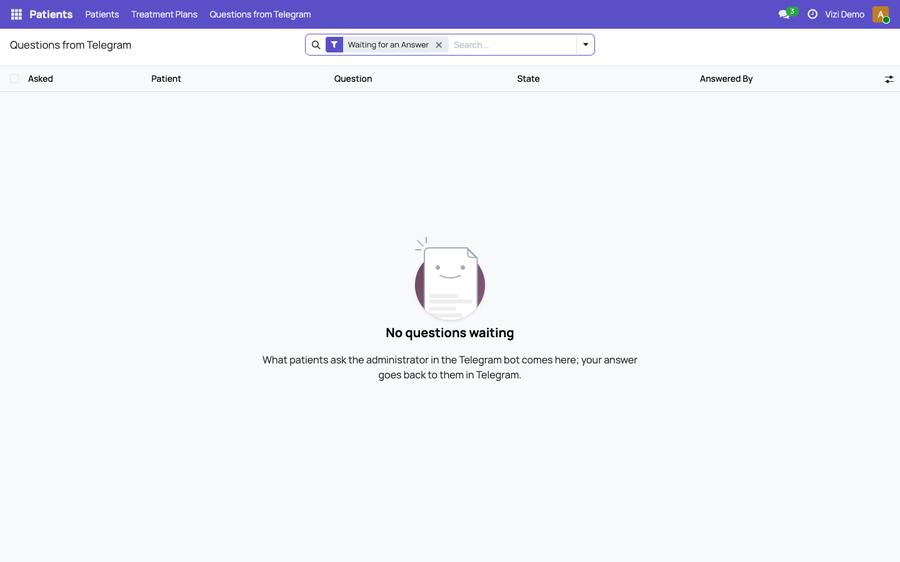
  4. What the bot cannot answer goes to the administrator: «Patients → Questions from Telegram». Open the question, write the answer and press «Send the Answer»: the patient gets it in Telegram.

    What the bot cannot answer goes to the administrator: «Patients → Questions from Telegram». Open the question, write the answer and press «Send the Answer»: the patient gets it in Telegram.
  5. In the app: Profile → Questions from Telegram, or answer right from the notification.

  6. «Configuration → General Settings» → Telegram: «Booking in Telegram» (the online booking page opens inside Telegram, the patient is recognised) and «Patients Move Their Visits» with how many hours before at least; closer to the visit the administrator is asked.

    «Configuration → General Settings» → Telegram: «Booking in Telegram» (the online booking page opens inside Telegram, the patient is recognised) and «Patients Move Their Visits» with how many hours bef
↑ To the top

Team and access

Who works in Vizi and what they may do

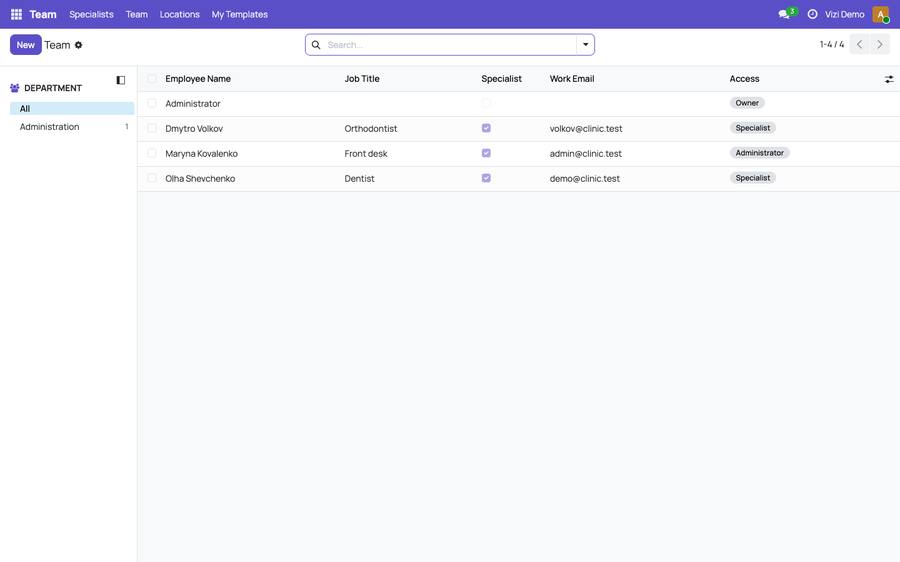
  1. «Team → Team»: everyone of the business. Add a person with «New», then give them access.

    «Team → Team»: everyone of the business. Add a person with «New», then give them access.
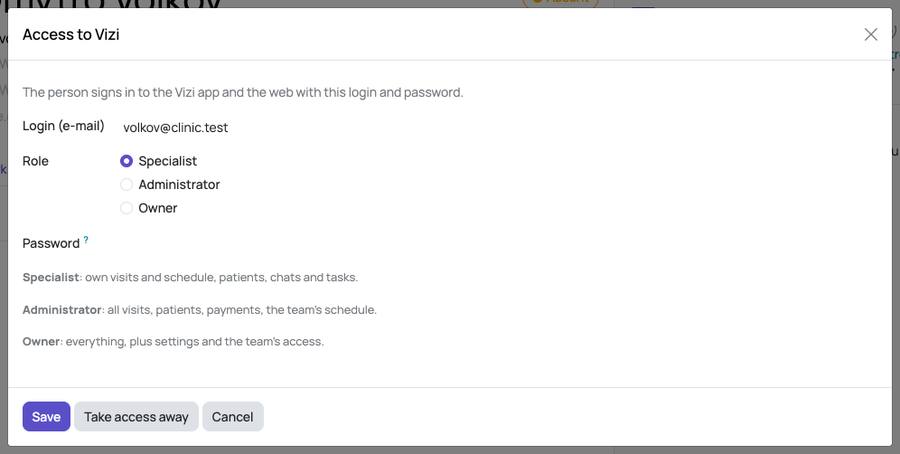
  2. On the person's card press «Access to Vizi»: the login, a password and the role. Specialist: their own visits and the patients of their branches. Administrator: all visits, the money and the patients of the branches. Owner: everything, with the team and the subscription.

    On the person's card press «Access to Vizi»: the login, a password and the role. Specialist: their own visits and the patients of their branches. Administrator: all visits, the money and the patients
  3. The plan includes a number of specialists and of administrators. At the limit Vizi offers «Change the Plan»; taking someone's access away is always possible.

↑ To the top

Subscription

Your plan and its payment

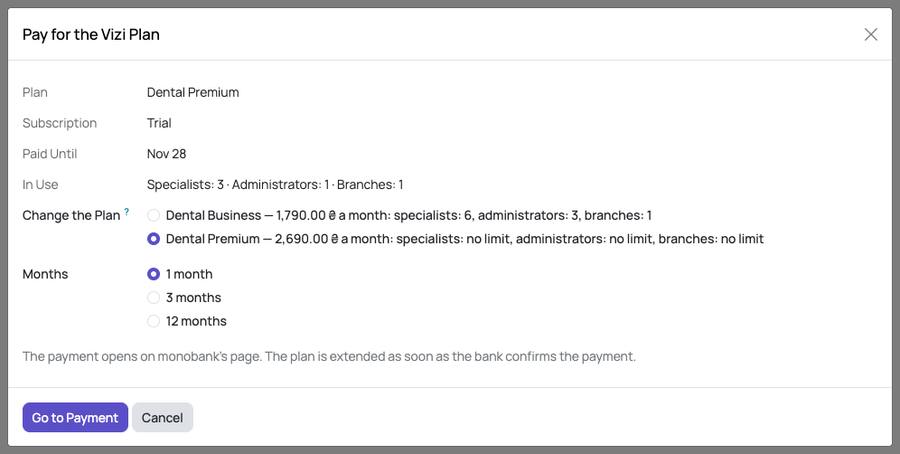
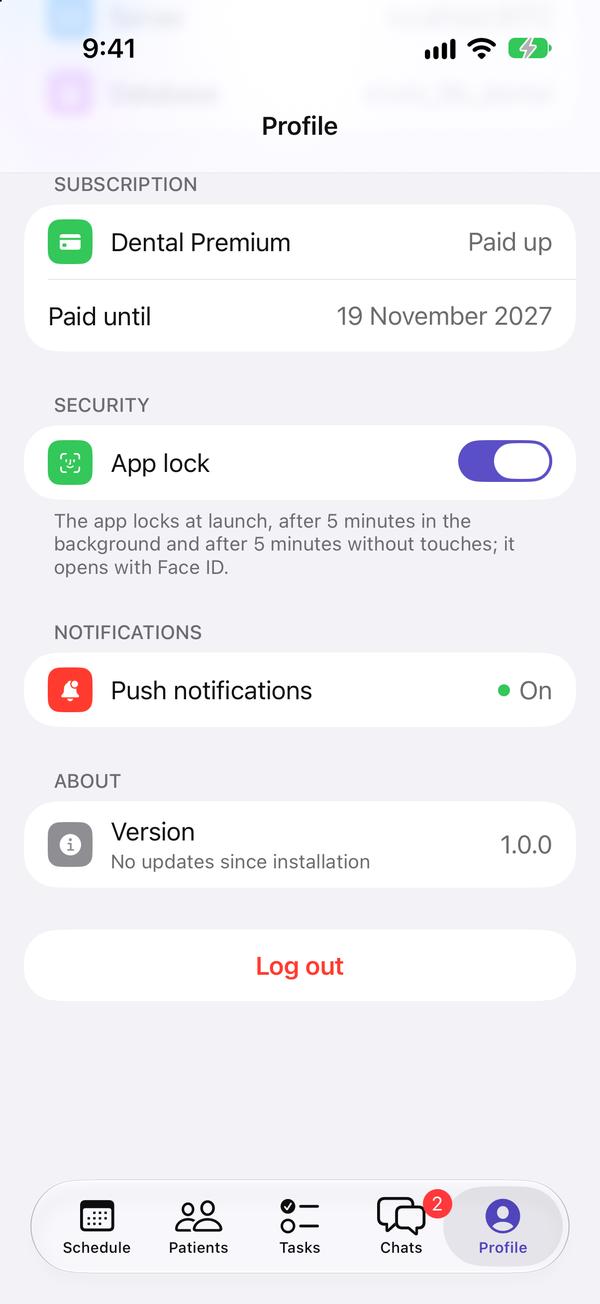
  1. «Vizi Subscription»: your plan, the date it is paid until and how many specialists, administrators and branches are in use.

    «Vizi Subscription»: your plan, the date it is paid until and how many specialists, administrators and branches are in use.
  2. Choose 1, 3 or 12 months (or another plan of your kind) and pay by card: the plan is extended as soon as the bank confirms the payment.

↑ To the top

Support

A question to the Vizi team

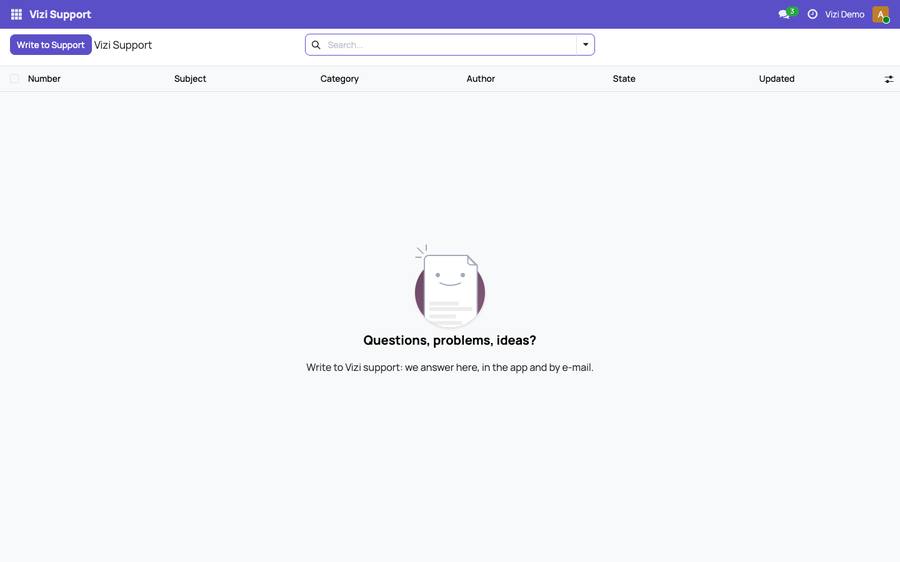
  1. «Vizi Support»: your questions to the Vizi team and their answers.

    «Vizi Support»: your questions to the Vizi team and their answers.
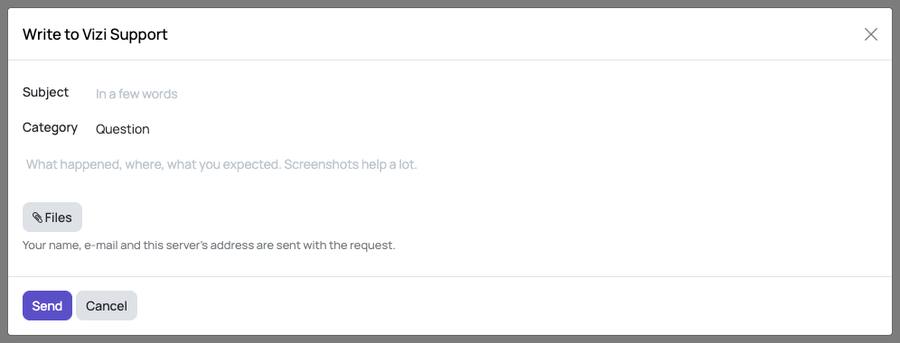
  2. «Write to Support»: choose what it is about, describe it and send. The answer comes in the same request; you can reply there.

    «Write to Support»: choose what it is about, describe it and send. The answer comes in the same request; you can reply there.
↑ To the top

The phone app

Installation and notifications

Install the app, sign in and turn on notifications

  1. Install Vizi from the App Store on iPhone or from Google Play on Android.

  2. Open Vizi and sign in with your login and password. Your clinic administrator will give you the server address and database.

  3. When the app asks about notifications, tap "Allow": that is how chat messages, tasks and assignments reach you.

New versions come from the App Store or Google Play. Turn on automatic updates so you don't miss them.

Small updates arrive by themselves: close the app completely (swipe it up) and open it again, sometimes twice.

To check that an update has arrived, see "Profile → Version": it shows the date "Updated on …".

Not getting notifications? iPhone Settings → Vizi → Notifications → "Allow Notifications".

↑ To the top

Lock and Face ID

The app locks when you step away from your phone

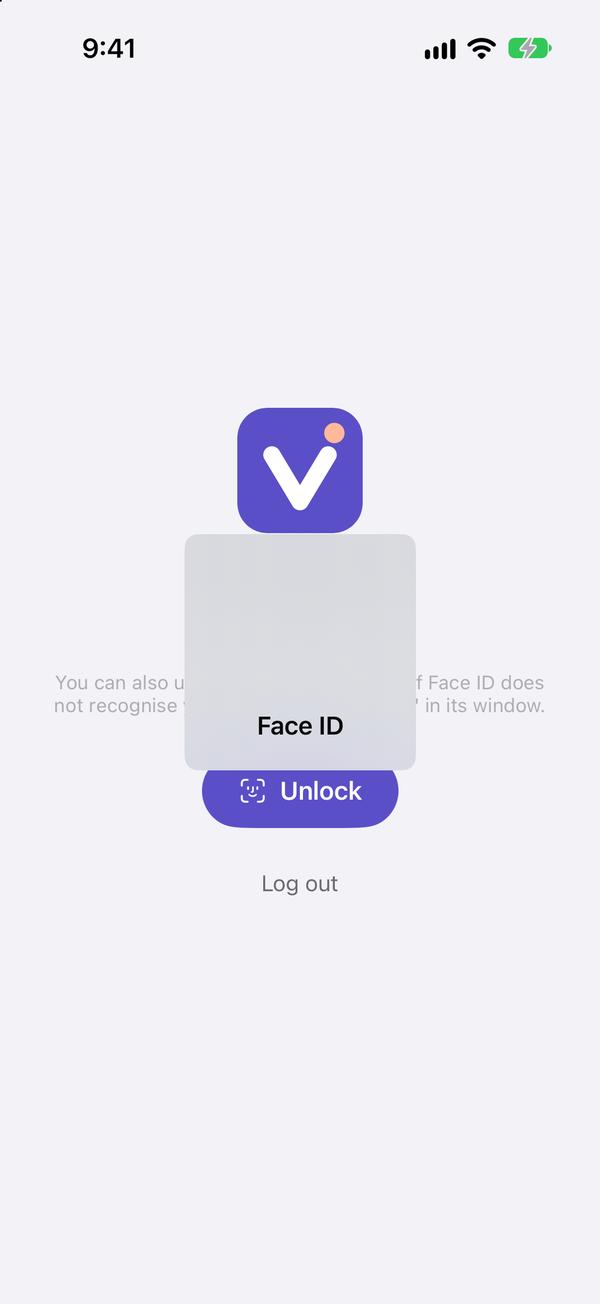
  1. Each time it starts, Vizi asks for Face ID (Touch ID or the phone passcode). If the check fails, tap "Unlock".

    Each time it starts, Vizi asks for Face ID (Touch ID or the phone passcode). If the check fails, tap "Unlock".
  2. The app also locks by itself: after 5 minutes in the background and after 5 minutes without being touched. It won't lock while you are typing.

  3. Face ID doesn't recognise you (mask, gloves)? In the Face ID window tap "Enter Passcode" and enter your iPhone passcode. The app has no separate code.

  4. You can turn the lock off in "Profile → Security": the phone will ask for Face ID once more to do it.

    You can turn the lock off in "Profile → Security": the phone will ask for Face ID once more to do it.

The app holds medical data: don't turn the lock off on a work phone.

The app switcher shows a cover screen instead, so patient data stays hidden.

↑ To the top

Book a patient

A new booking: patient, time, doctor and services

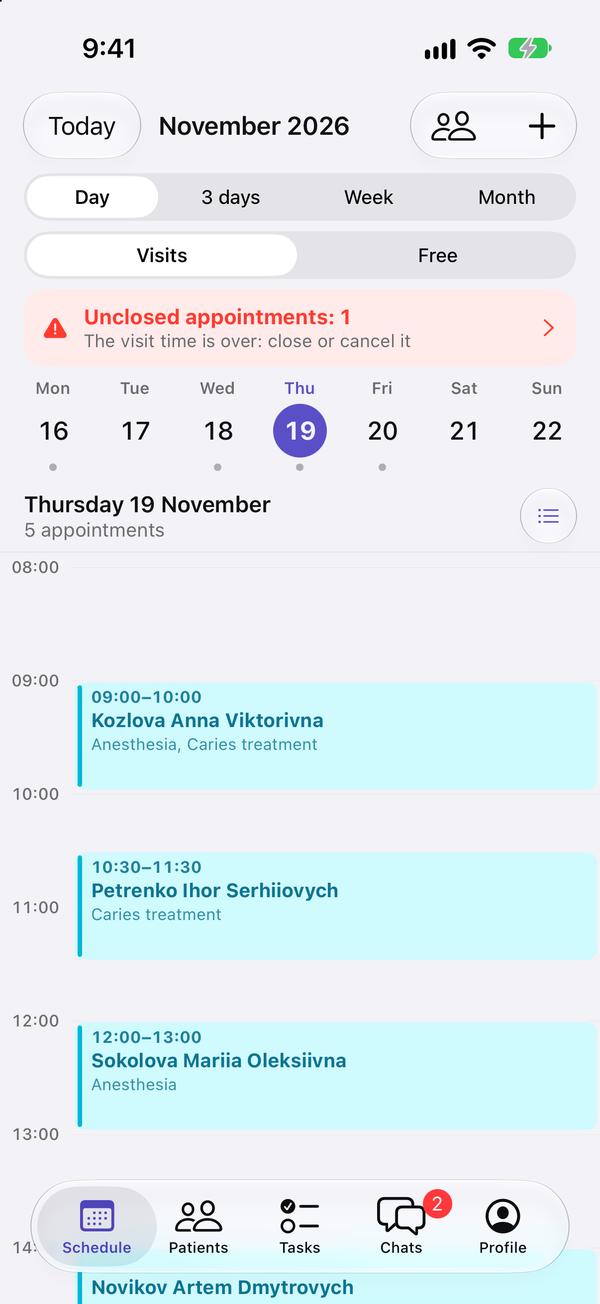
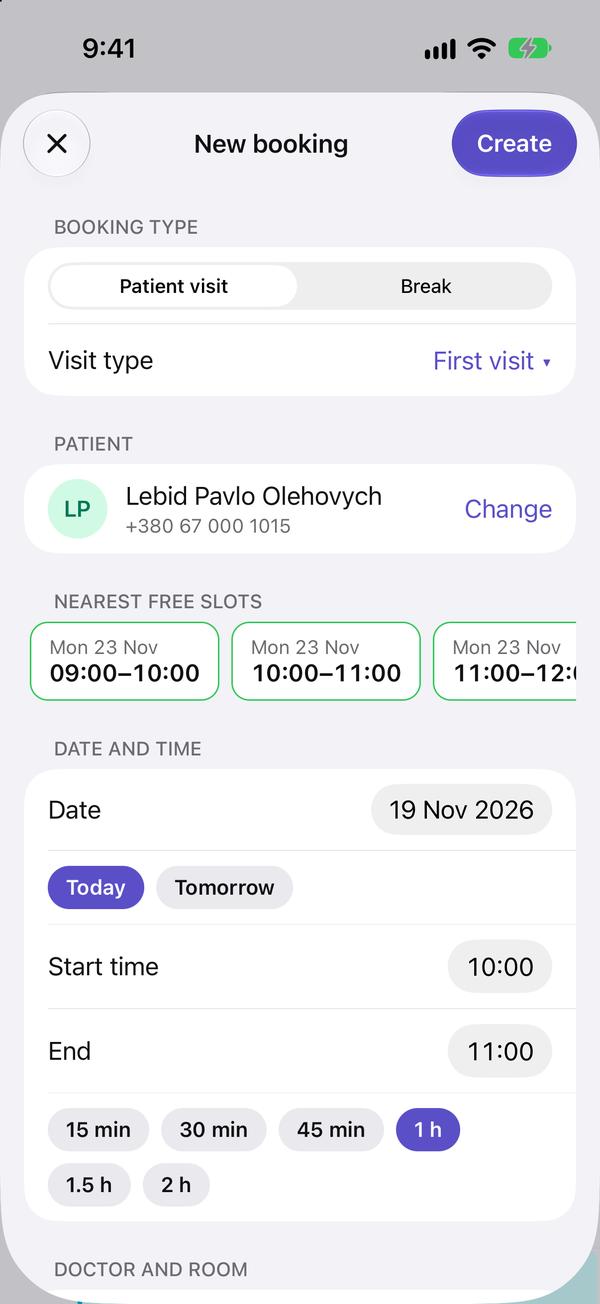
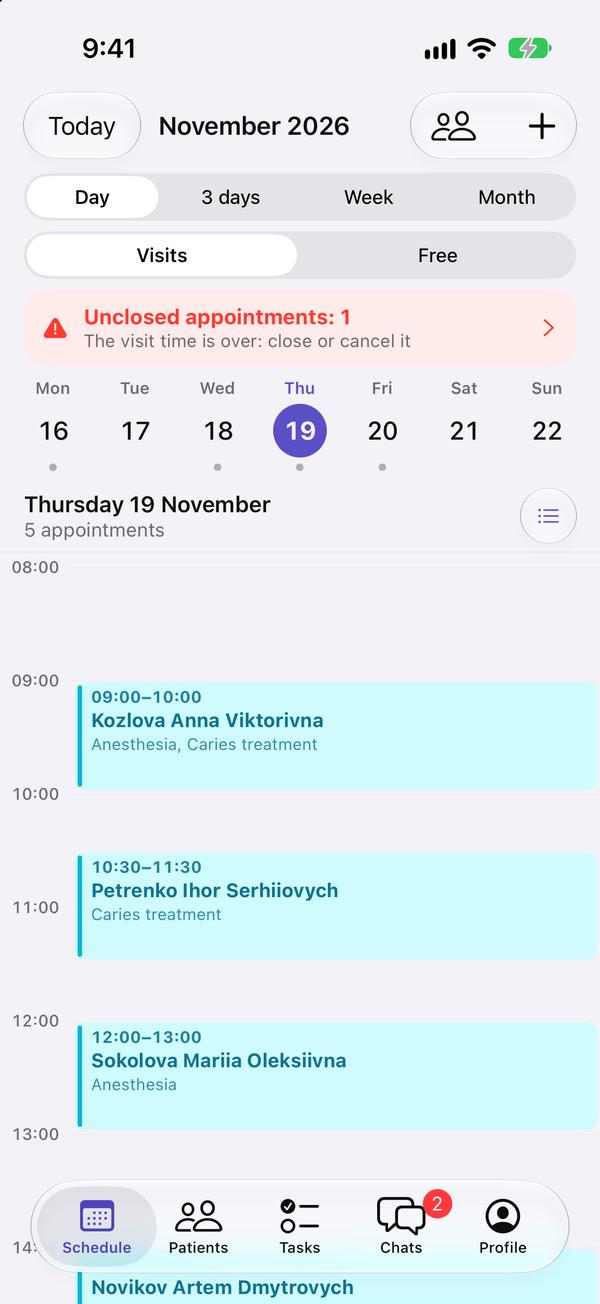
  1. In the schedule, tap "+" at the top right. You can also just tap a free time in the grid and the booking opens at that time.

    In the schedule, tap "+" at the top right. You can also just tap a free time in the grid and the booking opens at that time.
  2. Tap "Choose a patient".

    Tap "Choose a patient".
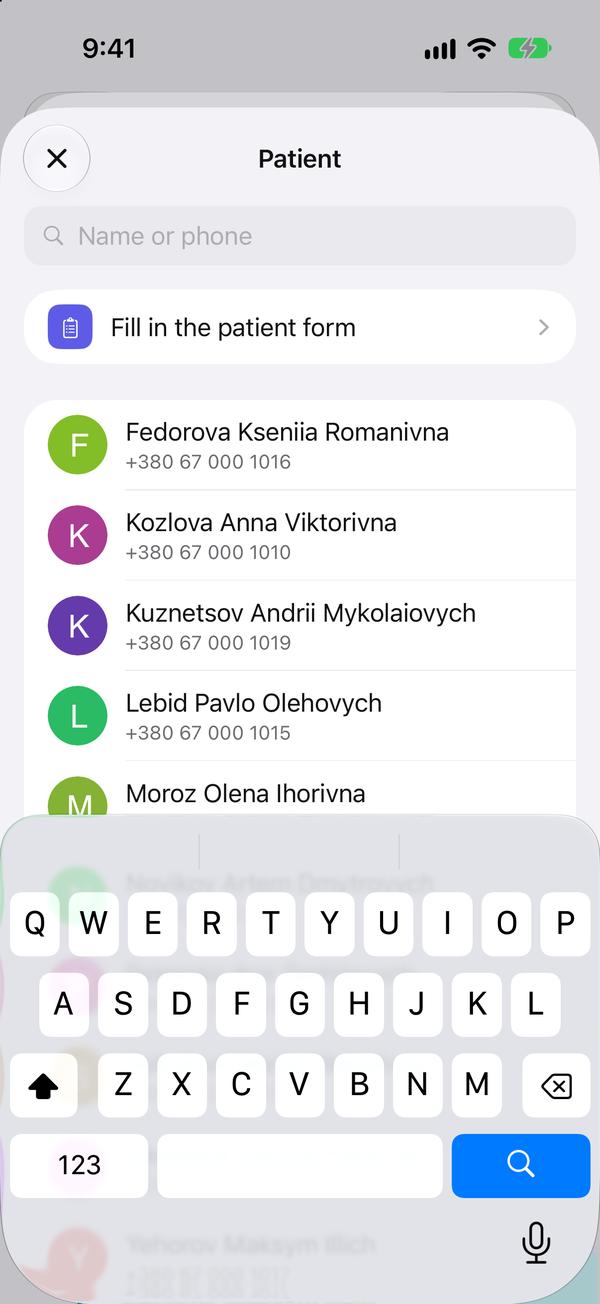
  3. Find the patient by name or phone. A new patient can be added right away with "Fill in the patient form".

    Find the patient by name or phone. A new patient can be added right away with "Fill in the patient form".
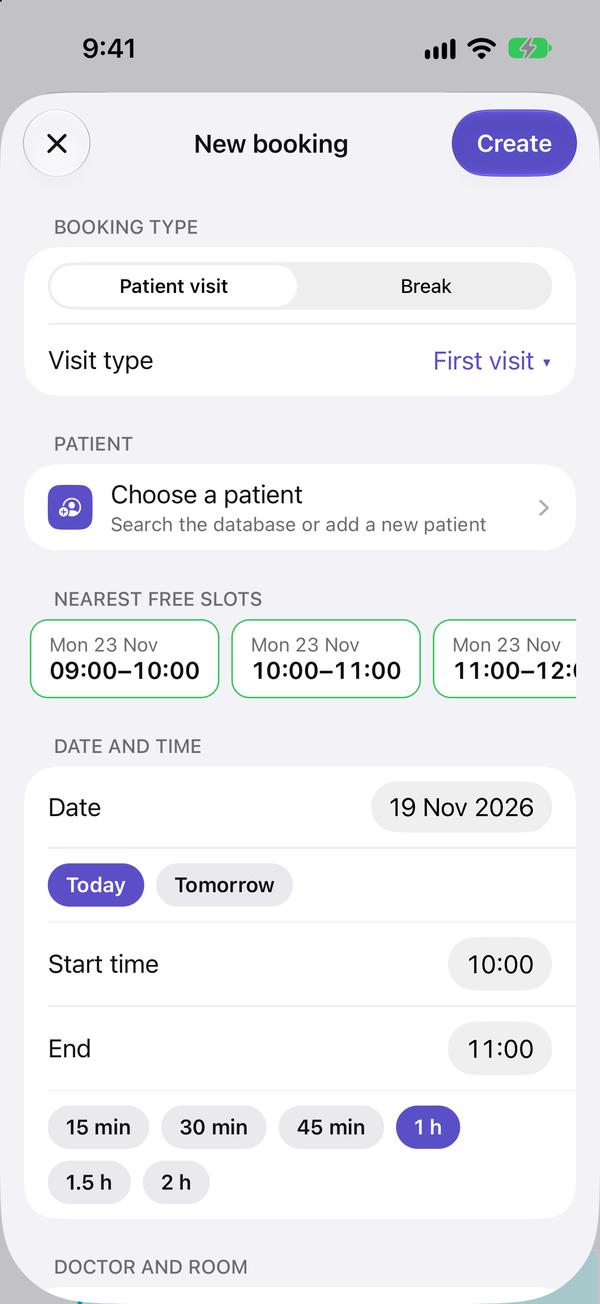
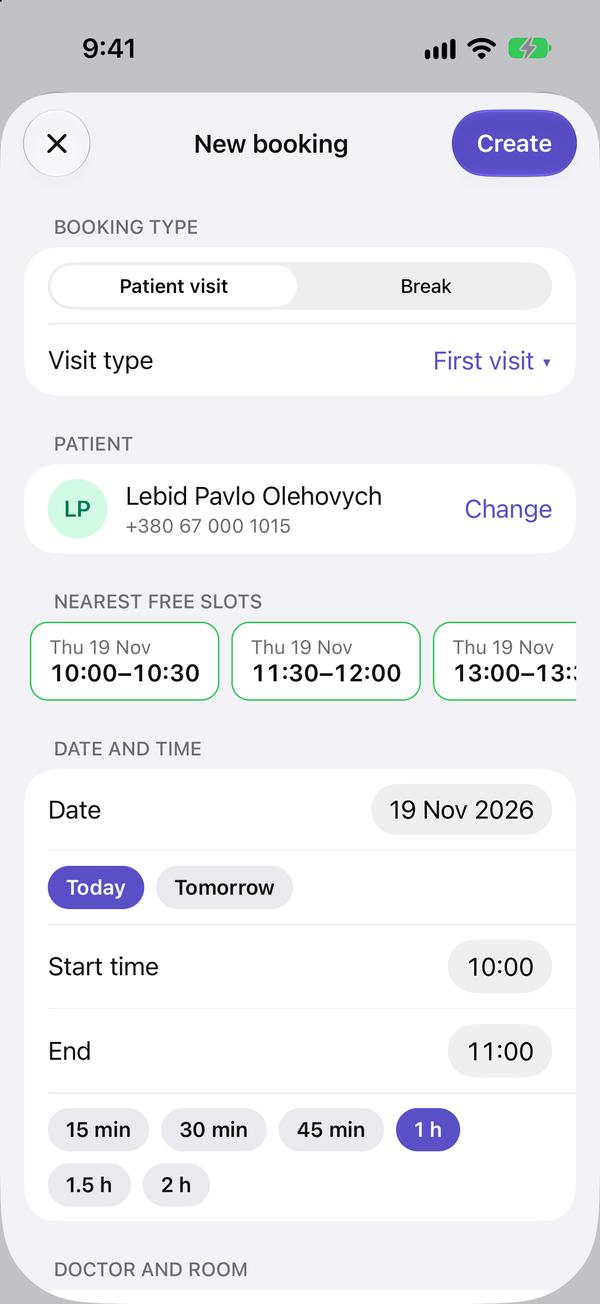
  4. Choose the date and time. The "Today" and "Tomorrow" buttons and the durations ("30 min", "1 h" …) save time. The doctor and clinic are taken from the patient's record.

    Choose the date and time. The "Today" and "Tomorrow" buttons and the durations ("30 min", "1 h" …) save time. The doctor and clinic are taken from the patient's record.
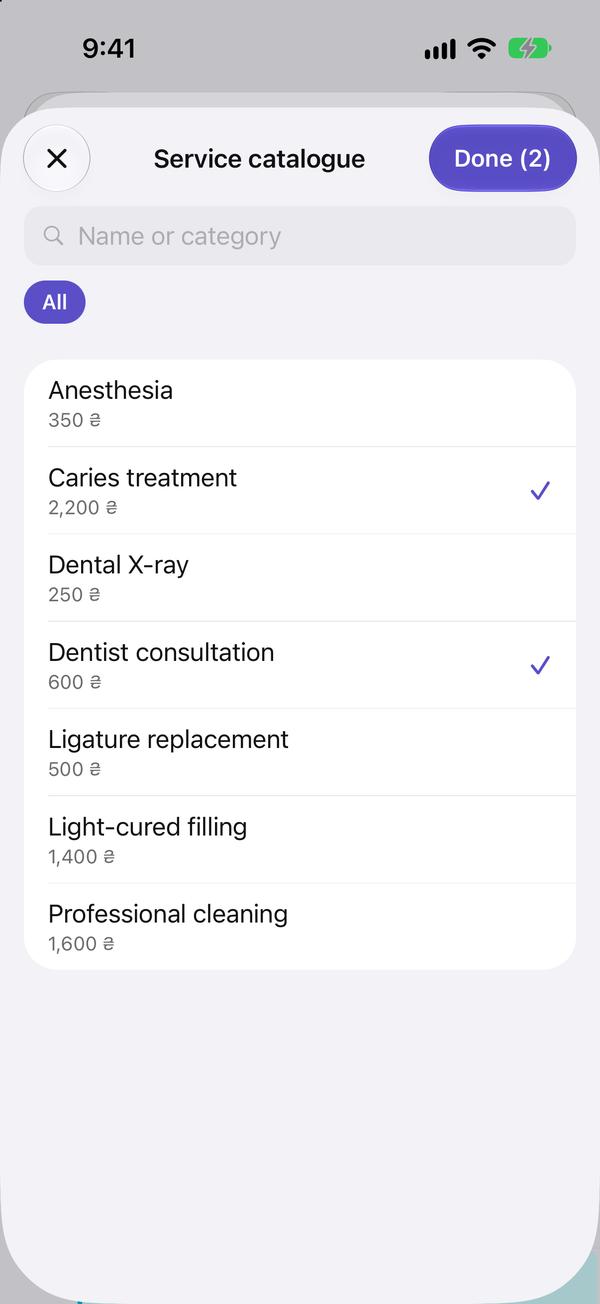
  5. Below, tap "Add service", tick the services in the catalogue, then tap "Done".

    Below, tap "Add service", tick the services in the catalogue, then tap "Done".
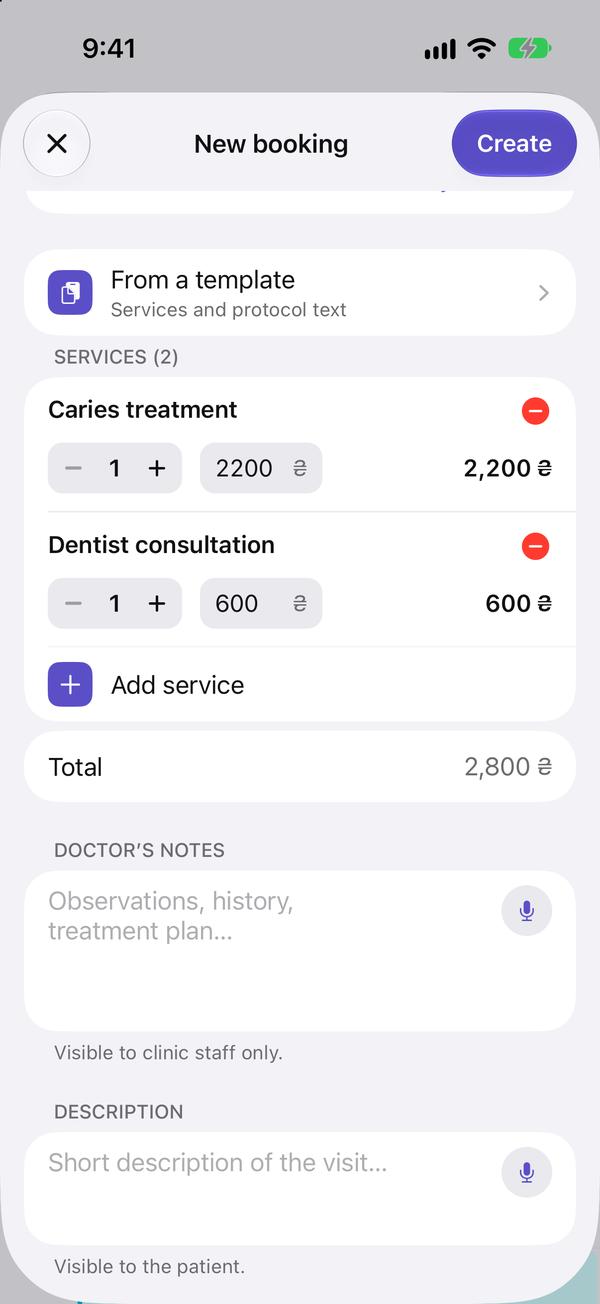
  6. Check the services and the total and tap "Create".

    Check the services and the total and tap "Create".
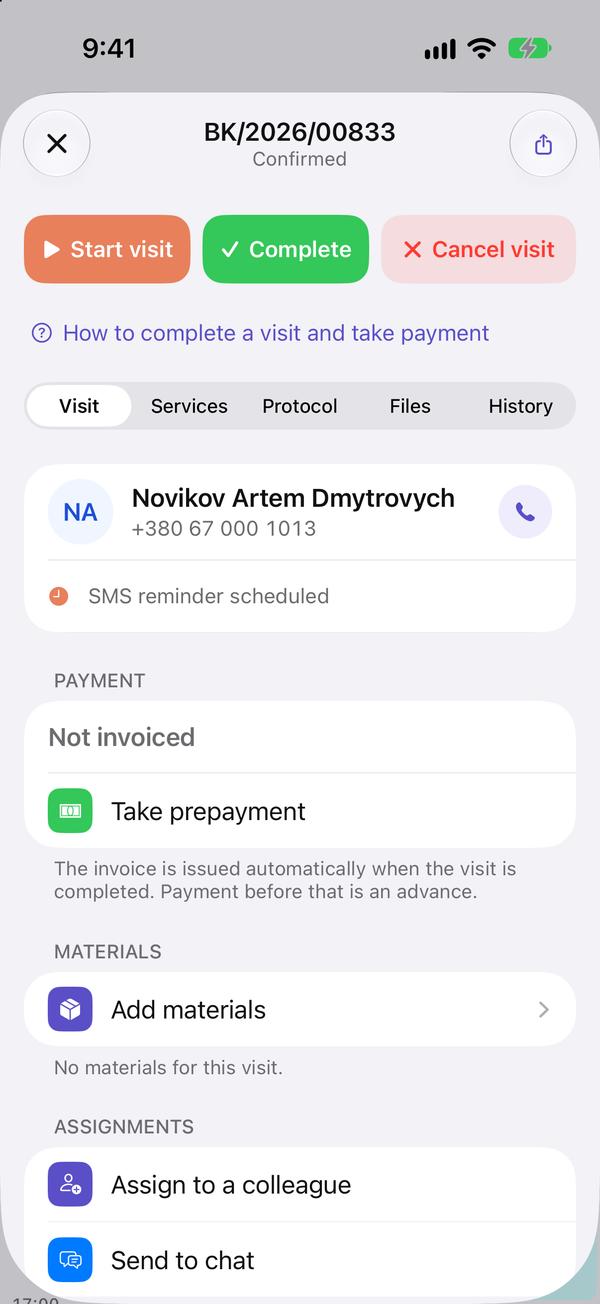
  7. The booking is created and opens straight away: from here you can take a prepayment, assign something to a colleague or send the visit to a chat.

    The booking is created and opens straight away: from here you can take a prepayment, assign something to a colleague or send the visit to a chat.

Services can also be added later, during the visit.

A break or busy time is marked the same way: just choose "Break" at the top.

↑ To the top

Reschedule or change a visit

Another time, doctor or services

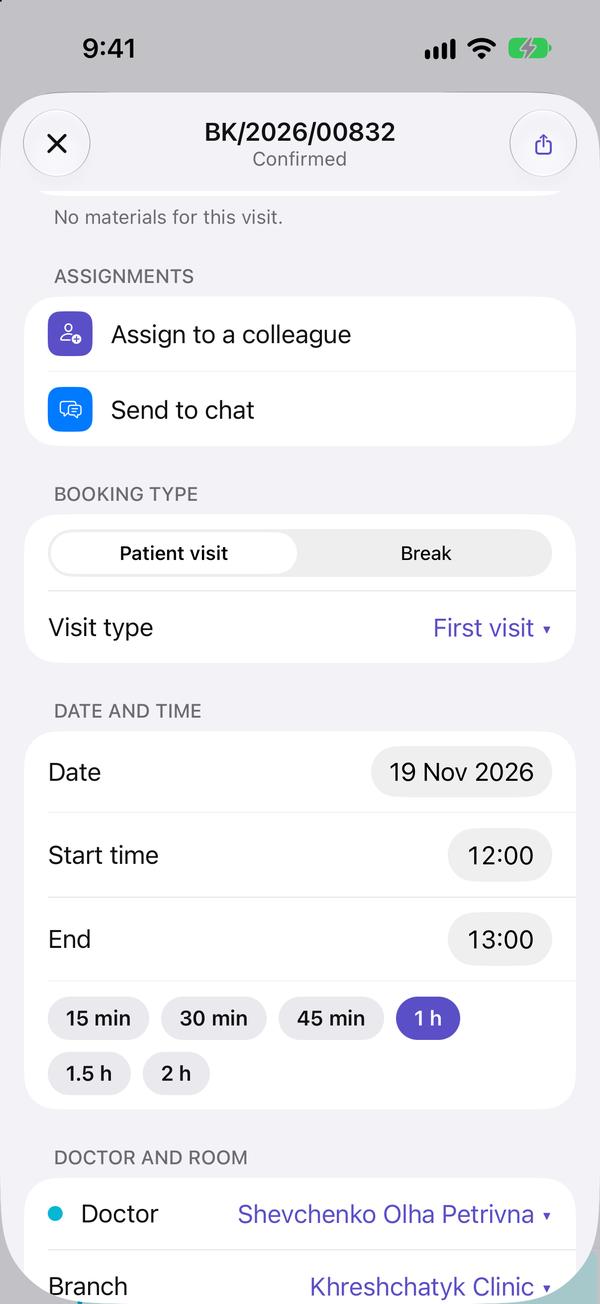
  1. Open the visit and scroll to the "Date and time" section.

    Open the visit and scroll to the "Date and time" section.
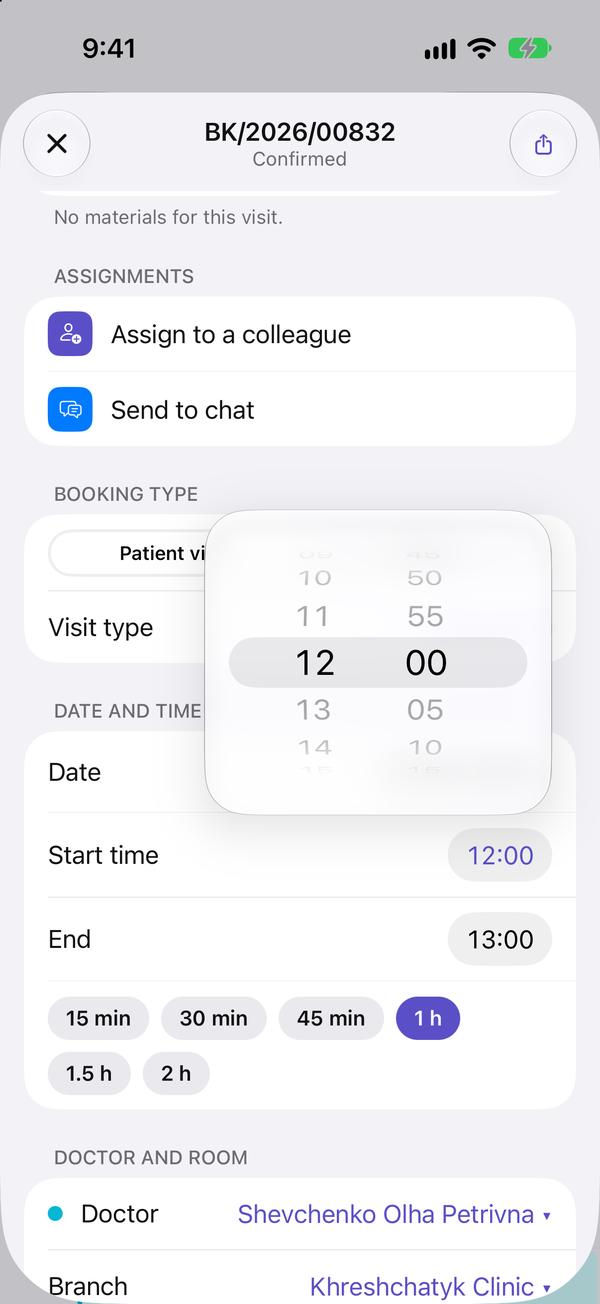
  2. Tap the time or date and choose new ones. The end time moves by itself and the duration stays the same.

    Tap the time or date and choose new ones. The end time moves by itself and the duration stays the same.
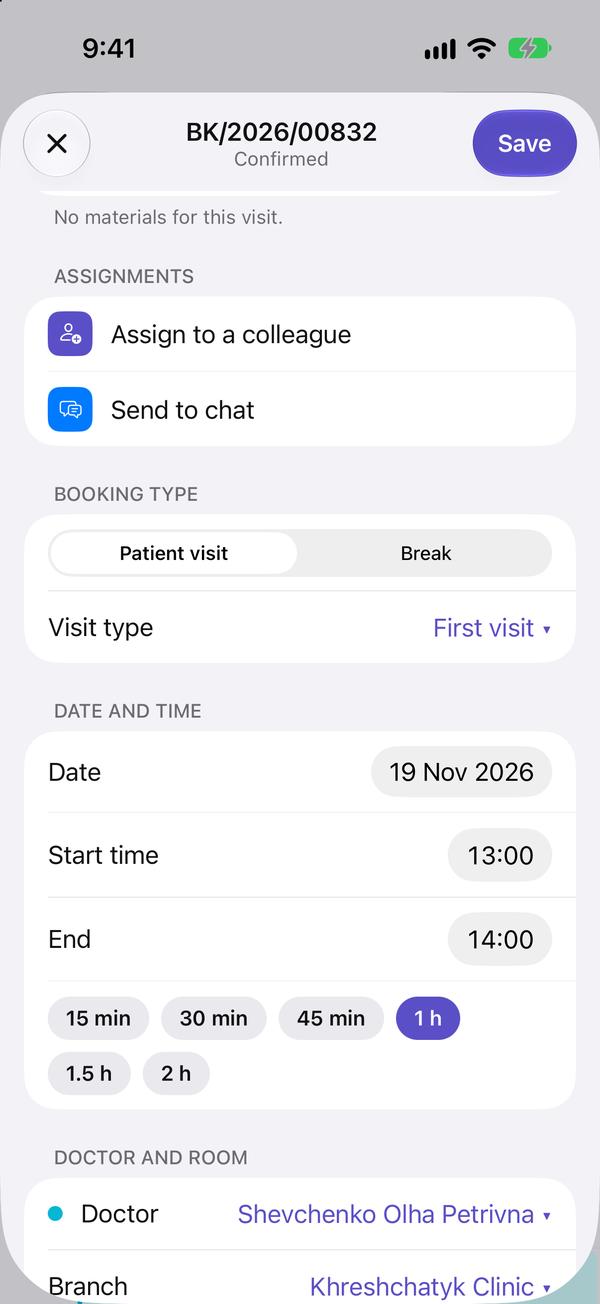
  3. "Save" appears at the top: tap it. Until you save, only you can see the changes.

    "Save" appears at the top: tap it. Until you save, only you can see the changes.

The doctor, room, services and notes are changed the same way.

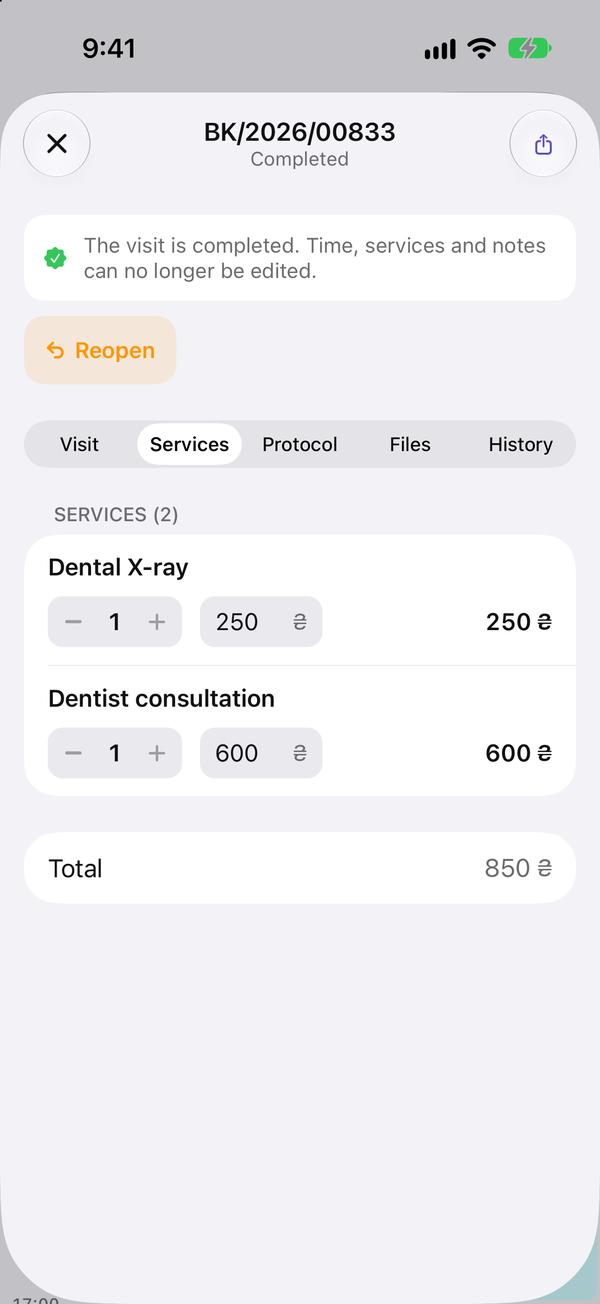
A completed visit can't be changed. If needed, ask the administrator to reopen it.

↑ To the top

Complete a visit and take payment

Check the services, complete, get paid now or later

  1. Open the visit: tap the patient's card in the schedule.

    Open the visit: tap the patient's card in the schedule.
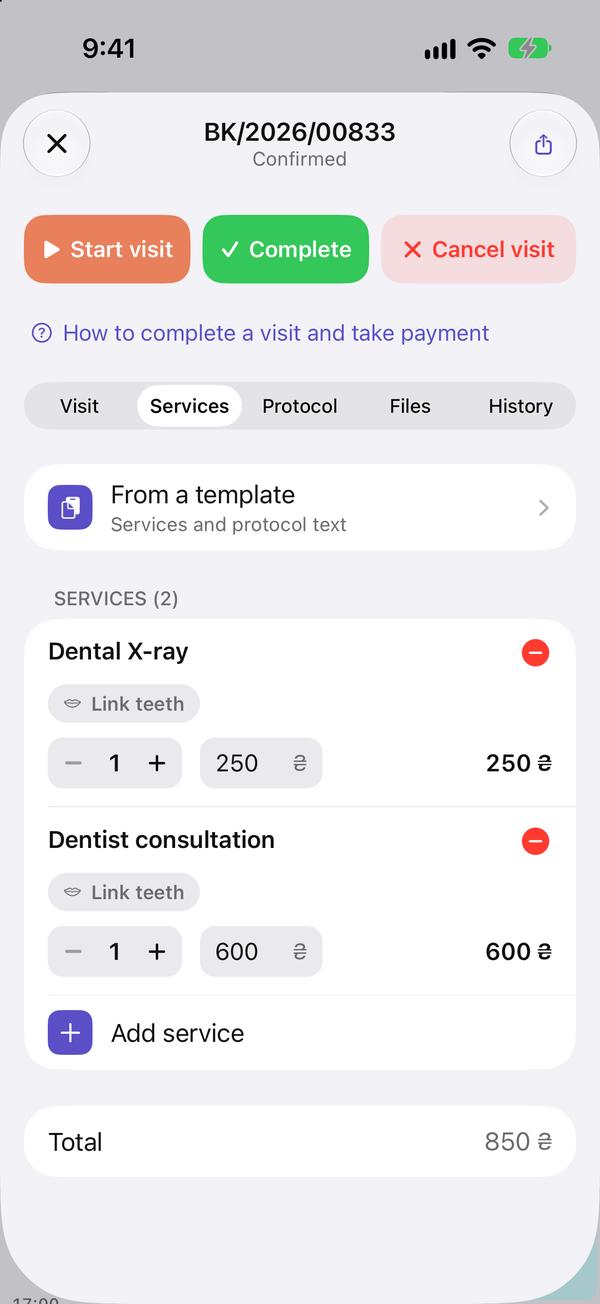
  2. Go to the "Services" tab and check the services, quantities and prices. They can't be changed after completion. The app saves unsaved edits by itself.

    Go to the "Services" tab and check the services, quantities and prices. They can't be changed after completion. The app saves unsaved edits by itself.
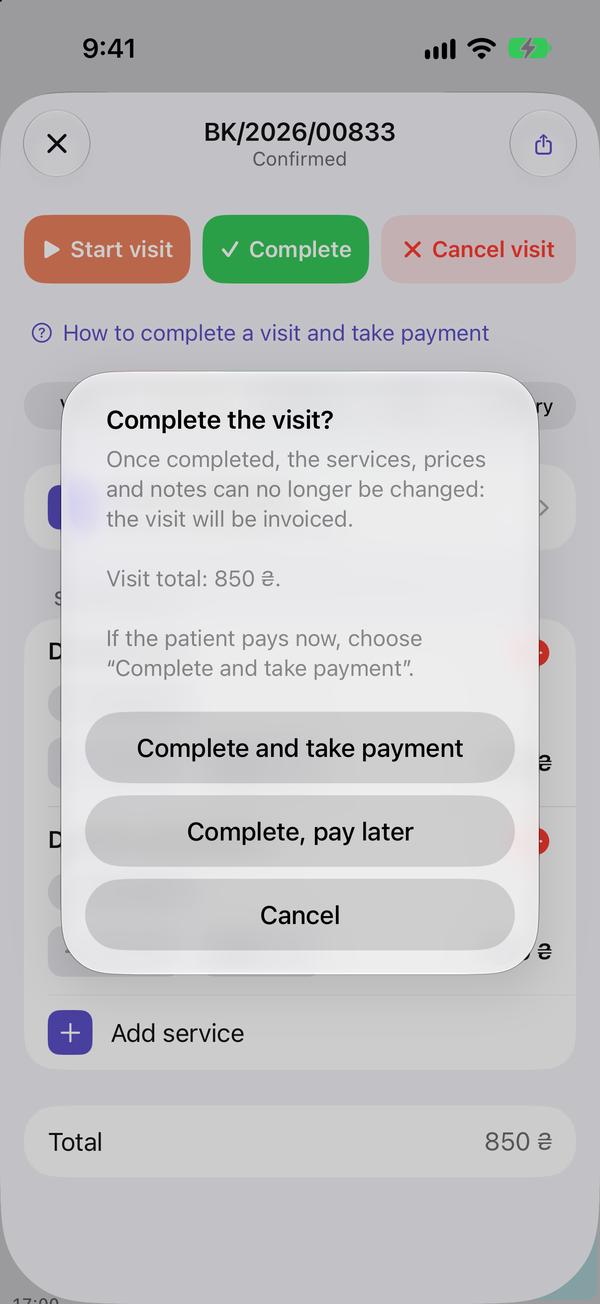
  3. Tap "Complete visit" at the top.

    Tap "Complete visit" at the top.
  4. If the patient pays now, choose "Complete and take payment". If they will pay later, choose "Complete, pay later".

    If the patient pays now, choose "Complete and take payment". If they will pay later, choose "Complete, pay later".
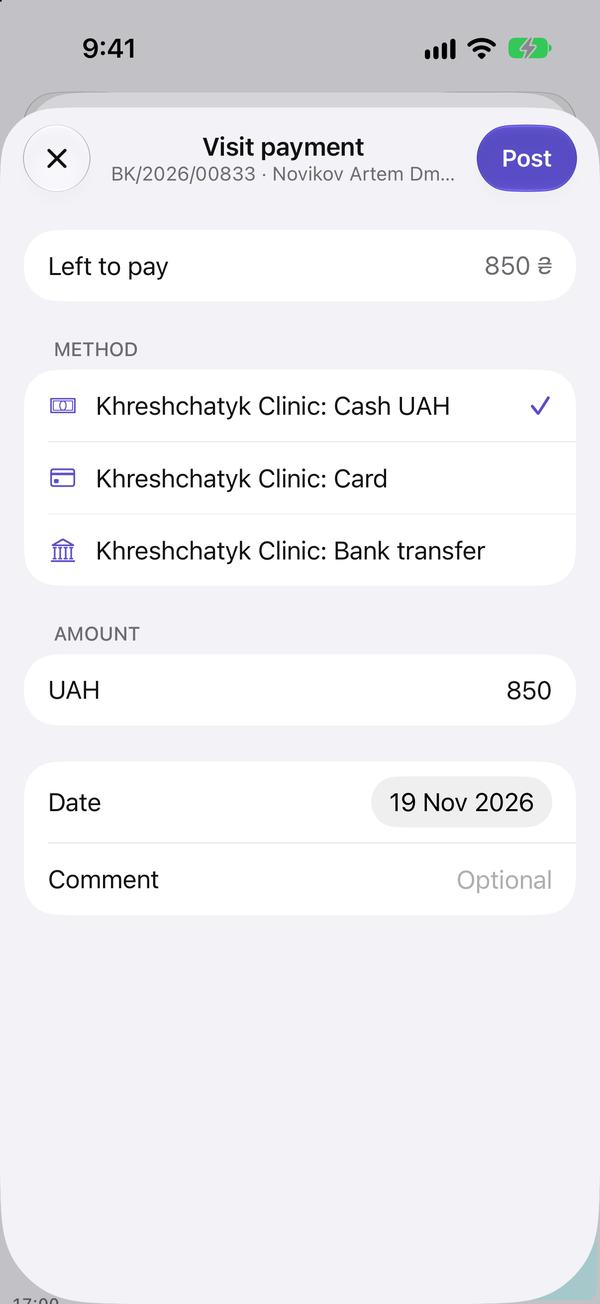
  5. Choose how the patient pays: cash to the cash desk, card or transfer. Check the amount and tap "Post".

    Choose how the patient pays: cash to the cash desk, card or transfer. Check the amount and tap "Post".
  6. Done: in the "Payment" section the visit is marked "Paid", and the payment is in the day's cash desk.

    Done: in the "Payment" section the visit is marked "Paid", and the payment is in the day's cash desk.

The patient didn't pay in full? Enter what they paid in "Amount". The rest stays as a debt, and the patient appears in "Patients → Debtors".

A prepayment made before the visit is completed is credited automatically.

Made a mistake in the services after completion? Only the administrator can reopen the visit.

↑ To the top

Cash desk and doctor's share

Payments for the day, week, month; the doctor's share; patients' debts

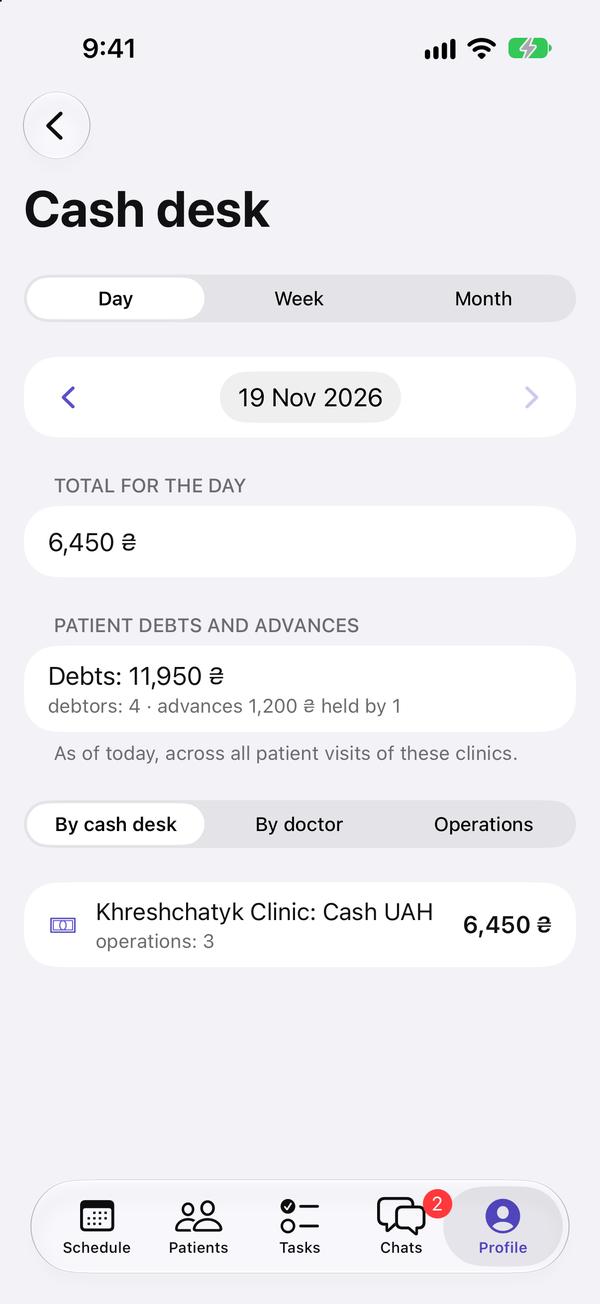
  1. Open "Profile → Cash desk" and choose a period: day, week or month. The arrows page through periods.

    Open "Profile → Cash desk" and choose a period: day, week or month. The arrows page through periods.
  2. At the top of the "By doctor" tab is "Completed visits": how many visits each doctor completed in the period, for what amount, and the line "doctor 30%: …". The share is counted on the amount of completed visits, paid or not, and a visit counts on the day of the visit itself, not the day it was completed. Payments by doctor are below.

  3. Administrators also see today's "Patient debts and advances"; debtors can be opened in "Patients → Debtors".

Money (cash, card, transfer) counts on the day it was paid.

A doctor sees only themselves: their visits, share and the payments they took. An administrator sees all doctors and all cash desks.

The administrator sets the doctor's share in the web version: Employees → the doctor's record → the "Doctor's share" tab.

↑ To the top

Payment by QR

The patient pays from any bank app: to a FOP or to a card

  1. In a visit tap "Payment" and choose the bank transfer method: the row "Show the QR for payment" appears. For the whole debt: the patient's card → "QR for paying the debt".

  2. The patient scans the QR with the camera or the bank app (Privat, Mono, any Ukrainian bank): the recipient, IBAN, amount and purpose are filled in. Not next to you? "Send the payment link" to Telegram, Viber or SMS.

  3. When the money has come, record the payment with the bank transfer method: the visit becomes paid.

Whose account: the specialist's own, if they have one; otherwise the branch's; otherwise the company's.

No requisites yet? The owner sets them up in "Profile → Settings → Payment requisites".

↑ To the top

Settings for the owner

Requisites, branches, services and the team, right in the app

  1. Open "Profile → Settings": the owner and administrators see it. Everything here is the same as in the web version.

  2. "Payment requisites": tap the company, a branch or a specialist and choose "FOP or company" or "Personal card".

  3. The quickest way: in your bank's app open the card, "Top up" (or "Requisites") and copy the link. In Vizi tap "Paste the link from the bank": the name, IBAN and РНОКПП are filled in. Tap "Save".

  4. "Company and branches": the name and contacts; add a branch (it gets its cash desks at once) or close one. "Services and prices" and "Team and access": the price list, the people and their access.

A personal card suits a master without a FOP: the QR tops the card up, with "Account top-up" as the purpose. With a regular income a FOP is safer: banks may ask about payments for services coming to a personal card.

A specialist who is a separate FOP or takes payments on their own card: set the requisites on them, and the QR of their visits pays to their account.

↑ To the top

Visit templates and dictation

Services and protocol text in one tap; dictate instead of typing

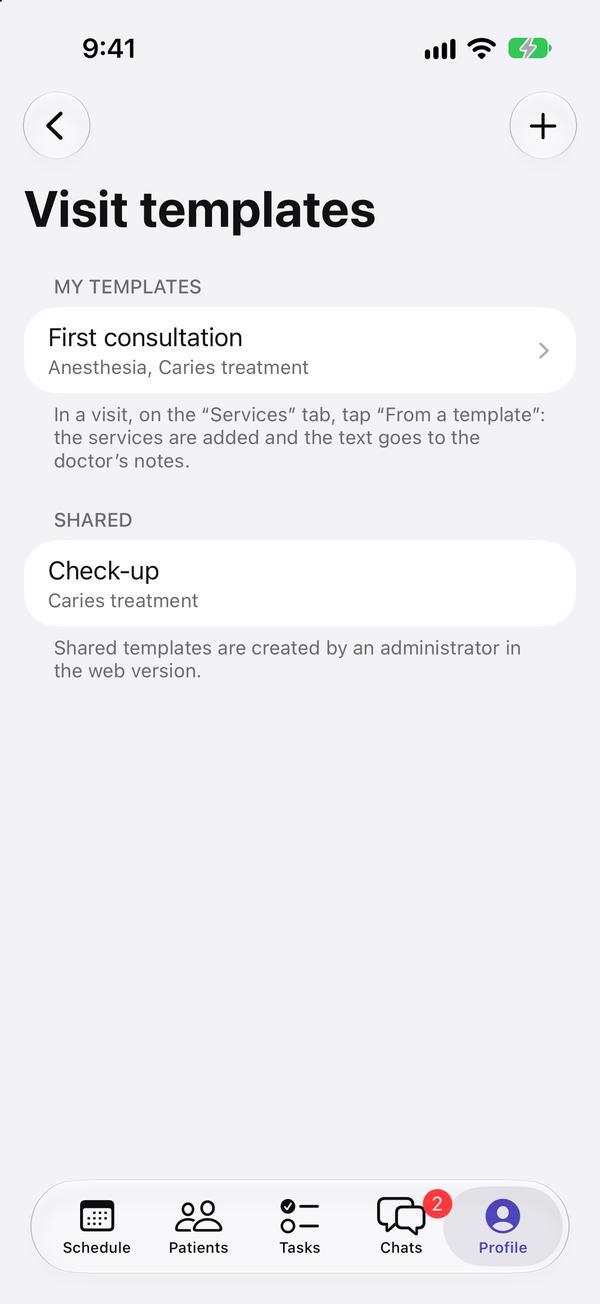
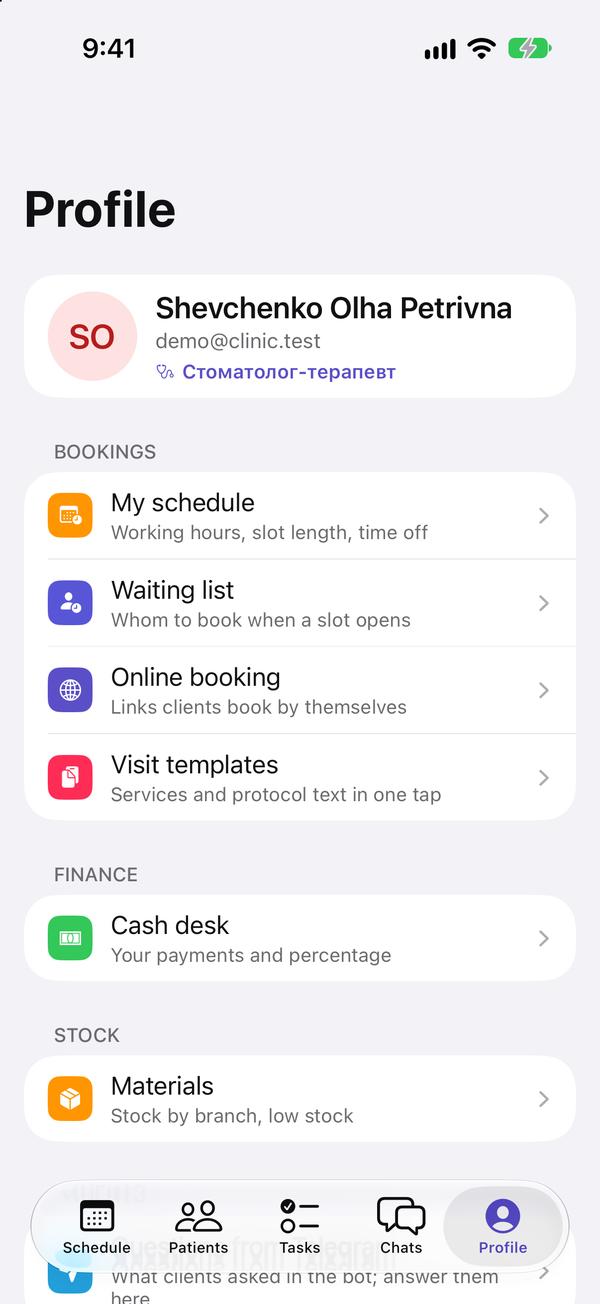
  1. In "Profile → Visit templates" tap "+" and create a template for a frequent visit, for example "Caries treatment".

    In "Profile → Visit templates" tap "+" and create a template for a frequent visit, for example "Caries treatment".
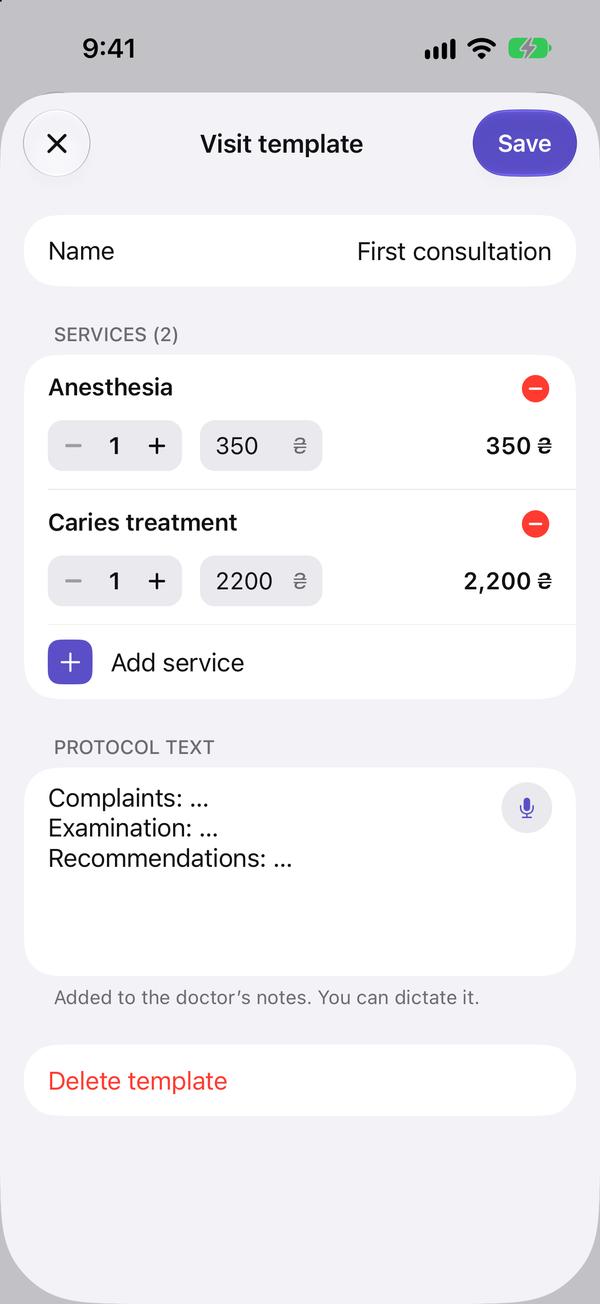
  2. Add the services and the protocol text. You can dictate the text: tap the microphone and speak, tap it again to stop recording.

    Add the services and the protocol text. You can dictate the text: tap the microphone and speak, tap it again to stop recording.
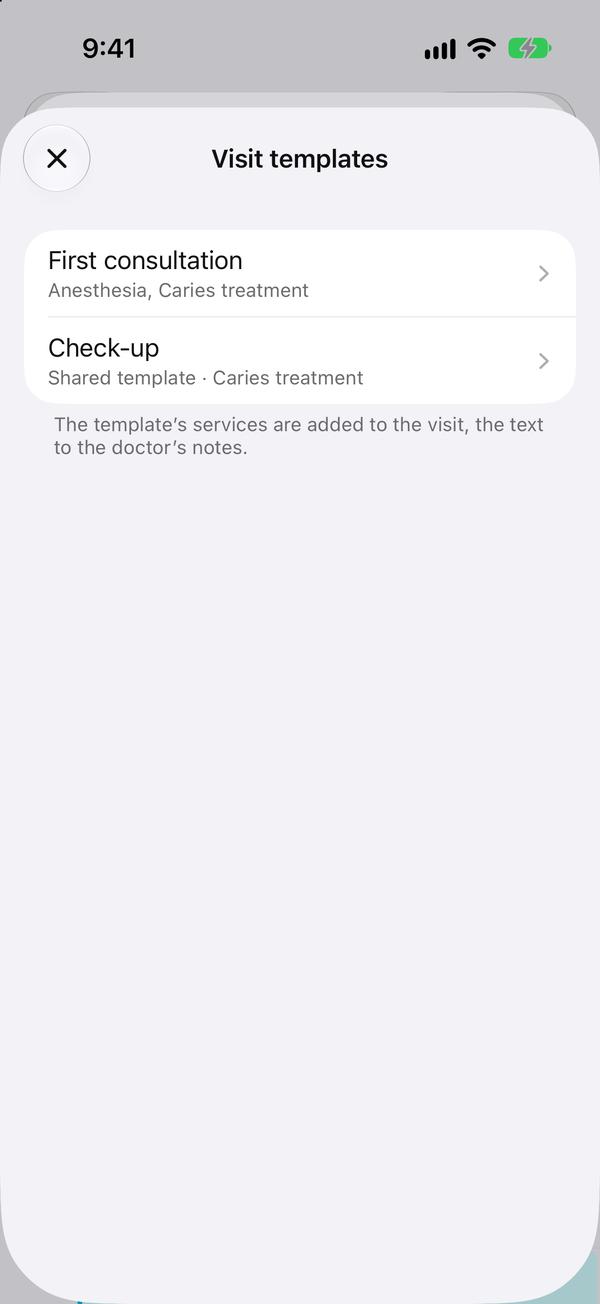
  3. In a visit (when booking or on the "Services" tab) tap "From a template".

    In a visit (when booking or on the "Services" tab) tap "From a template".
  4. Choose a template. The clinic's shared templates are marked "Shared".

    Choose a template. The clinic's shared templates are marked "Shared".
  5. The services are added at the clinic's prices and the text goes to the doctor's notes. Adjust if needed and save the visit.

    The services are added at the clinic's prices and the text goes to the doctor's notes. Adjust if needed and save the visit.

The doctor's notes, visit description and recommendations have a microphone too: dictate right in the visit.

Shared templates for all doctors are created by the administrator in the web version: Settings → Visit templates.

↑ To the top

My hours and free time

Working hours, days off and booking into free slots

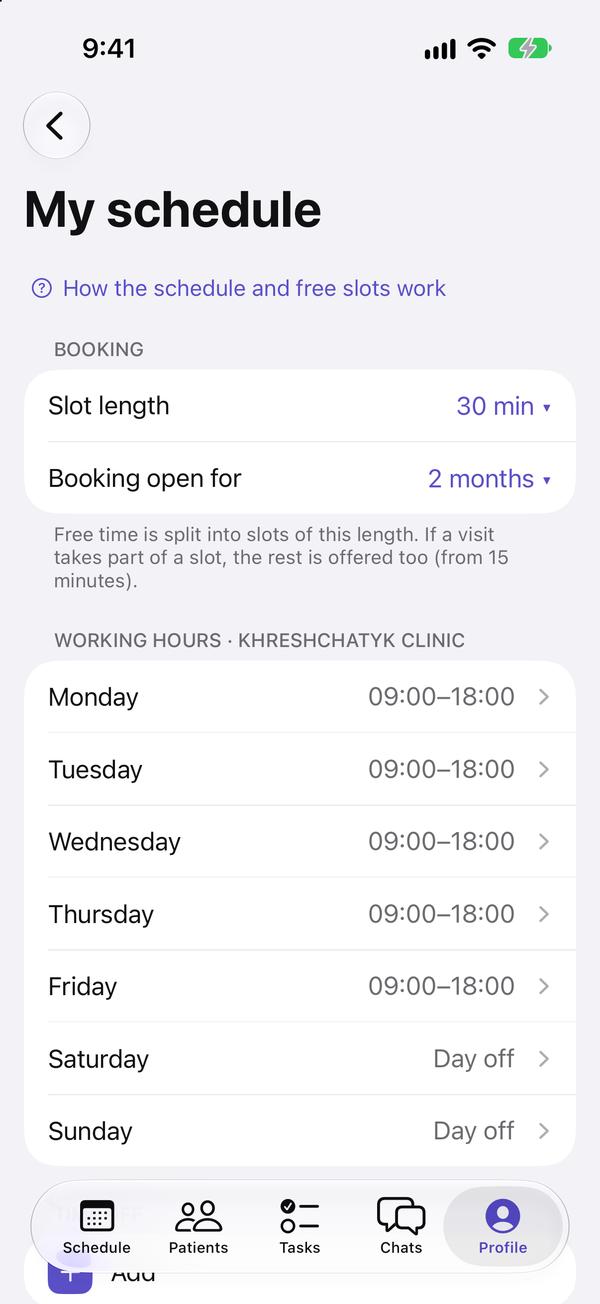
  1. Profile → "My schedule". Only doctors see and set it up, each their own.

    Profile → "My schedule". Only doctors see and set it up, each their own.
  2. Choose the slot length (for example, 1 hour) and how far ahead booking is open. Below are the working hours by day for each of your clinics. After making changes, tap "Save".

    Choose the slot length (for example, 1 hour) and how far ahead booking is open. Below are the working hours by day for each of your clinics. After making changes, tap "Save".
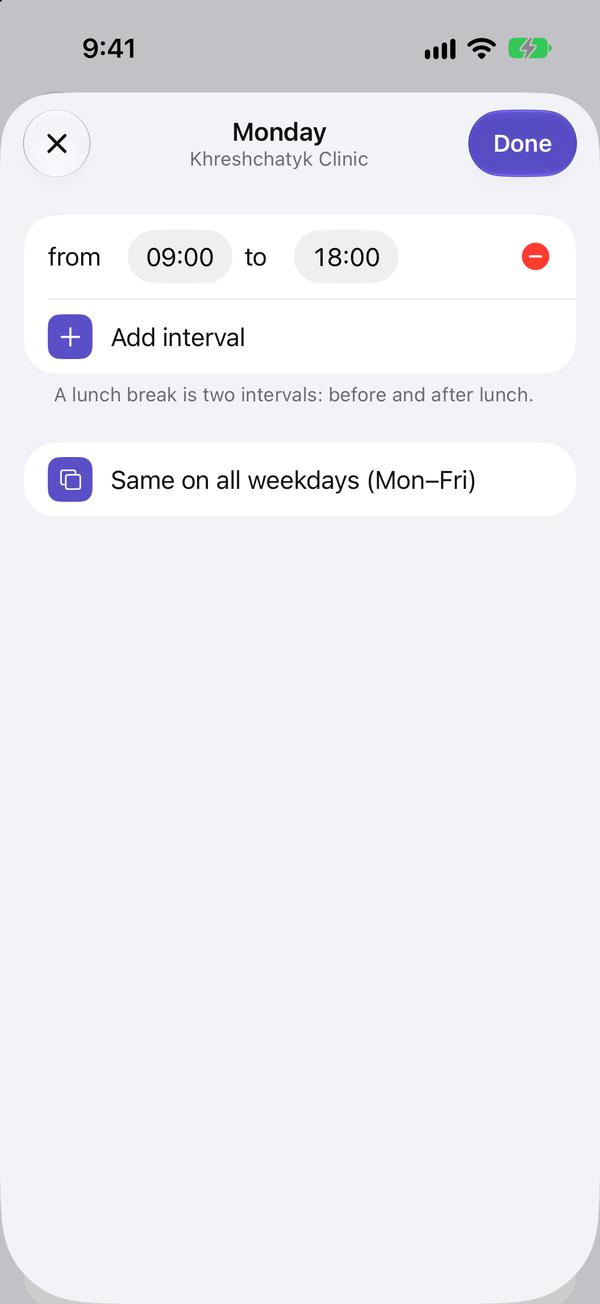
  3. Tap a day: "Working day" adds hours, and you change a time by tapping it. Lunch is two intervals: before and after. "Same on all weekdays (Mon–Fri)" copies the hours to Mon–Fri.

    Tap a day: "Working day" adds hours, and you change a time by tapping it. Lunch is two intervals: before and after. "Same on all weekdays (Mon–Fri)" copies the hours to Mon–Fri.
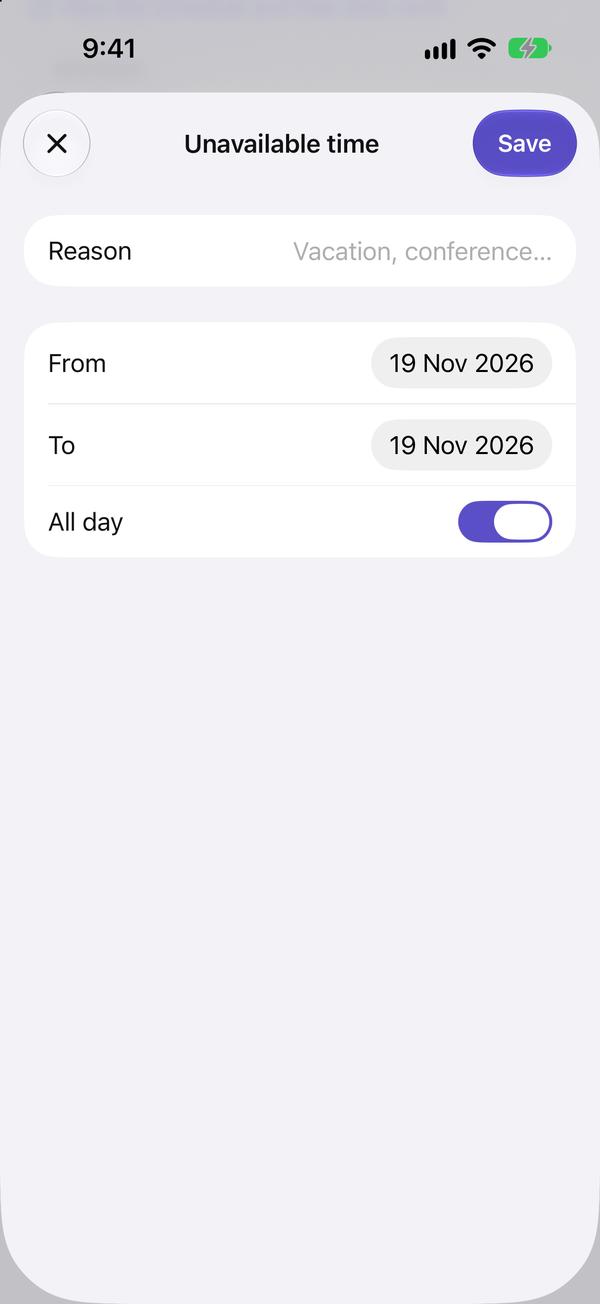
  4. Holiday or a short day: "Time off" → "Add". Enter the dates, the reason and, if it is not the whole day, the hours.

    Holiday or a short day: "Time off" → "Add". Enter the dates, the reason and, if it is not the whole day, the hours.
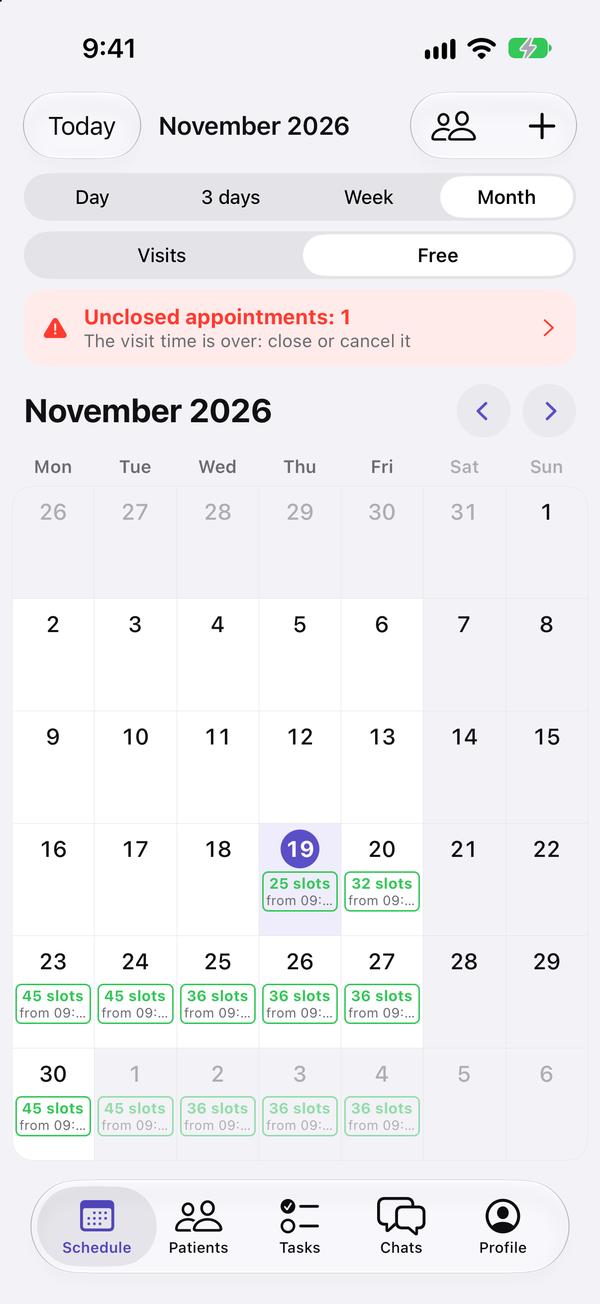
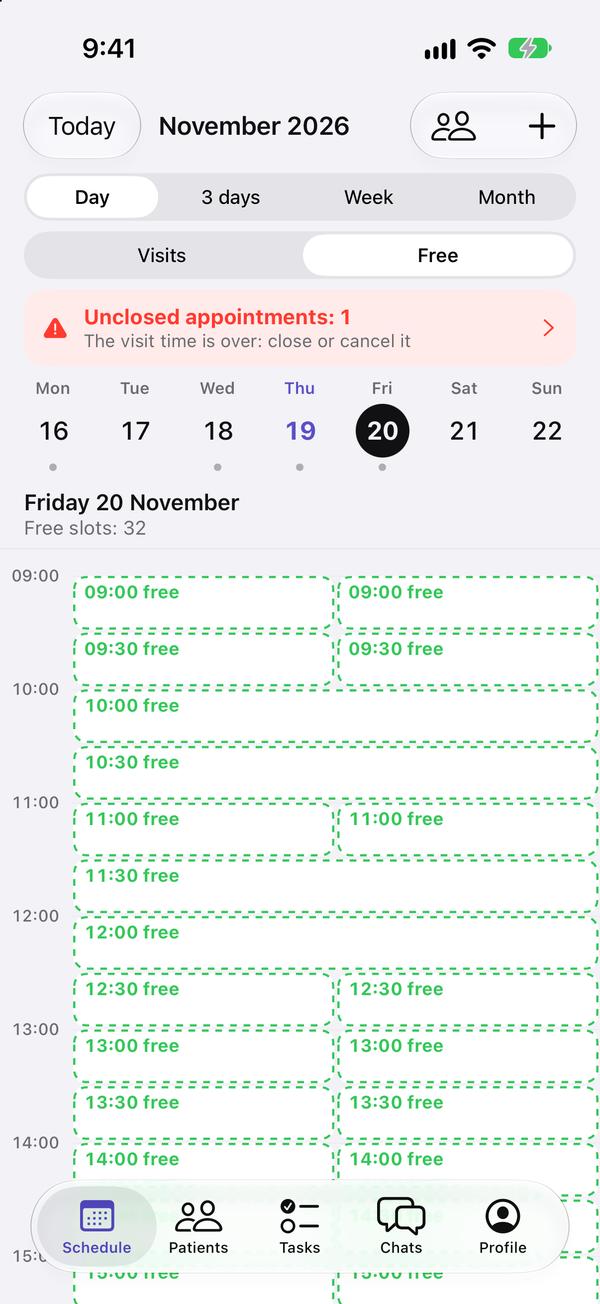
  5. In the schedule, switch "Visits" to "Free". The month view shows how many slots each day has and from what time.

    In the schedule, switch "Visits" to "Free". The month view shows how many slots each day has and from what time.
  6. Open a day: the green dashed blocks are free slots. If all doctors are selected, the slots sit next to the doctor's name.

    Open a day: the green dashed blocks are free slots. If all doctors are selected, the slots sit next to the doctor's name.
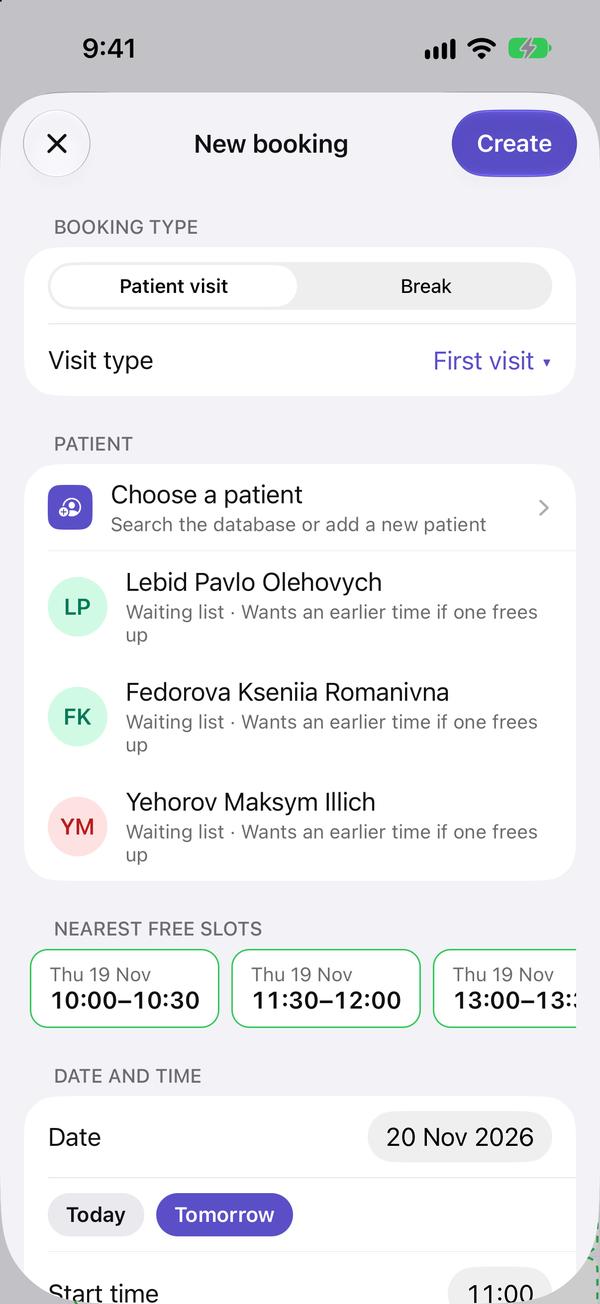
  7. Tap a slot and a new booking opens with the date, time, doctor and clinic. At the top are this doctor's nearest free slots: tapping one fills in the time.

    Tap a slot and a new booking opens with the date, time, doctor and clinic. At the top are this doctor's nearest free slots: tapping one fills in the time.
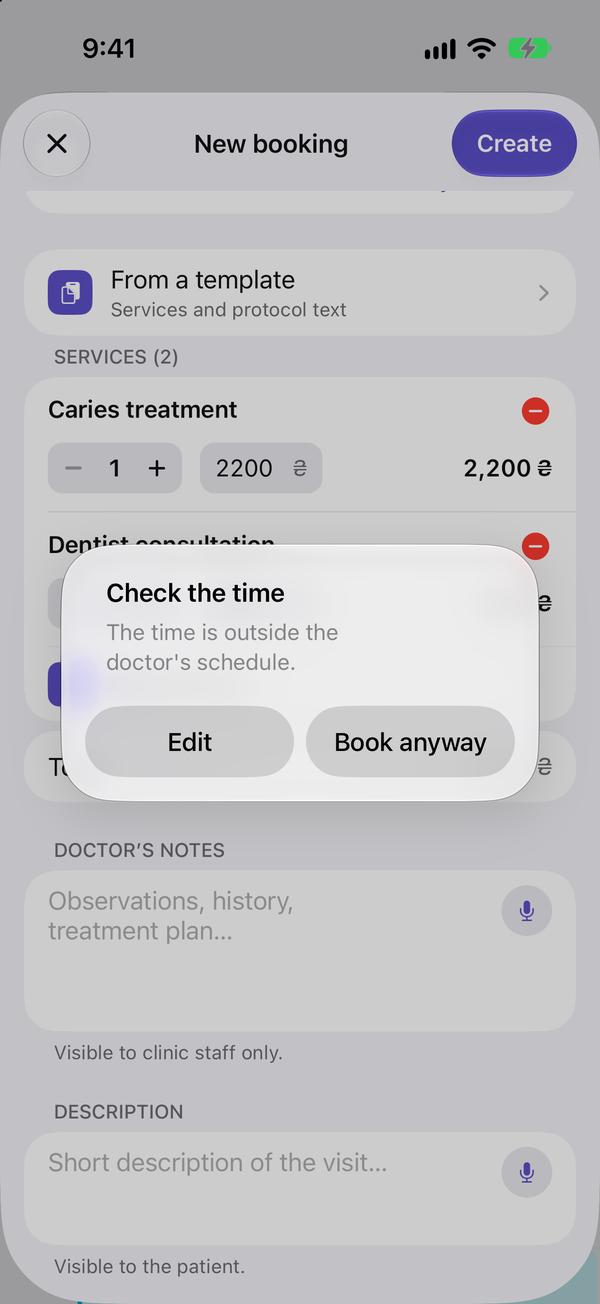
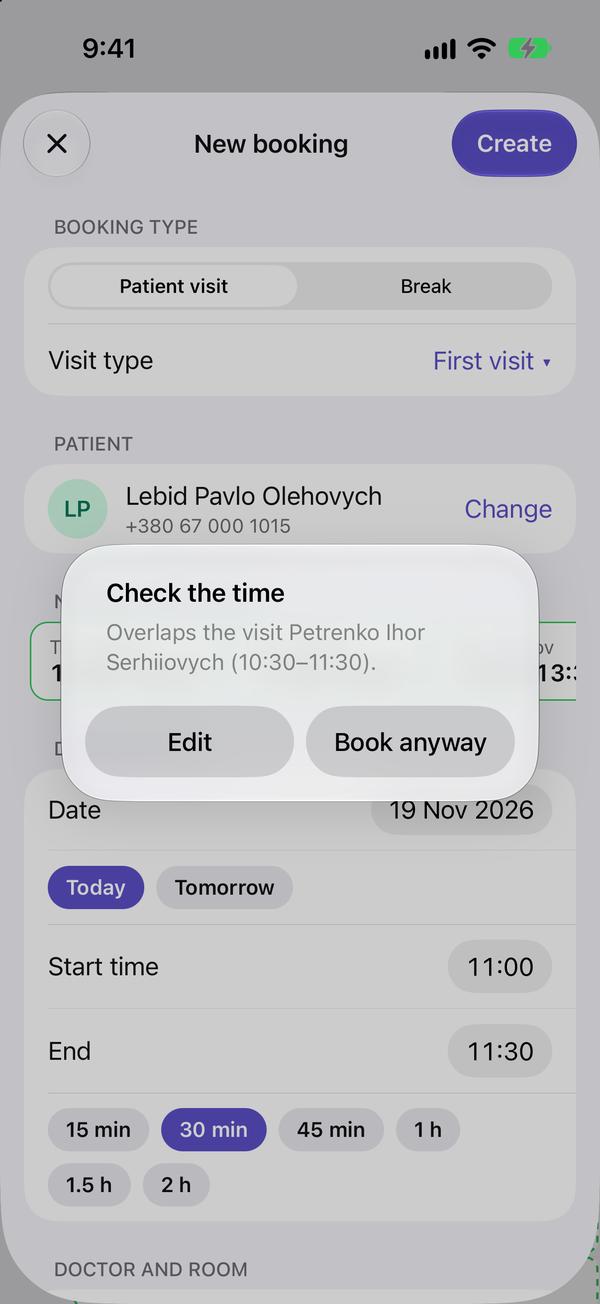
  8. If the time is outside working hours, on a day off or over another visit, the app warns you. You can change the time or book anyway.

    If the time is outside working hours, on a day off or over another visit, the app warns you. You can change the time or book anyway.

Slots are counted automatically: a booking takes a slot, a cancellation frees it, and a visit created in the web version or anywhere else is counted too.

If a visit takes part of a slot, the rest is offered as a separate slot (if it is at least 15 minutes long).

Until a doctor fills in their hours, they have no free slots and no warnings about hours; the app still warns when visits overlap.

↑ To the top

Waiting list

Who to book when time frees up

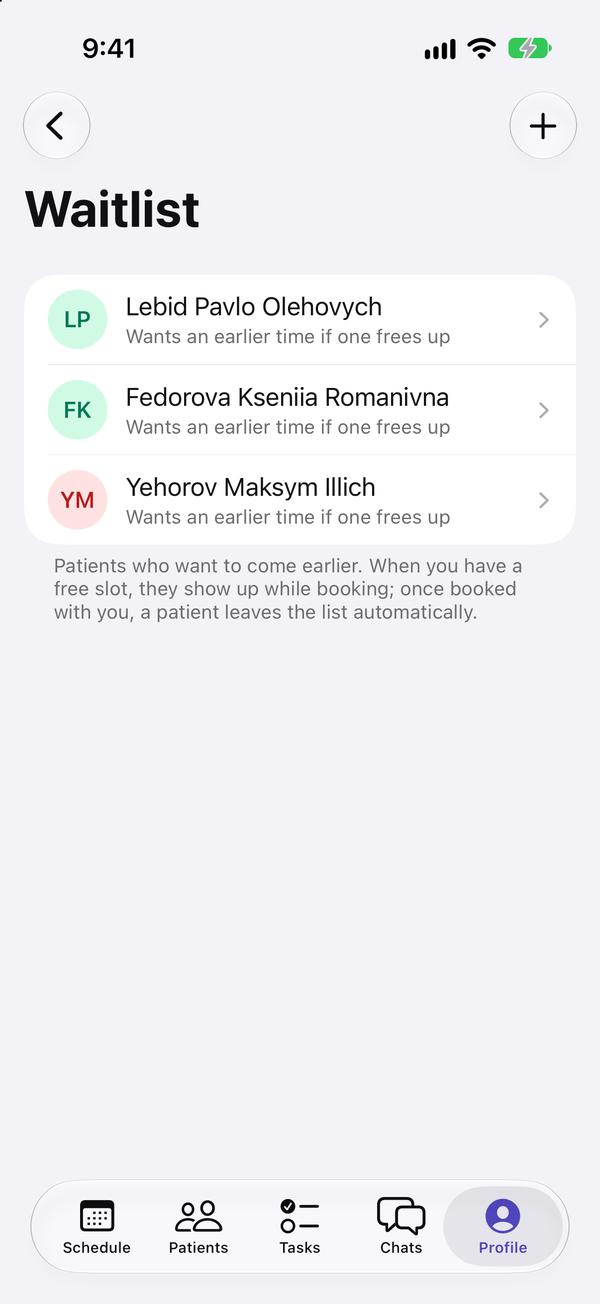
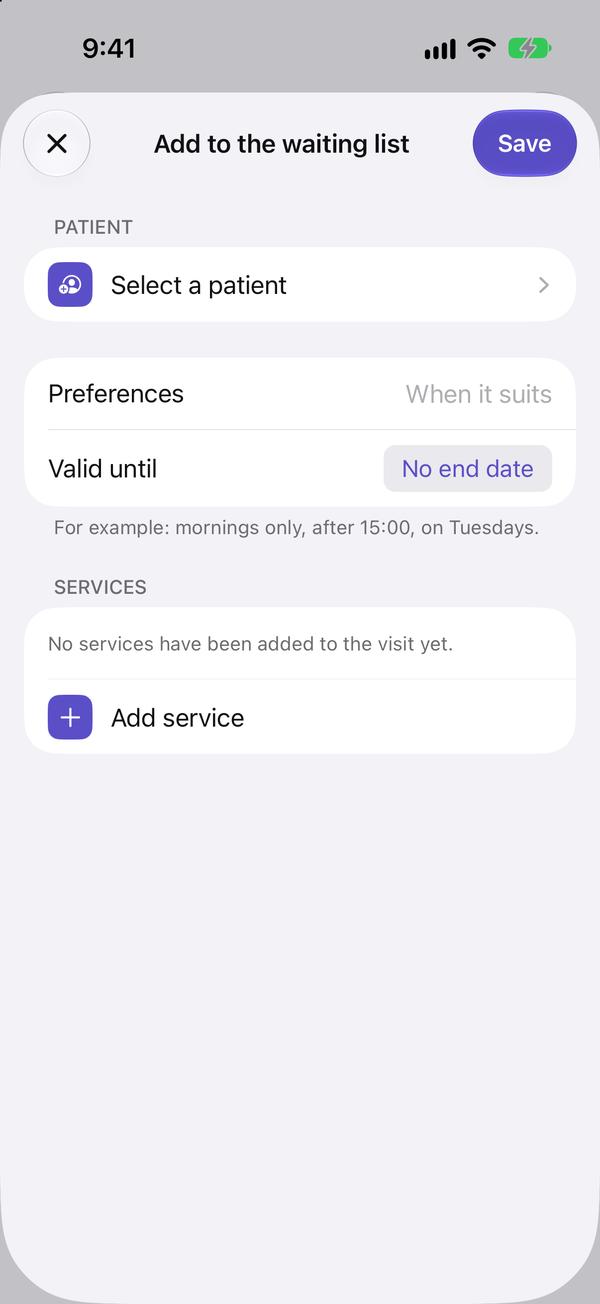
  1. A patient wants to come sooner but there are no free slots? Add them to "Profile → Waiting list" with the "+" button.

    A patient wants to come sooner but there are no free slots? Add them to "Profile → Waiting list" with the "+" button.
  2. Enter the preferences ("mornings only"), the date until which it applies, and the services, just as in a visit.

    Enter the preferences ("mornings only"), the date until which it applies, and the services, just as in a visit.
  3. A slot has freed up: tap the patient → "Book the patient". A new booking opens with the patient, services and preferences already filled in; you only need to choose the time.

    A slot has freed up: tap the patient → "Book the patient". A new booking opens with the patient, services and preferences already filled in; you only need to choose the time.
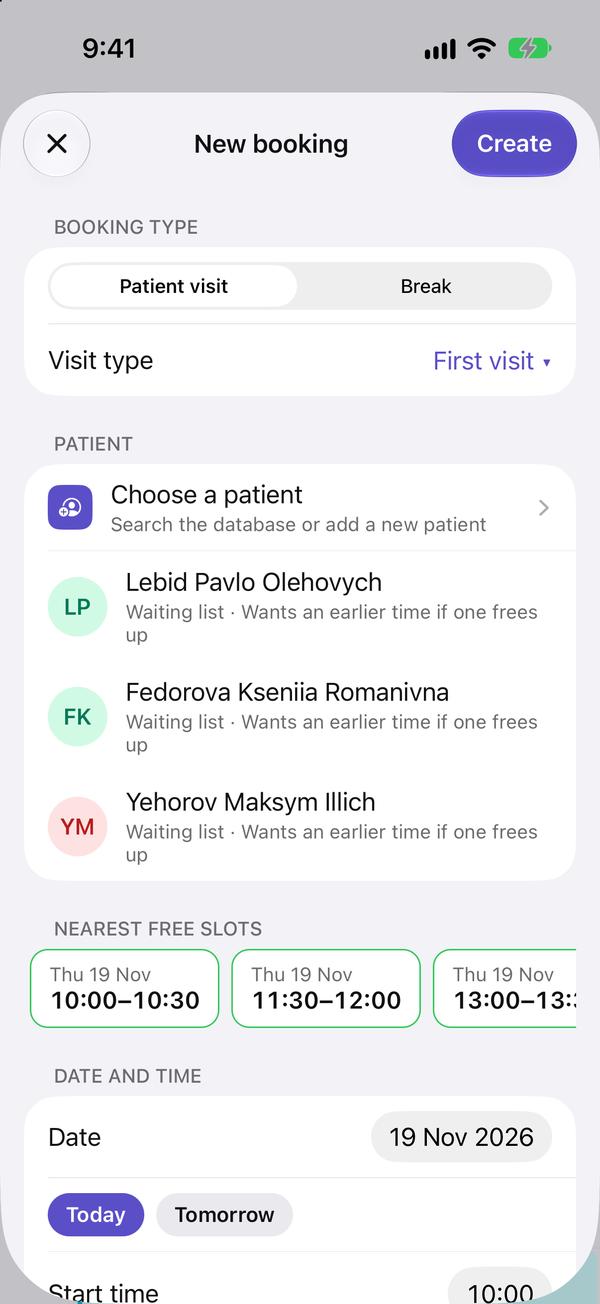
  4. It works the other way too: with any new booking, patients from the doctor's waiting list appear under "Choose a patient". One tap fills in the patient and services.

    It works the other way too: with any new booking, patients from the doctor's waiting list appear under "Choose a patient". One tap fills in the patient and services.

Once booked with you, the patient leaves the waiting list automatically.

Colleagues who book patients for you can see your list, but only you can change it.

When a patient signs a treatment plan, its stages with services appear here automatically.

↑ To the top

Patients, debts and advances

Search, debtors, prepayments and the day's cash desk

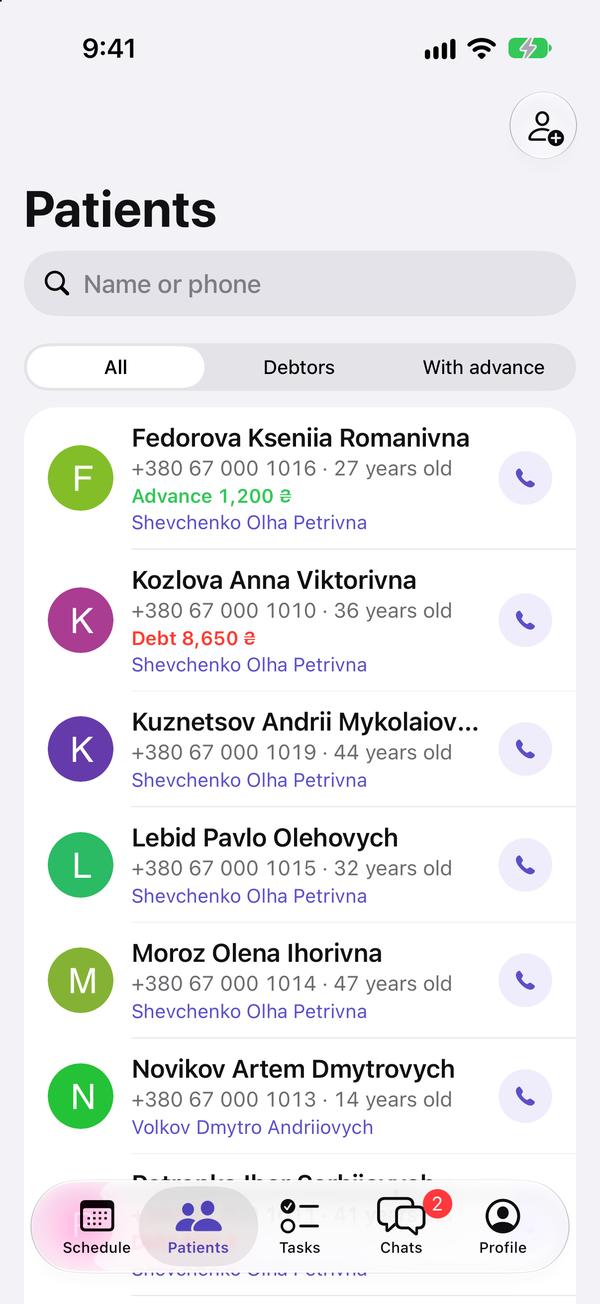
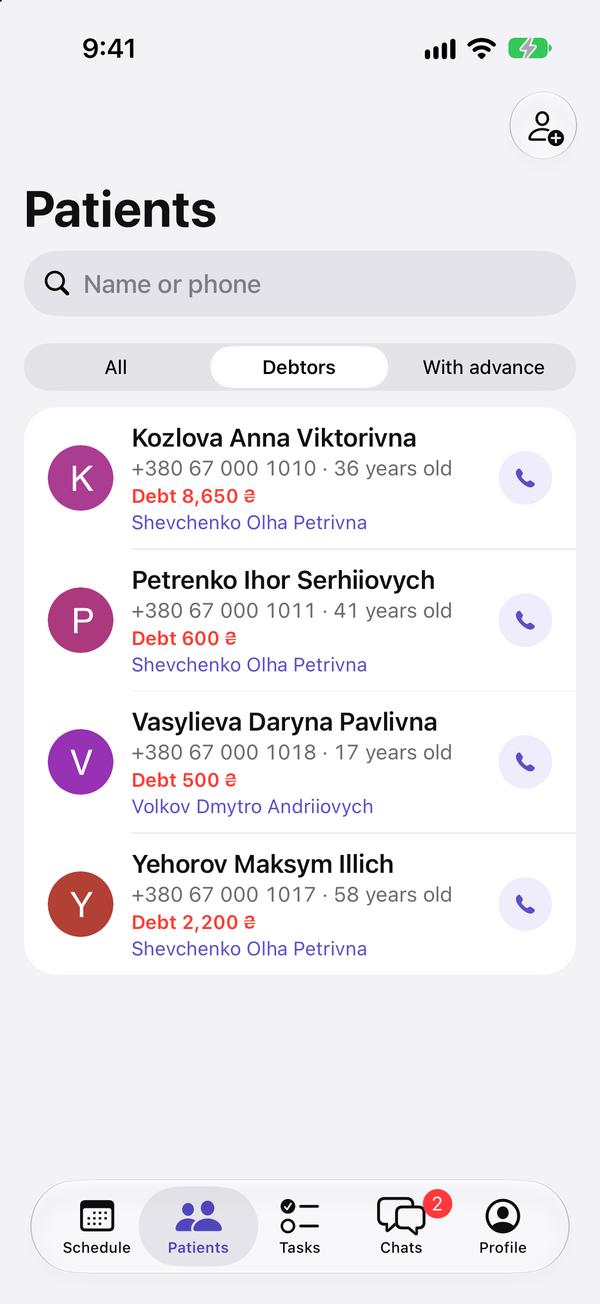
  1. On the "Patients" tab, search by name or phone. Under the name you see the attending doctor and the debt or advance, if any.

    On the "Patients" tab, search by name or phone. Under the name you see the attending doctor and the debt or advance, if any.
  2. The "Debtors" switch shows everyone who owes the clinic, with the amount owed.

    The "Debtors" switch shows everyone who owes the clinic, with the amount owed.
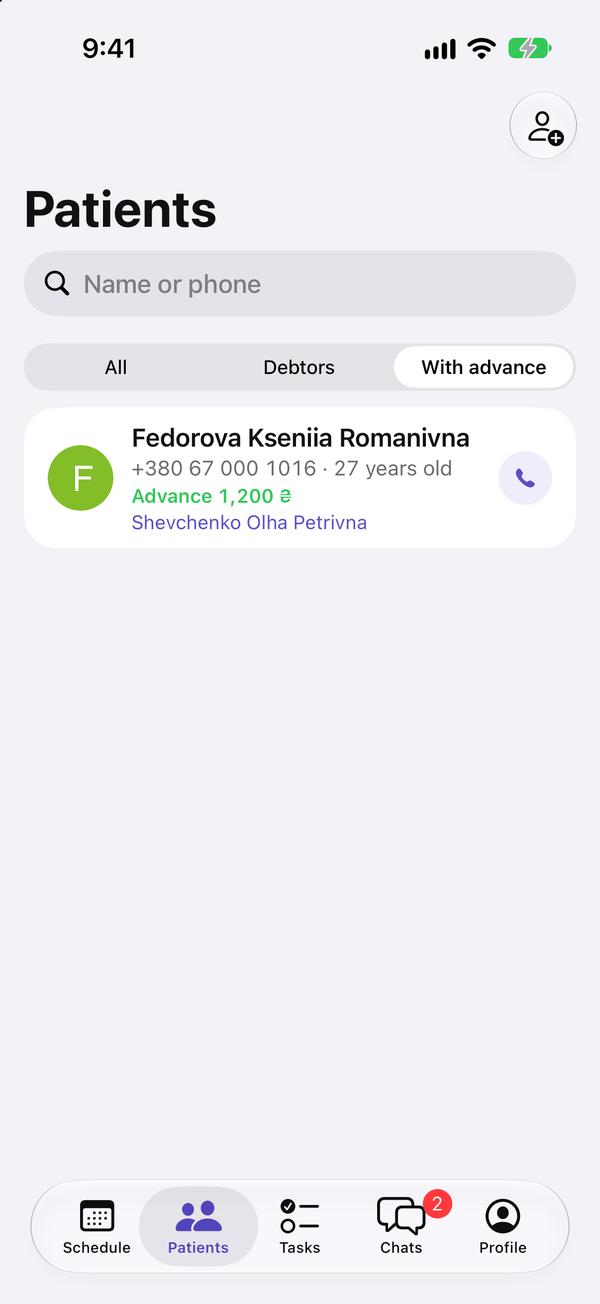
  3. "With advance" shows patients who have money on account: their prepayment is credited when their next visit is completed.

    "With advance" shows patients who have money on account: their prepayment is credited when their next visit is completed.
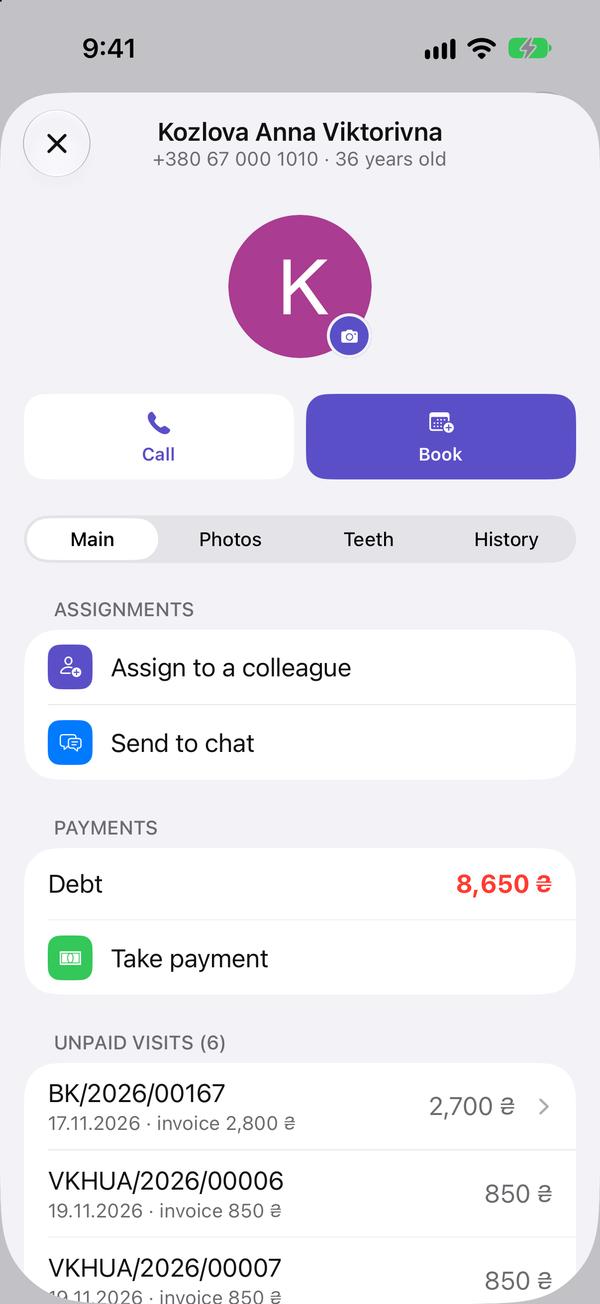
  4. In the patient's record, the "Payments" section shows the debt and unpaid visits. "Take payment" pays off the oldest debts first; if there are no debts, "Add advance" is there instead: a prepayment without a visit.

    In the patient's record, the "Payments" section shows the debt and unpaid visits. "Take payment" pays off the oldest debts first; if there are no debts, "Add advance" is there instead: a prepayment wi
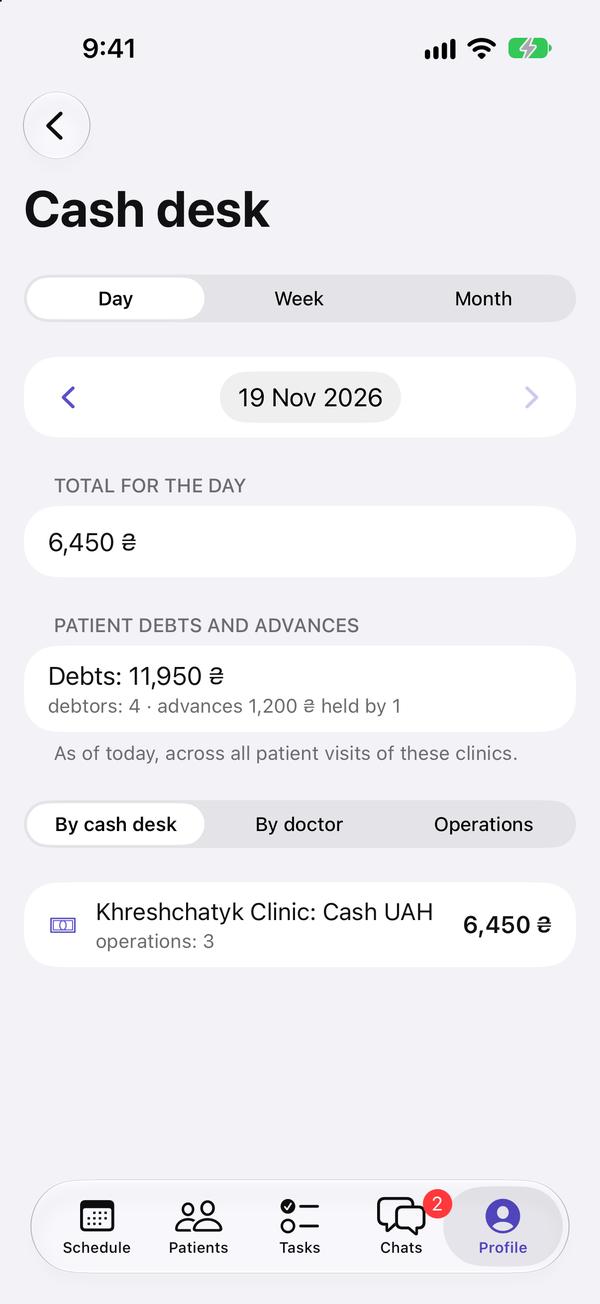
  5. Profile → "Cash desk": all of the day's payments by payment method. Use the arrows to page through days.

    Profile → "Cash desk": all of the day's payments by payment method. Use the arrows to page through days.

The "Call", "SMS", "Telegram" and "Instagram" buttons at the top of the record open a conversation with the patient.

Money can be refunded to a patient only from their advance: "Refund" in the "Payments" section of the record.

↑ To the top

Before and after photos

All of a patient's photos by date, and two side by side

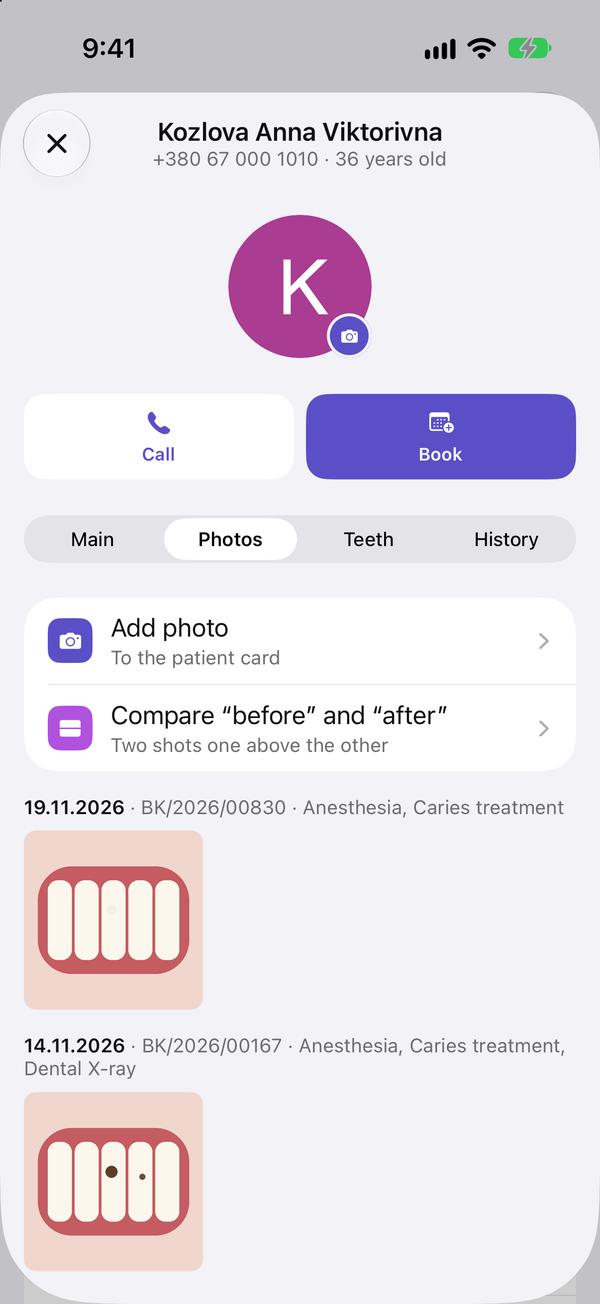
  1. In the patient's record open the "Photos" tab: it holds the photos from all their visits and from the record, by date. "Add photo" takes one with the camera or picks it from the gallery.

    In the patient's record open the "Photos" tab: it holds the photos from all their visits and from the record, by date. "Add photo" takes one with the camera or picks it from the gallery.
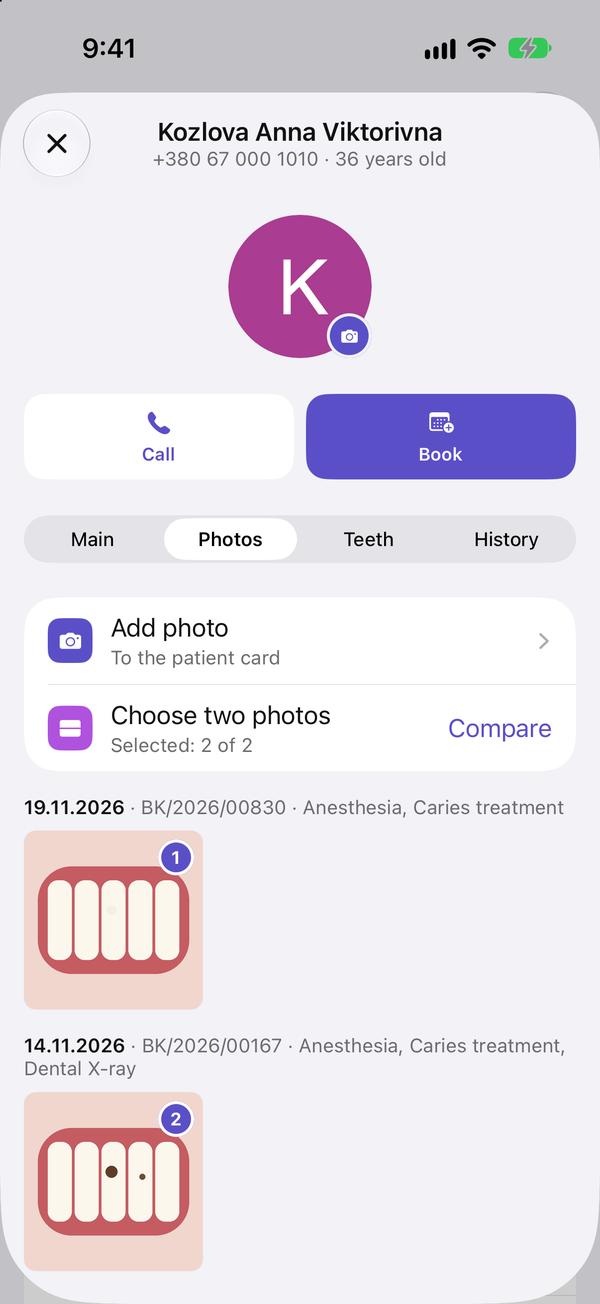
  2. Tap "Compare “before” and “after”" and select two photos.

    Tap "Compare “before” and “after”" and select two photos.
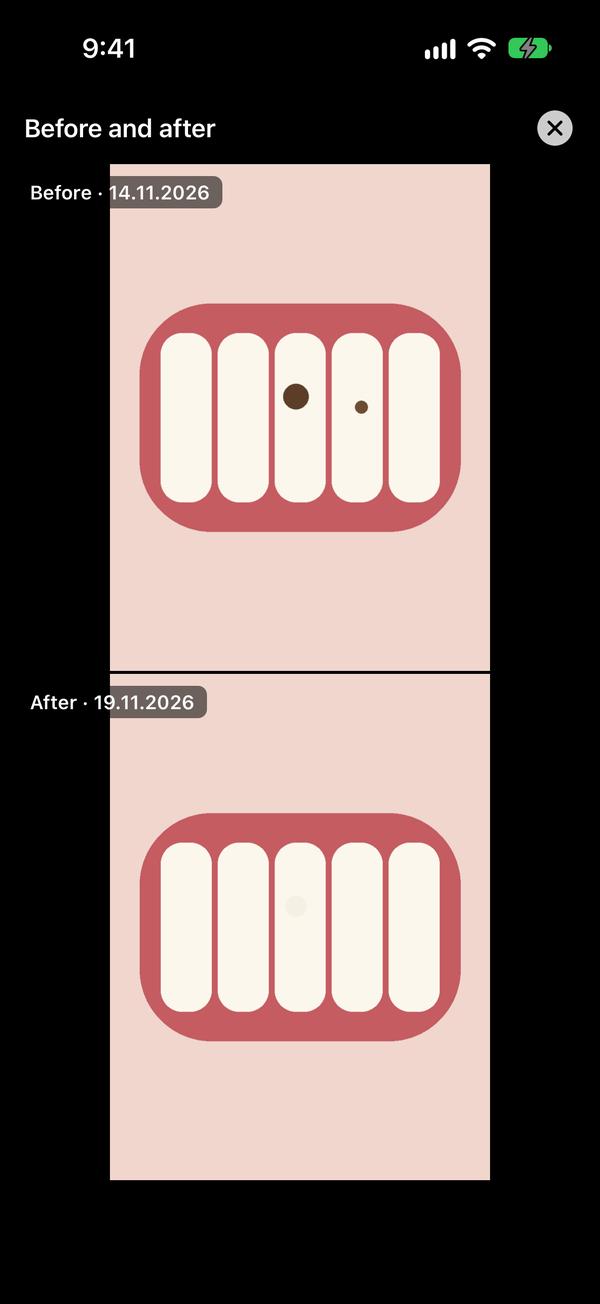
  3. Tap "Compare": the earlier photo is on top ("Before"), the later one below ("After"), with dates. Pinch with two fingers to zoom.

    Tap "Compare": the earlier photo is on top ("Before"), the later one below ("After"), with dates. Pinch with two fingers to zoom.
↑ To the top

Treatment plan

Stages and estimate; the patient confirms by signing via a link

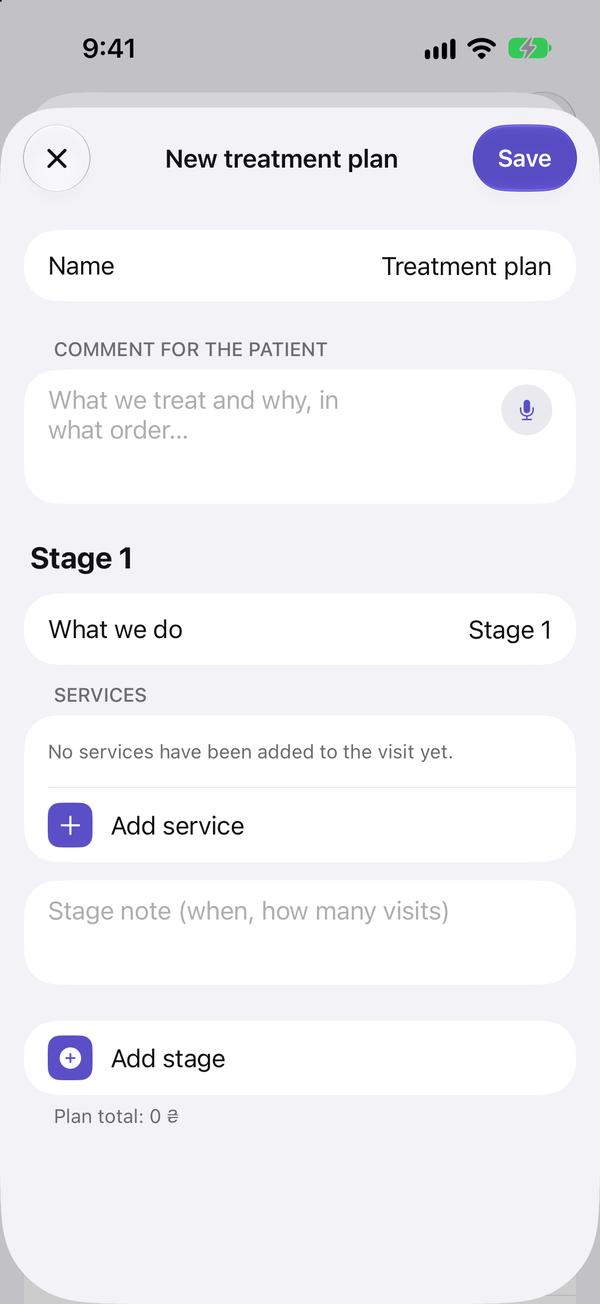
  1. Patient record → "Treatment plans" → "New treatment plan". Name the plan and, if you like, write a comment for the patient.

    Patient record → "Treatment plans" → "New treatment plan". Name the plan and, if you like, write a comment for the patient.
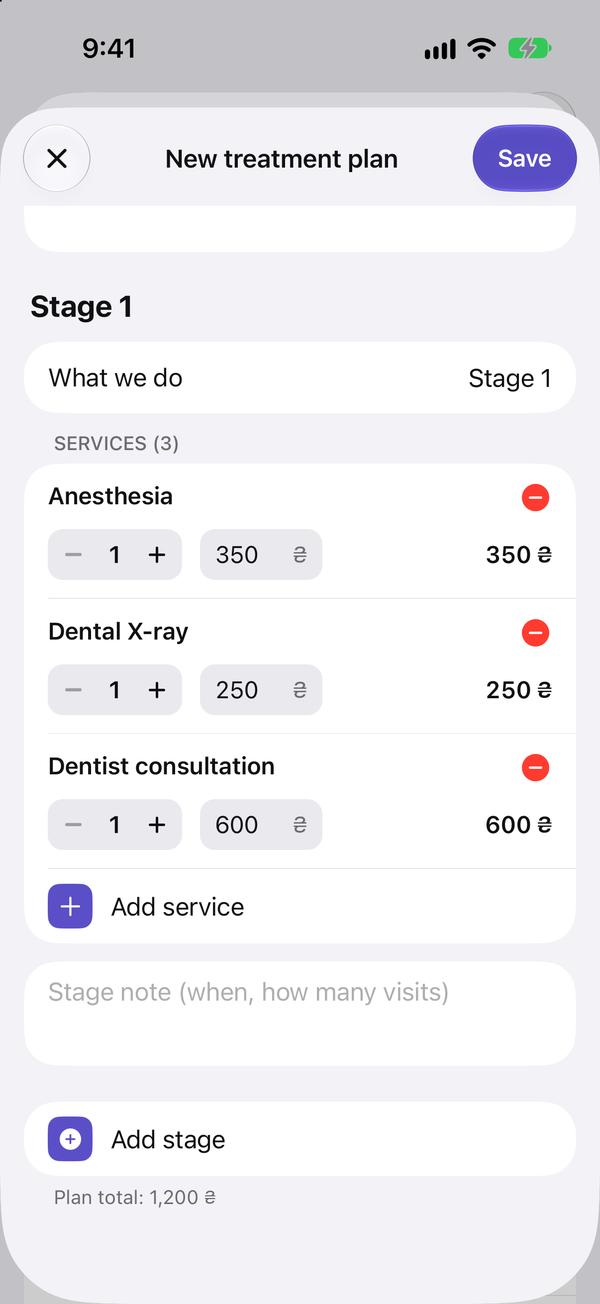
  2. In each stage, describe what will be done and add services: prices come from the clinic's price list. "Add stage" adds the next stage. The plan total is at the bottom.

    In each stage, describe what will be done and add services: prices come from the clinic's price list. "Add stage" adds the next stage. The plan total is at the bottom.
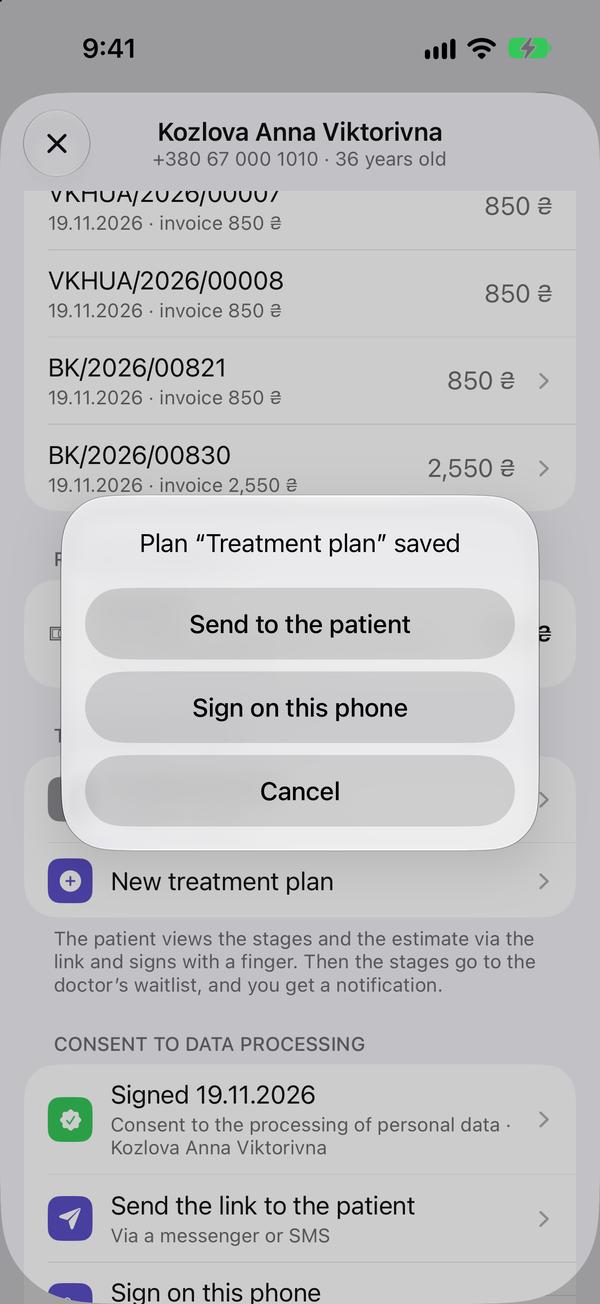
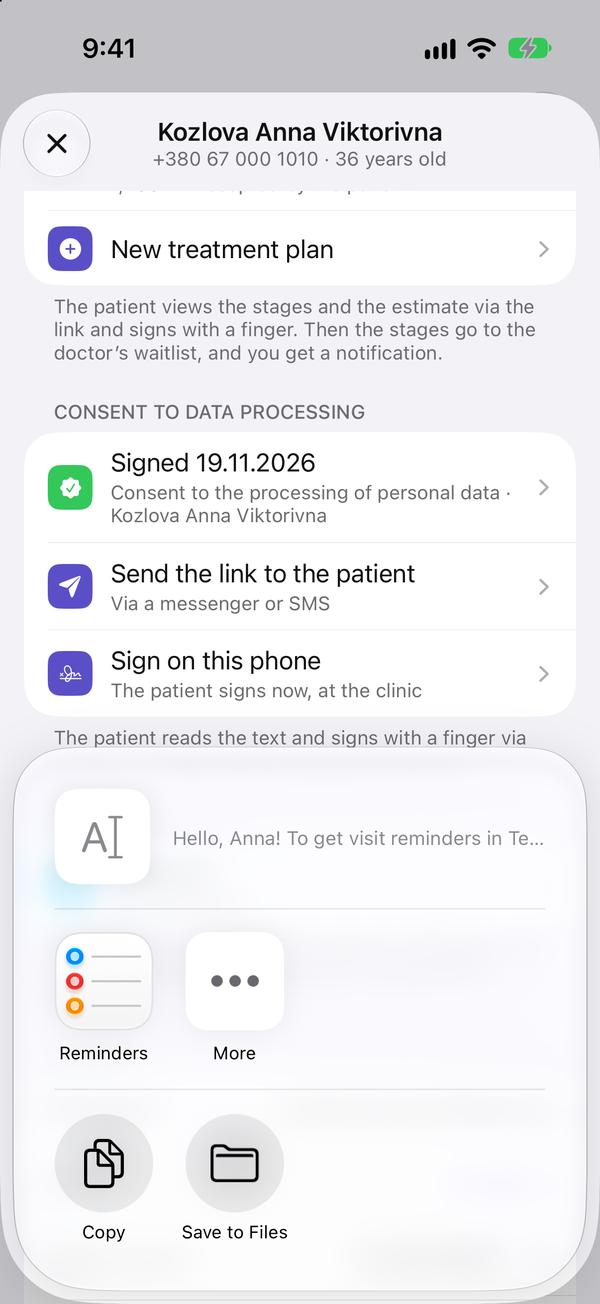
  3. Tap "Save", then "Send to the patient" and choose WhatsApp, SMS, Telegram or email in the "Share" sheet, or tap "Sign on this phone" if the patient is with you.

    Tap "Save", then "Send to the patient" and choose WhatsApp, SMS, Telegram or email in the "Share" sheet, or tap "Sign on this phone" if the patient is with you.
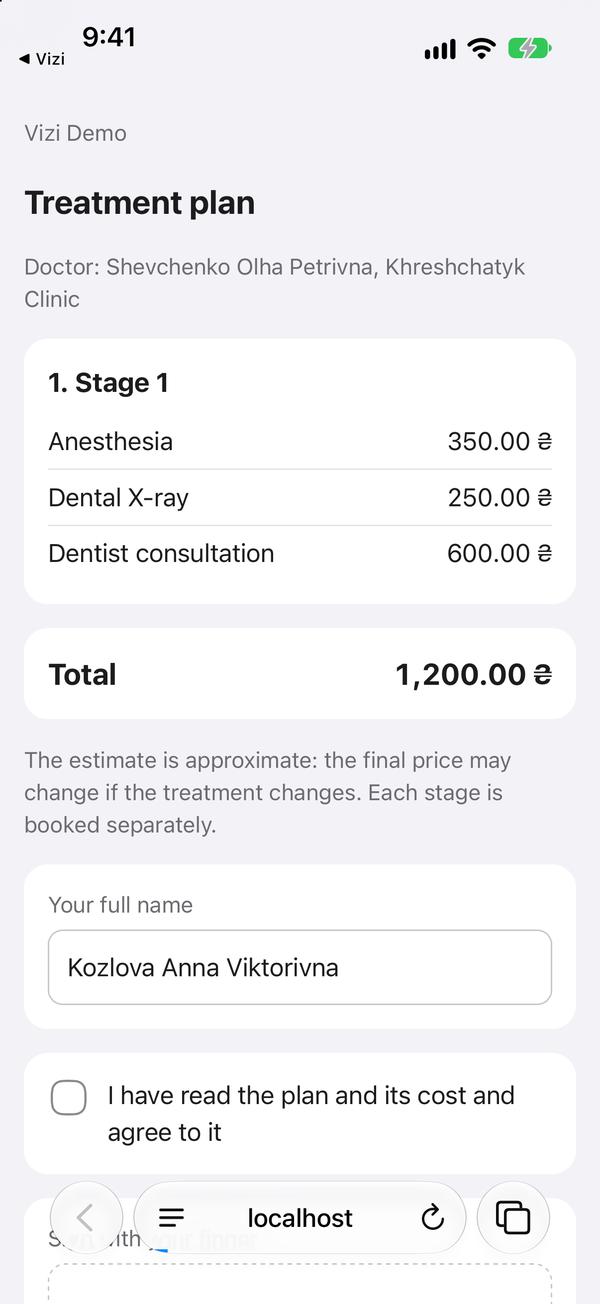
  4. The patient sees the stages, services and cost.

    The patient sees the stages, services and cost.
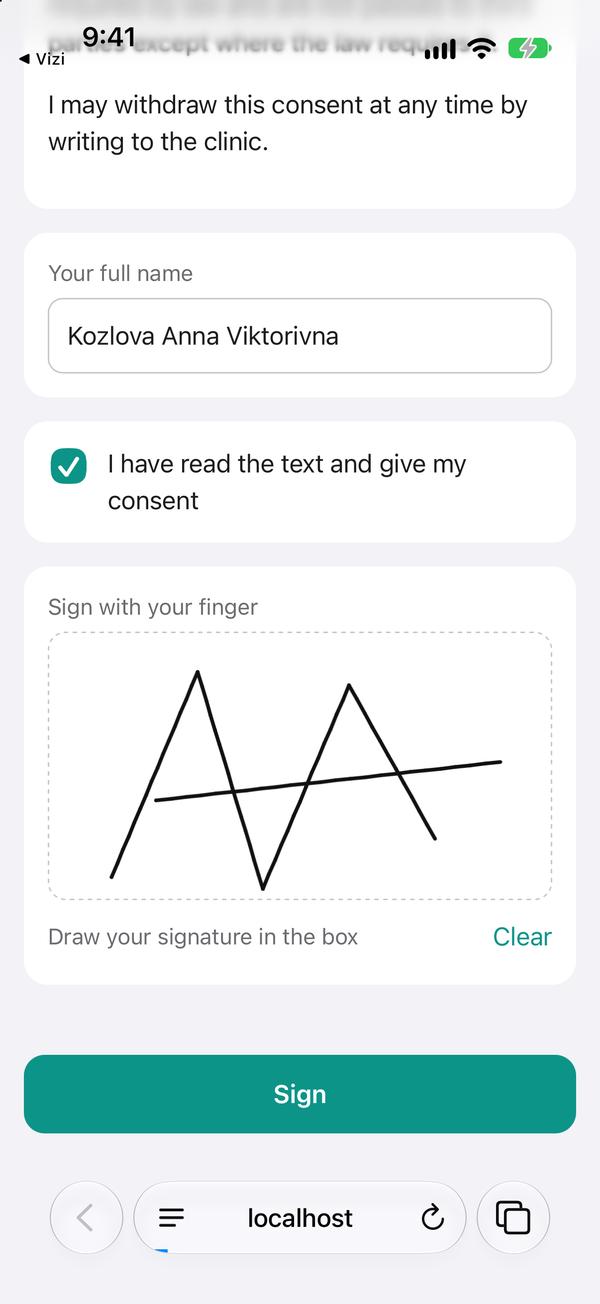
  5. They enter their full name, tick "I agree" and sign with a finger.

    They enter their full name, tick "I agree" and sign with a finger.
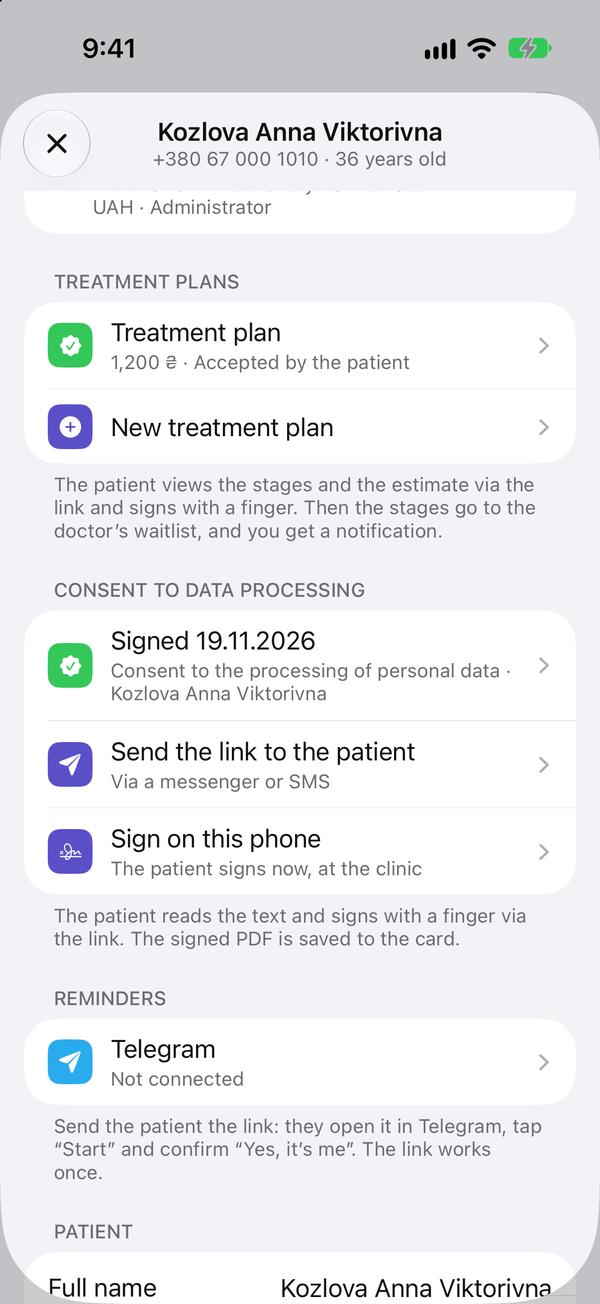
  6. You get a "Patient signed" notification. In the record the plan is "Accepted by the patient", and its stages with services are already in your "Waiting list": book the patient from there with "Book the patient".

    You get a "Patient signed" notification. In the record the plan is "Accepted by the patient", and its stages with services are already in your "Waiting list": book the patient from there with "Book th

The link is valid for 14 days. "Send to the patient" again sends the same link.

If you change a plan after sending it, the old link stops working: send a new one.

An accepted plan can't be changed or deleted: it is a signed document. Need a different one? Create a new plan.

↑ To the top

Telegram reminders

The patient gets a reminder the day before and answers with a button

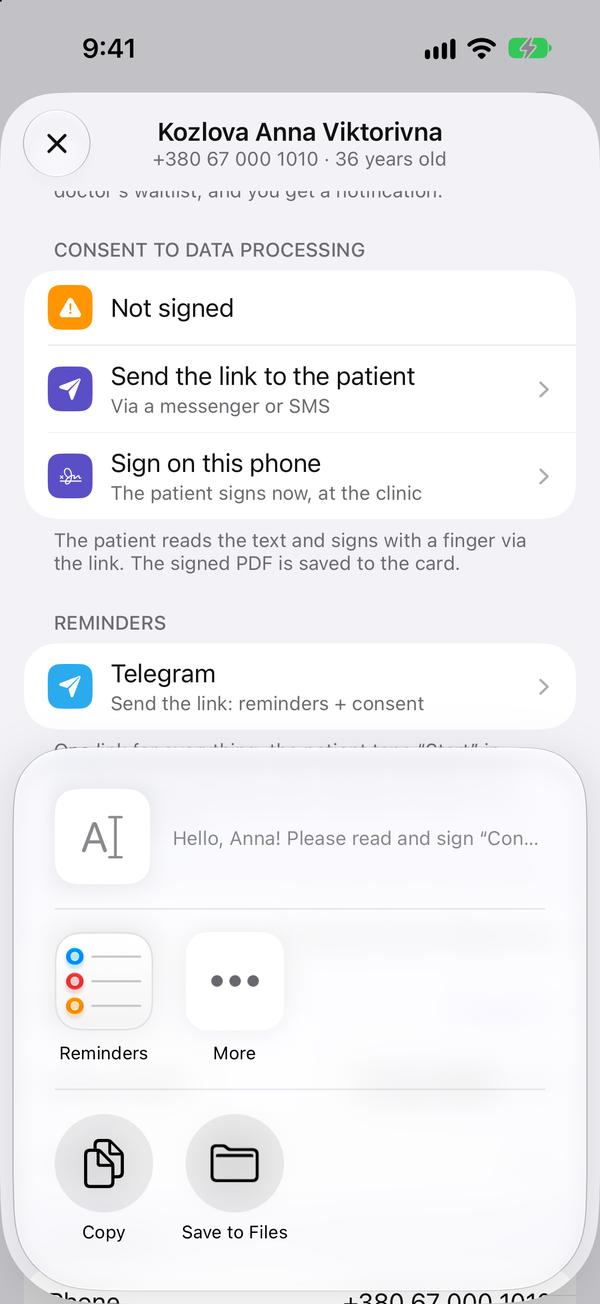
  1. Patient record → "Reminders" → "Telegram: Not connected". Tap it and the "Share" sheet opens.

    Patient record → "Reminders" → "Telegram: Not connected". Tap it and the "Share" sheet opens.
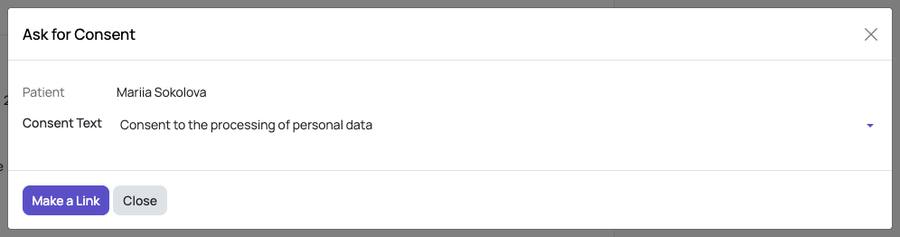
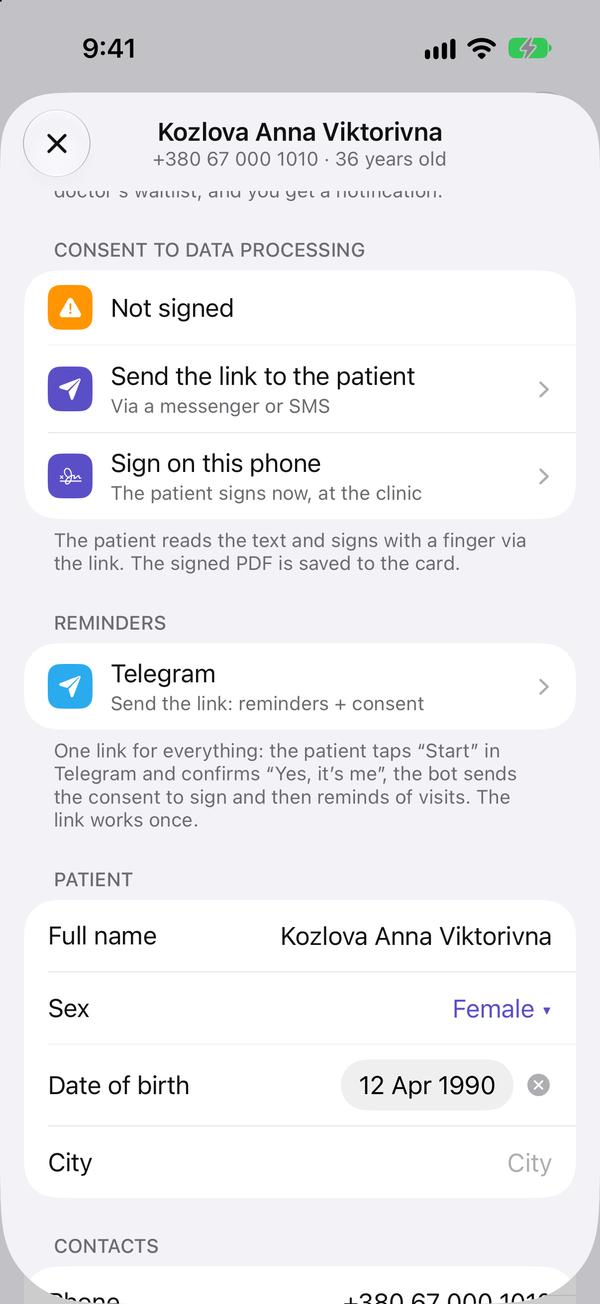
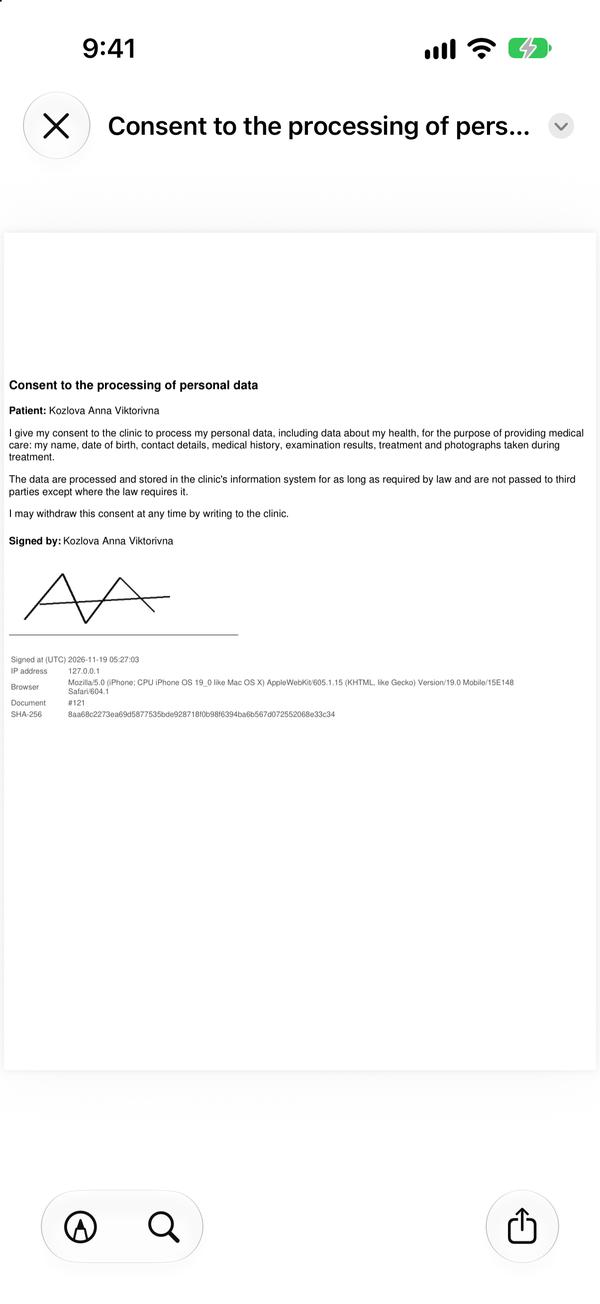
  2. Send the link to the patient (WhatsApp, Telegram, SMS). They open it in Telegram and tap "Start", and the record changes to "Connected". If the consent isn't signed yet, the bot sends it straight away with a "Read and sign" button: two jobs done with one link.

    Send the link to the patient (WhatsApp, Telegram, SMS). They open it in Telegram and tap "Start", and the record changes to "Connected". If the consent isn't signed yet, the bot sends it straight away
  3. During the day before the visit, the bot sends the patient a reminder: date, time, doctor, address and the "I'll come" and "Reschedule" buttons.

  4. The answer shows in the visit: "Patient confirmed: will come" or "Patient asks to reschedule". On "Reschedule" the doctor and administrator get a "Reschedule visit" assignment: call the patient.

    The answer shows in the visit: "Patient confirmed: will come" or "Patient asks to reschedule". On "Reschedule" the doctor and administrator get a "Reschedule visit" assignment: call the patient.

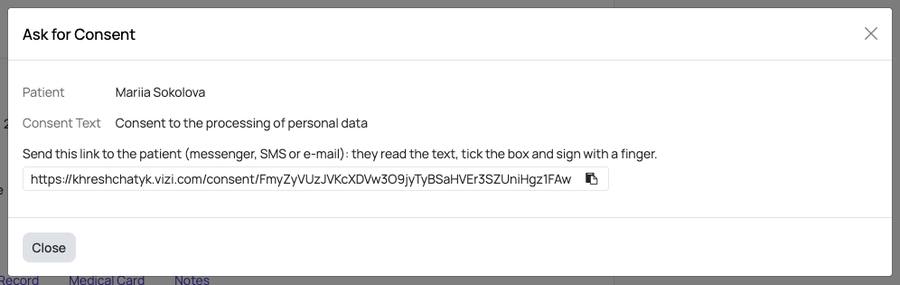
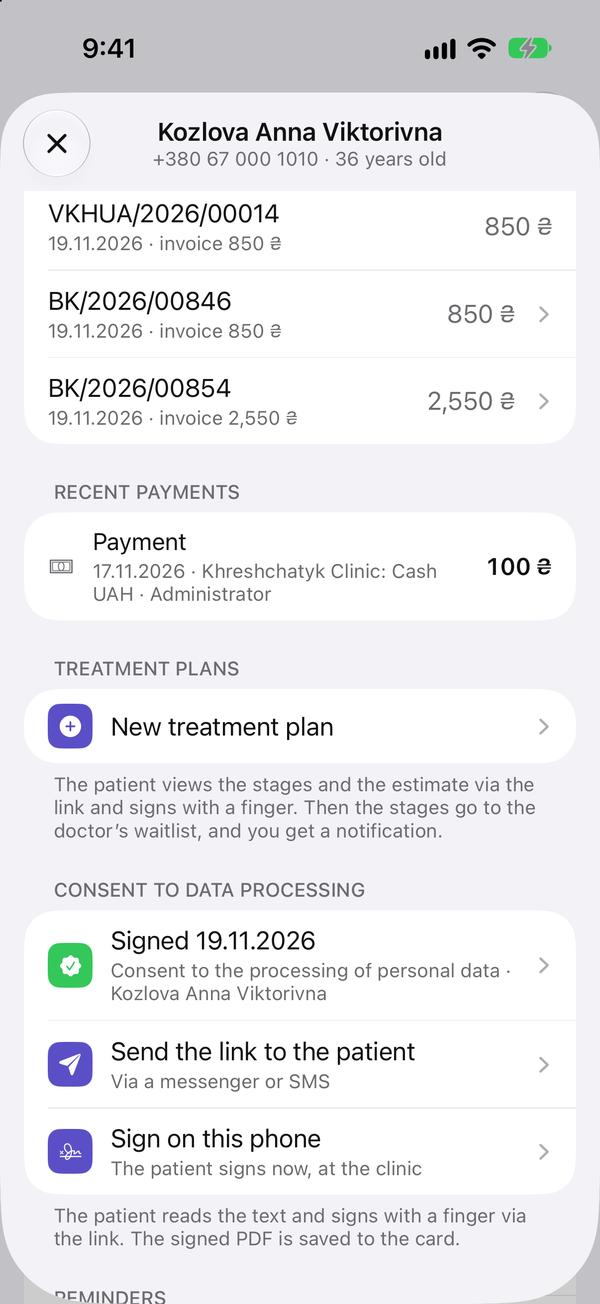
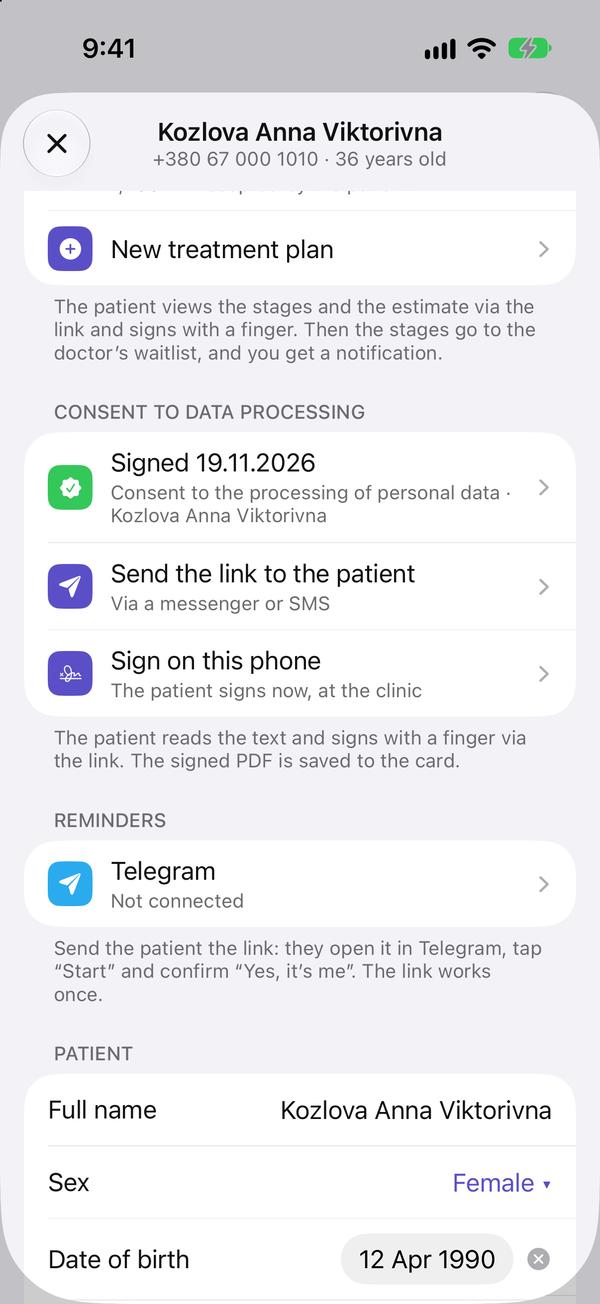
Only for patients with Telegram. For the rest, use "Send the link to the patient" in the "Consent" block; their reminders come by SMS.

If they answered in Telegram, no SMS reminder is sent. No answer within 3 hours, and the SMS goes out.

In the bot the patient has a "📅 My next visit" button: date, time, doctor, address and "I'll come" / "Reschedule". If there are no bookings, the button is "Ask to book".

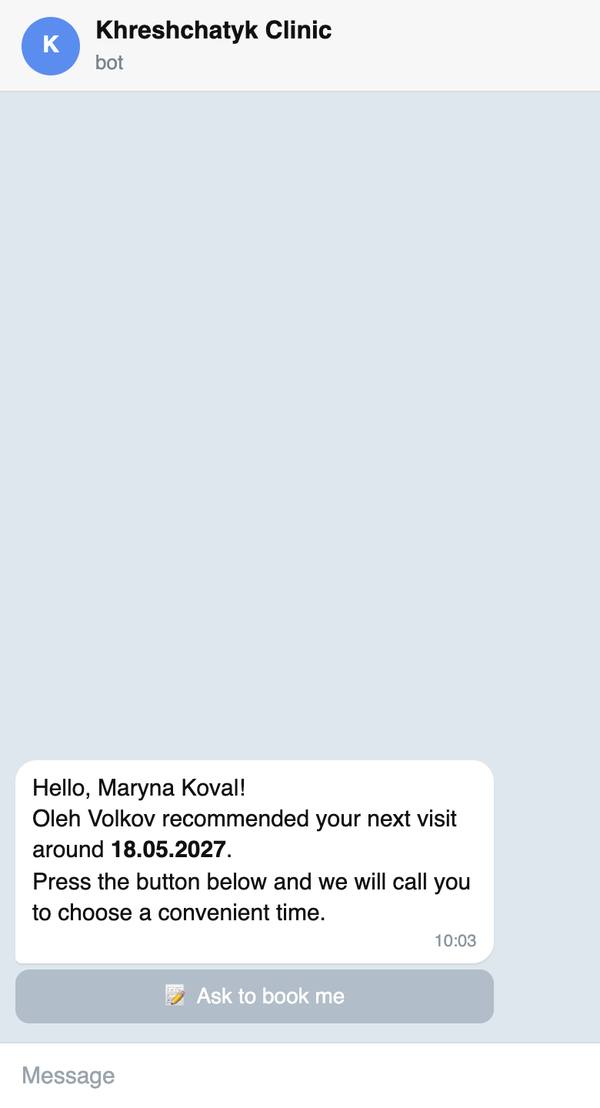
If you set a "recommended next visit" in a visit, a week before that date the bot writes to the patient and offers "Ask to book". If they tap it, the administrators are added to your "Book the patient" assignment.

The link works only once: each patient gets their own.

If you reschedule a visit, the reminder comes again for the new time.

↑ To the top

Tasks and assignments

Assign to a colleague, complete a task, discuss

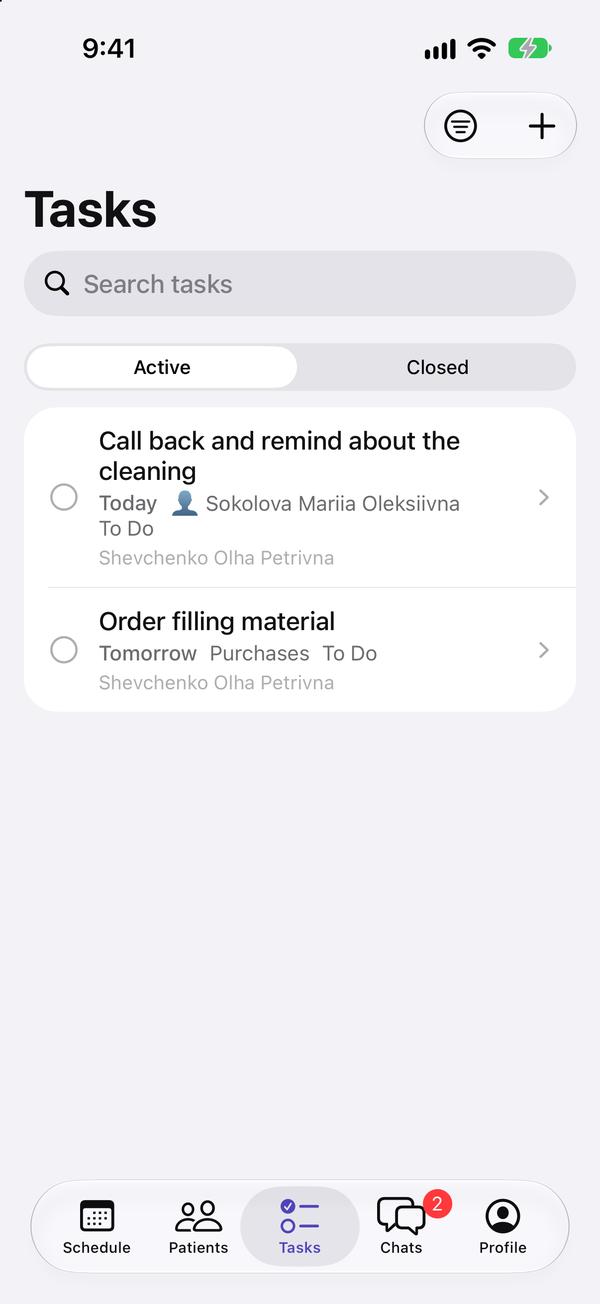
  1. The "Tasks" tab holds your tasks and patient assignments. The deadline, project and stage are shown in the list.

    The "Tasks" tab holds your tasks and patient assignments. The deadline, project and stage are shown in the list.
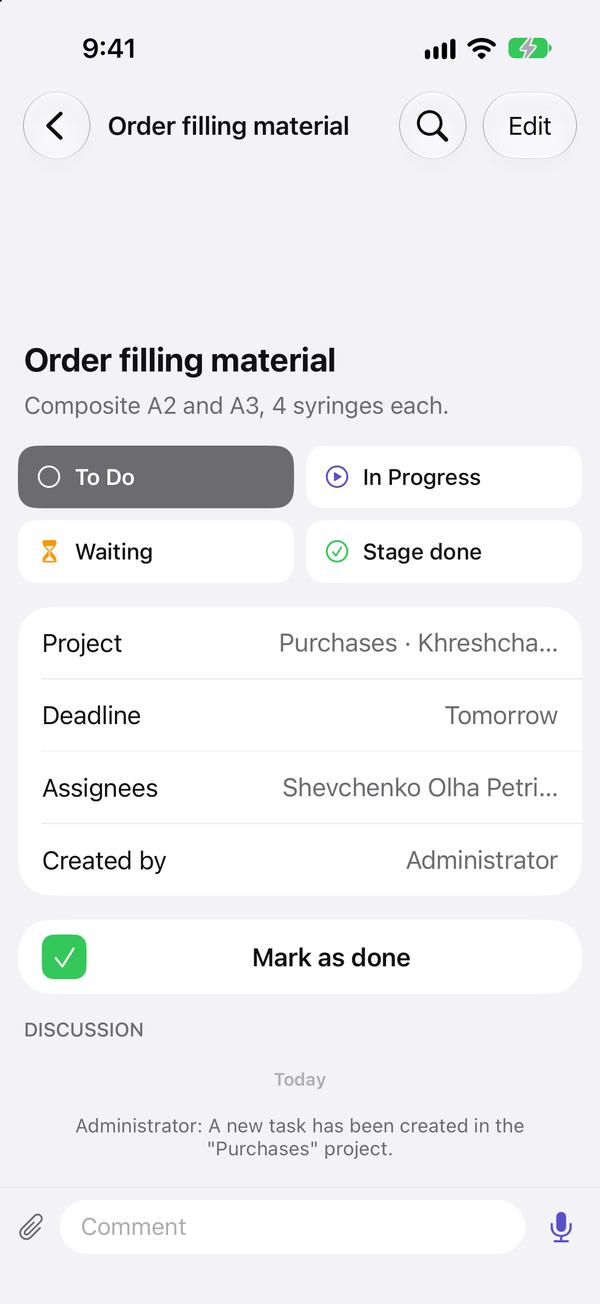
  2. Open a task: the description, assignees and deadline are at the top, the discussion below. When it's done, tap "Mark as done".

    Open a task: the description, assignees and deadline are at the top, the discussion below. When it's done, tap "Mark as done".
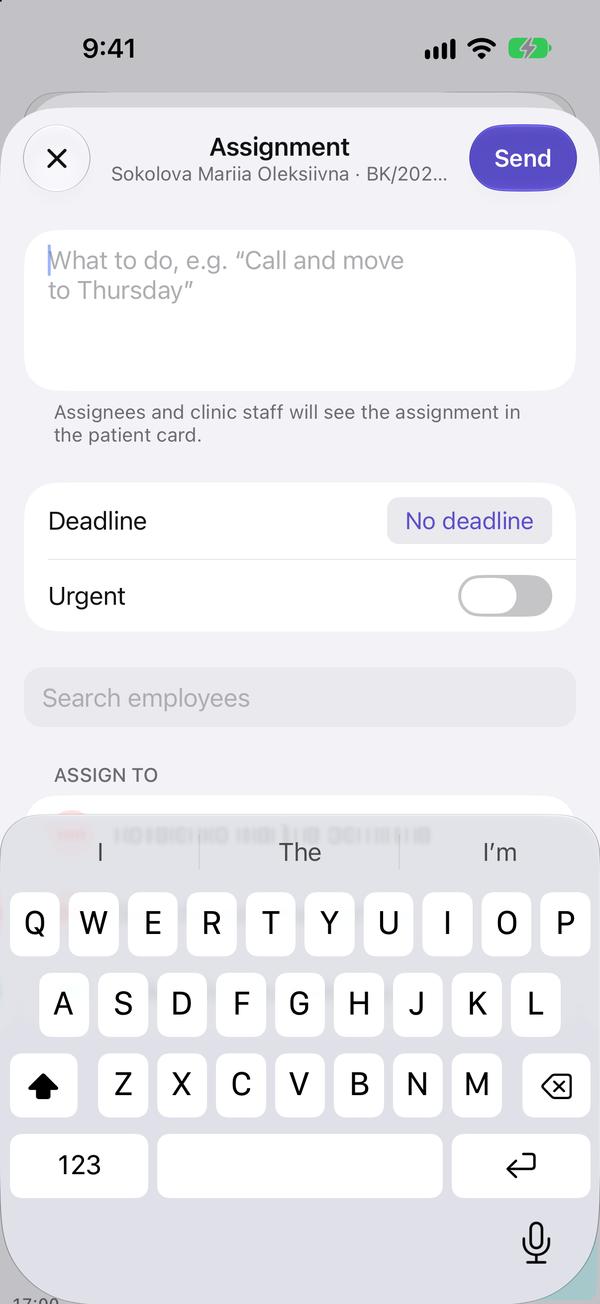
  3. To assign something about a patient or visit to a colleague, tap "Assign to a colleague" in the patient or visit record. Write what to do, choose the deadline and who, and tap "Send".

    To assign something about a patient or visit to a colleague, tap "Assign to a colleague" in the patient or visit record. Write what to do, choose the deadline and who, and tap "Send".

The assignee gets a notification right away, and all clinic staff see the assignment in the patient's record.

A task discussion works just like chats: replies, reactions, @mentions, pins and search.

Set a "Next visit" in a visit? A week before that date, you and the attending doctor get a "Book the patient" assignment if the patient isn't booked yet.

↑ To the top

Chats

Replies, reactions, @mentions, pins and search

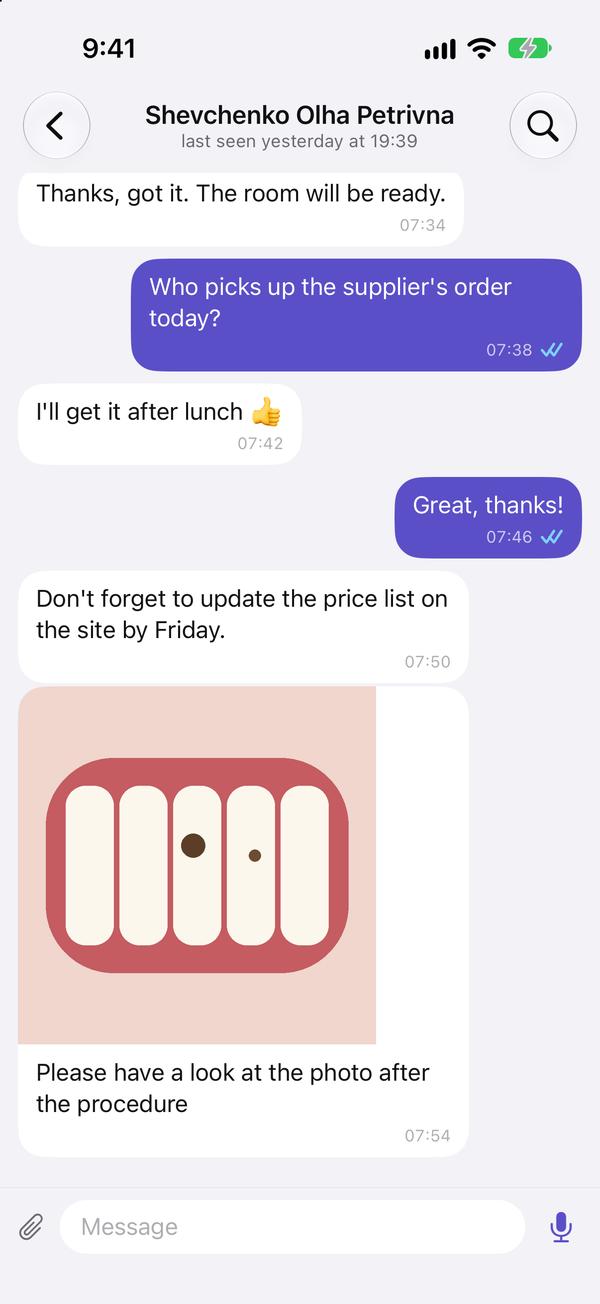
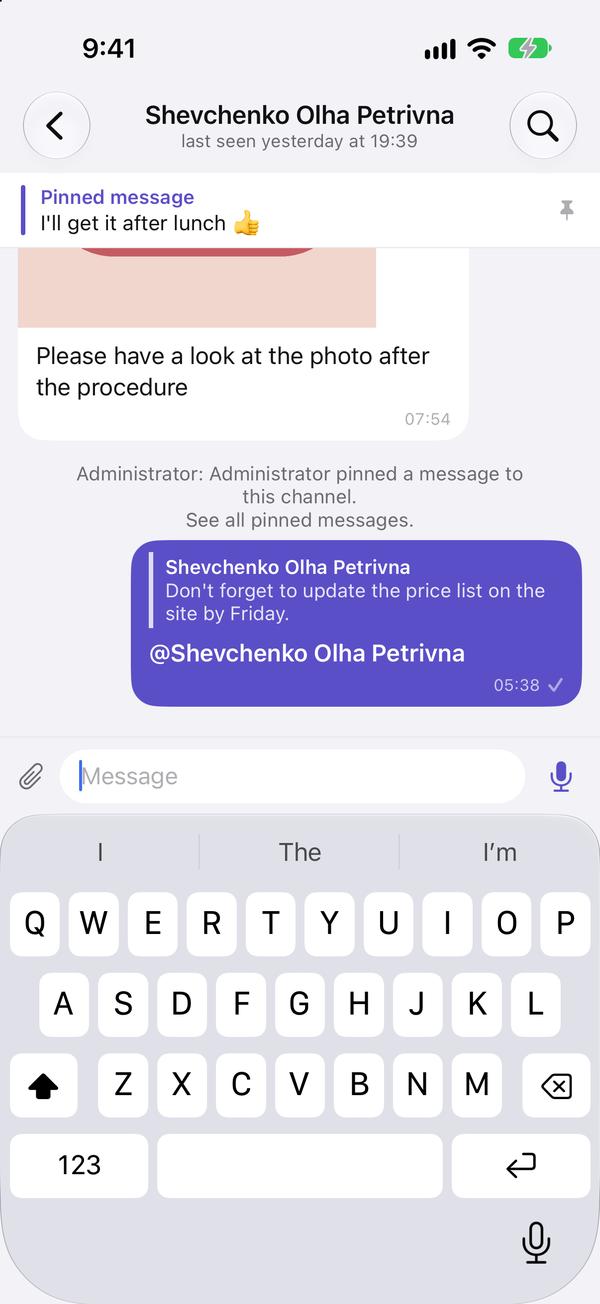
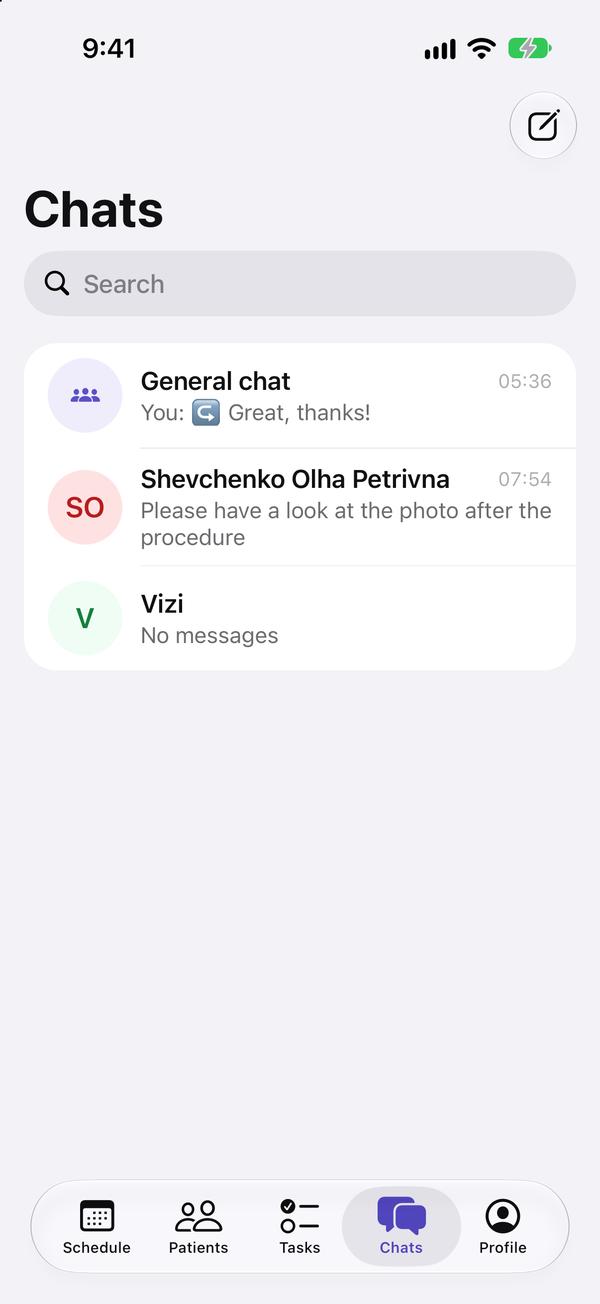
  1. The "Chats" tab holds direct messages and groups. To start a new chat, tap the pencil button at the top.

    The "Chats" tab holds direct messages and groups. To start a new chat, tap the pencil button at the top.
  2. Open a chat and type at the bottom. The paperclip attaches a photo.

    Open a chat and type at the bottom. The paperclip attaches a photo.
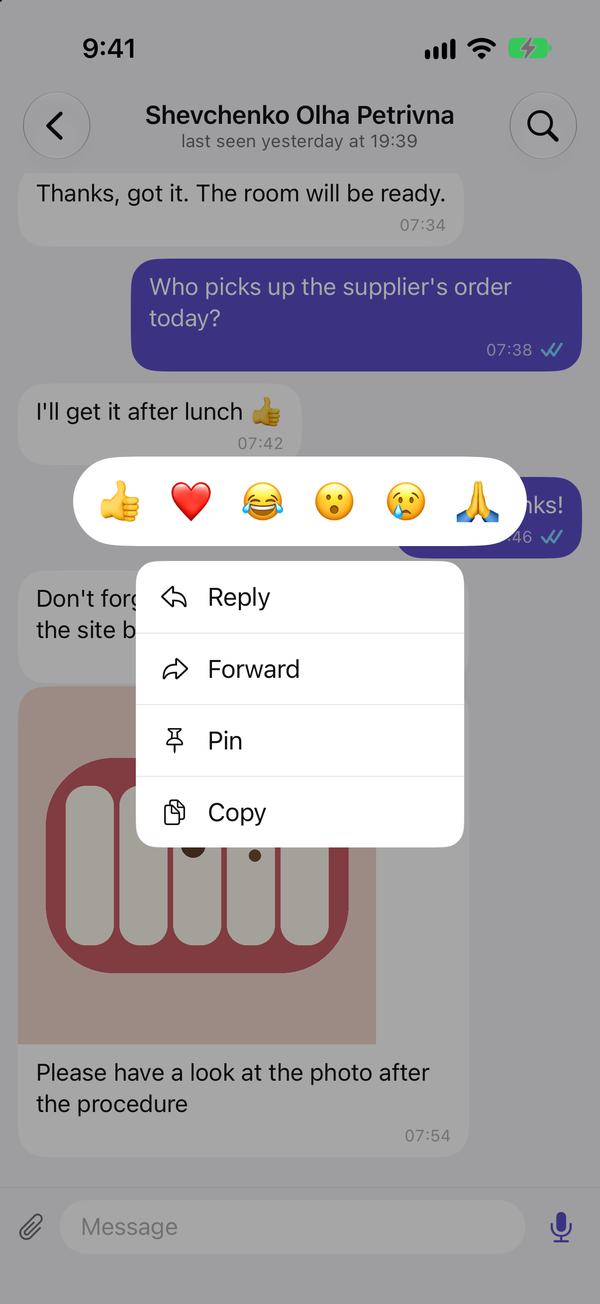
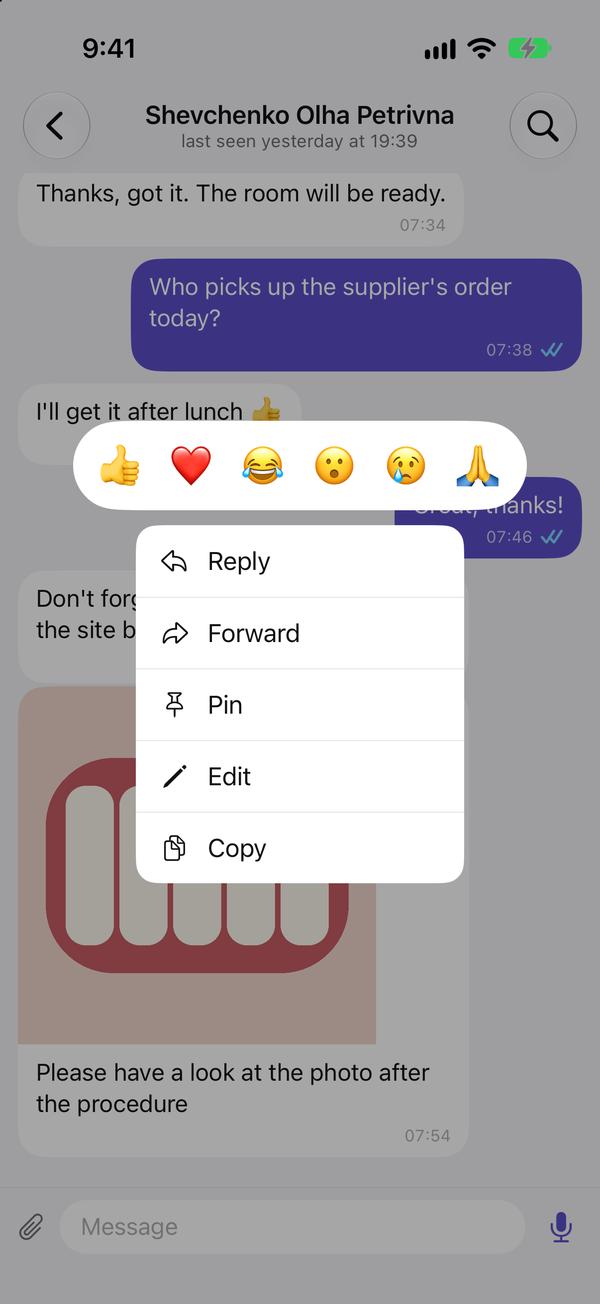
  3. Touch and hold a message: reactions appear along with the "Reply", "Pin" and "Copy" menu. Your own messages also have "Edit" there.

    Touch and hold a message: reactions appear along with the "Reply", "Pin" and "Copy" menu. Your own messages also have "Edit" there.
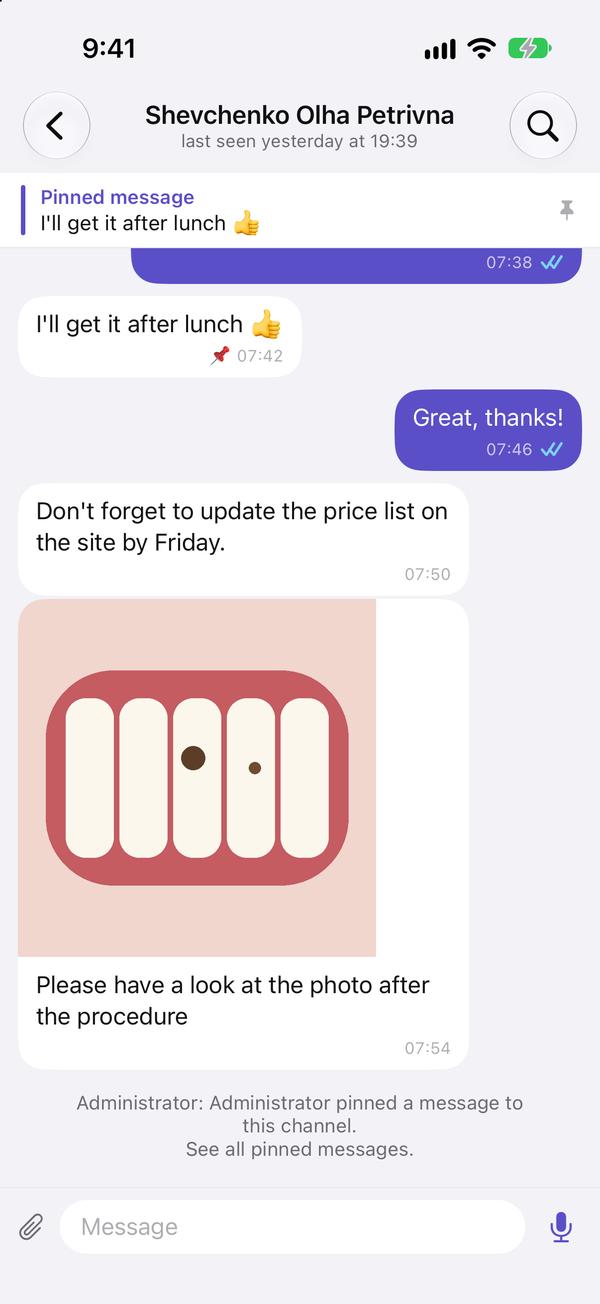
  4. A pinned message is visible to everyone at the top of the chat. Tap the banner to jump to it.

    A pinned message is visible to everyone at the top of the chat. Tap the banner to jump to it.
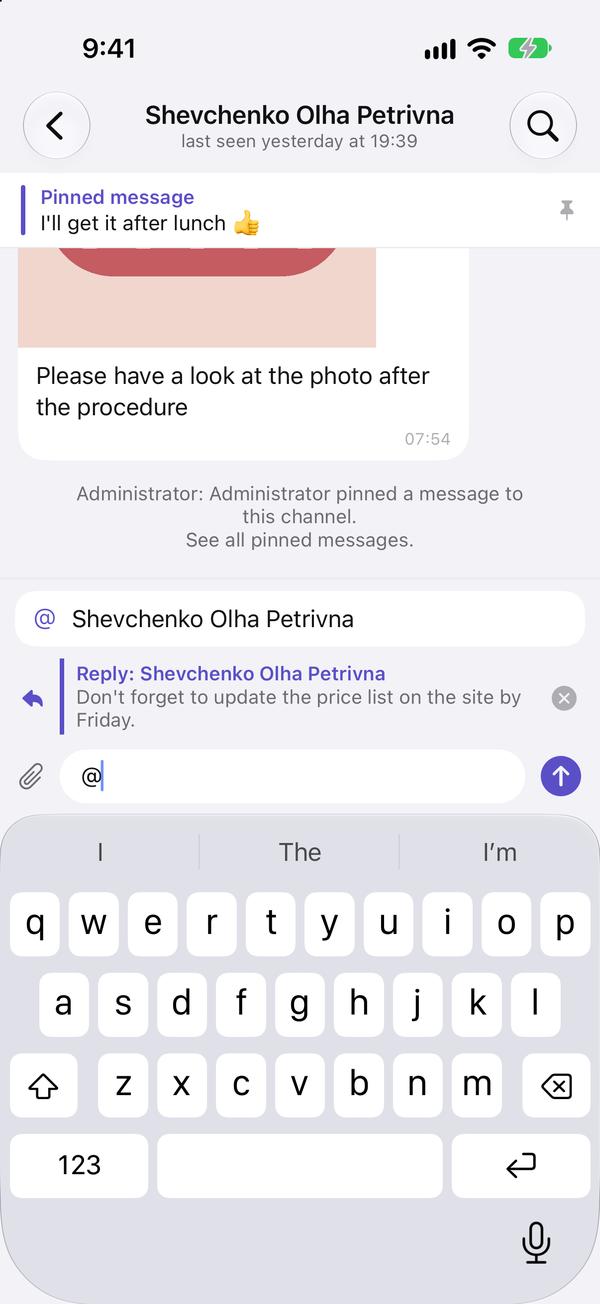
  5. To reply, swipe a message to the left. To call in a colleague, type "@" and choose them: they get a notification.

    To reply, swipe a message to the left. To call in a colleague, type "@" and choose them: they get a notification.
  6. A reply shows a quote, and a mention is highlighted.

    A reply shows a quote, and a mention is highlighted.
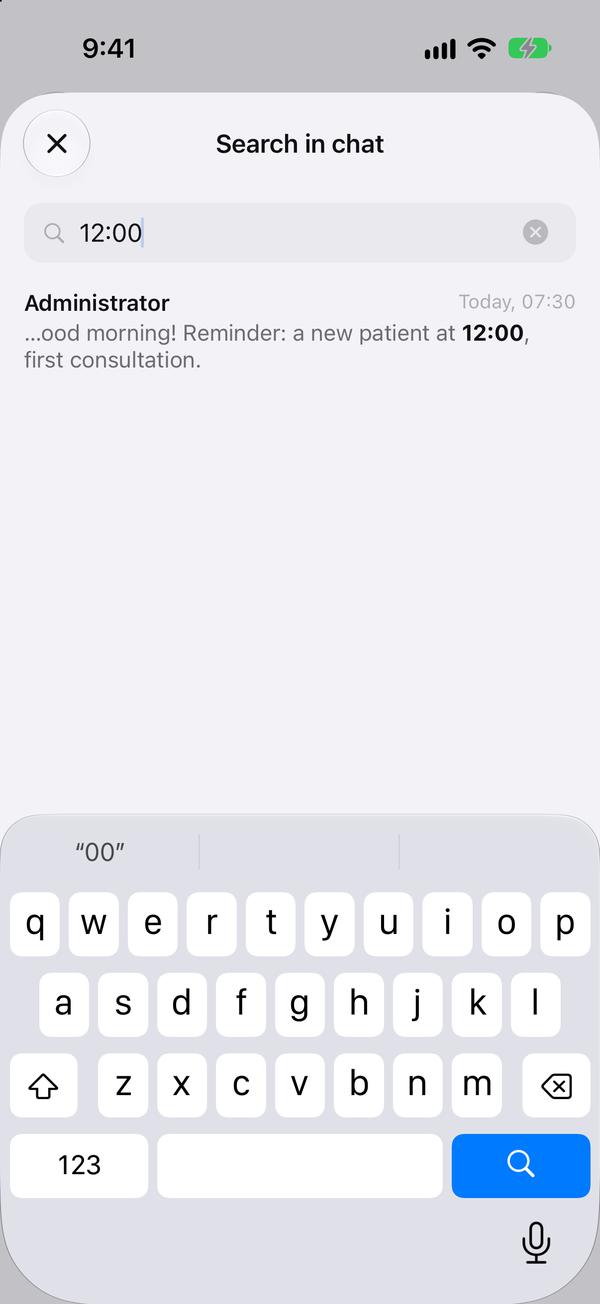
  7. The magnifier at the top searches the chat's messages. Tap a result and the chat scrolls to it.

    The magnifier at the top searches the chat's messages. Tap a result and the chat scrolls to it.

A patient or visit record can be sent to a chat with the "Send to chat" button: a colleague opens it with one tap.

To fix your message, hold it → "Edit", correct the text and tap the tick. The message gets an "edited" mark, and colleagues see the new text.

↑ To the top

Voice messages, forwarding and statuses

Voice messages, "Forward", ticks and "online"

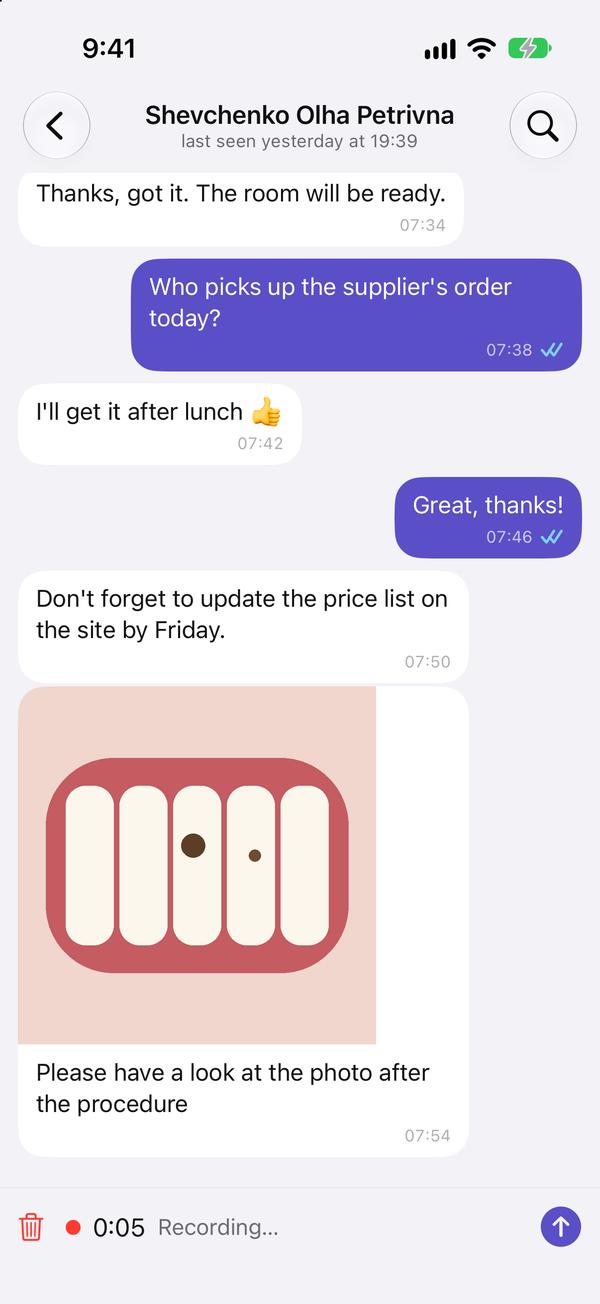
  1. Voice message: when nothing is typed in the field, there is a microphone on the right. Tap it to record; the arrow sends, the bin deletes.

    Voice message: when nothing is typed in the field, there is a microphone on the right. Tap it to record; the arrow sends, the bin deletes.
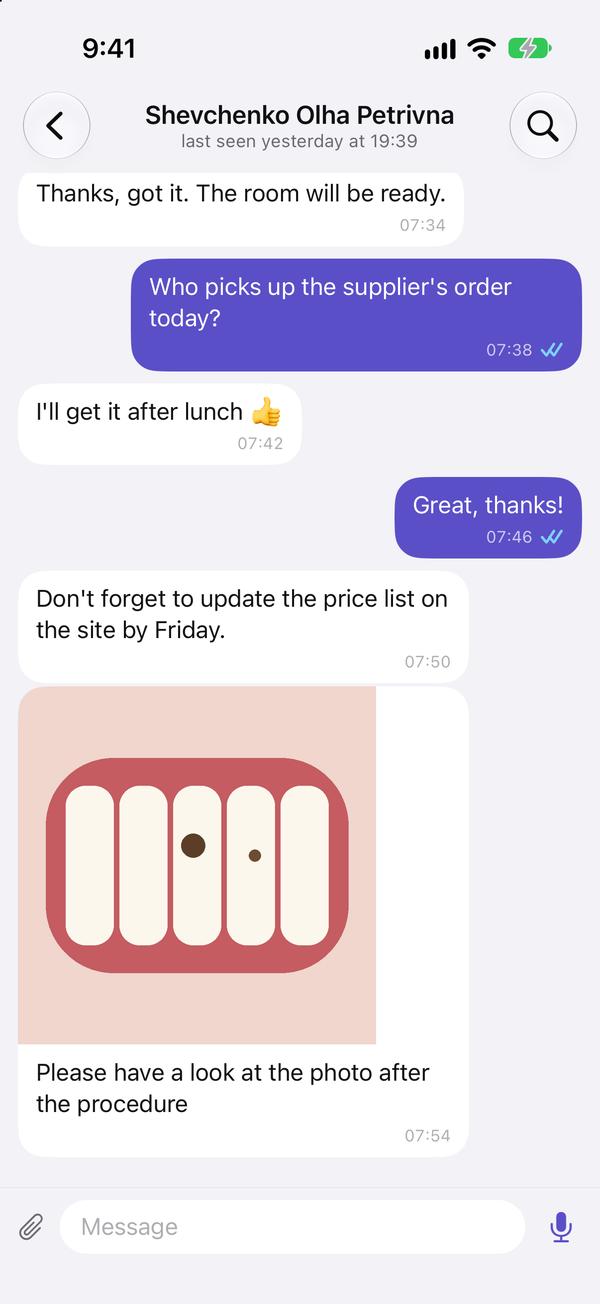
  2. Under the other person's name you see "online" or "last seen …". Ticks: one means sent, two grey ones delivered, two blue ones read.

    Under the other person's name you see "online" or "last seen …". Ticks: one means sent, two grey ones delivered, two blue ones read.
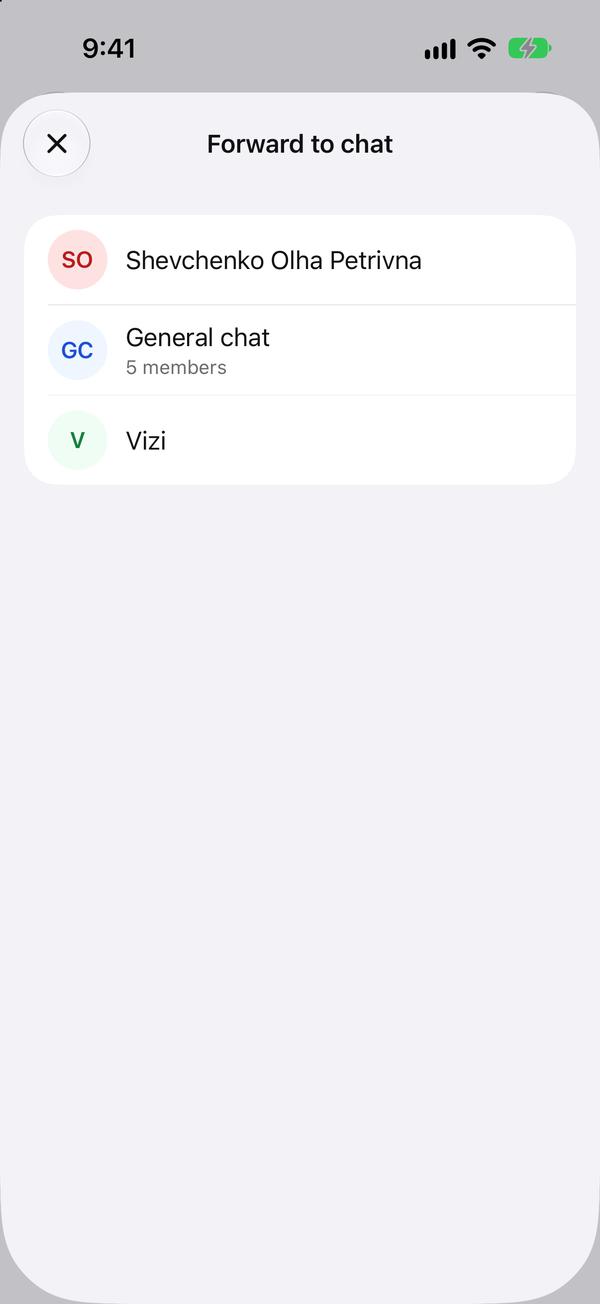
  3. To forward a message (from a chat or a task), hold it → "Forward".

    To forward a message (from a chat or a task), hold it → "Forward".
  4. Choose a chat and the message goes there along with its photos and records.

    Choose a chat and the message goes there along with its photos and records.
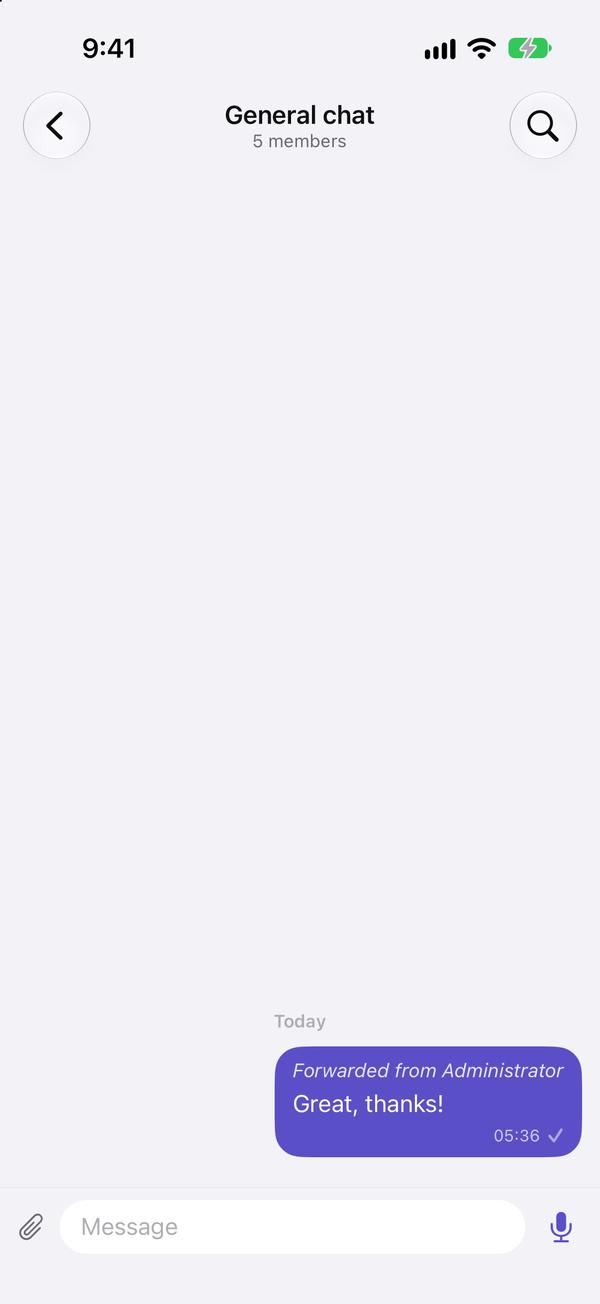
  5. In the chat it is labelled "Forwarded from …" with the author's name.

    In the chat it is labelled "Forwarded from …" with the author's name.
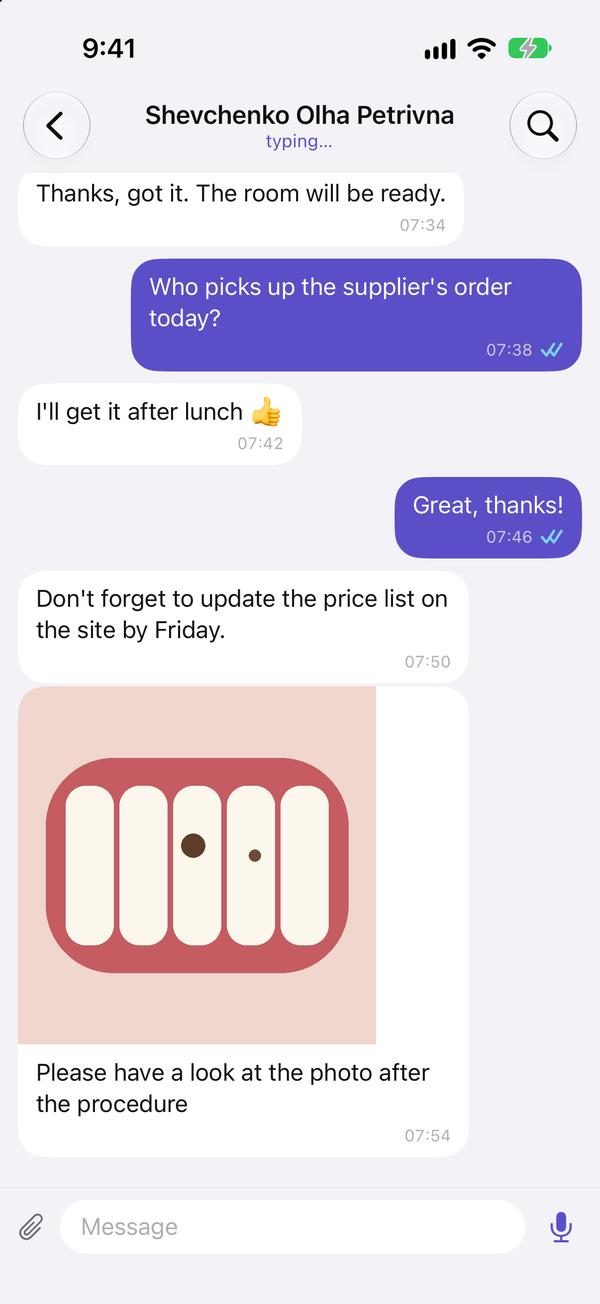
  6. When a colleague is typing, "typing…" shows under the chat name.

    When a colleague is typing, "typing…" shows under the chat name.
↑ To the top

Photo markup and pasting screenshots

Circle, highlight, point with an arrow, and straight to the chat

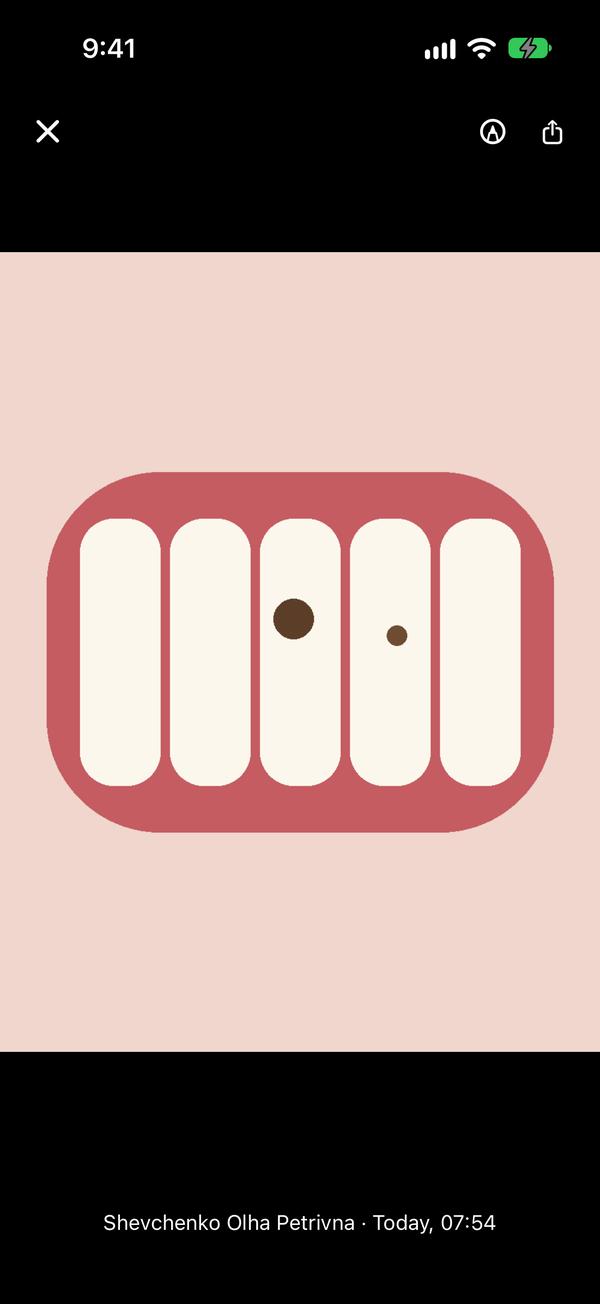
  1. Open a photo in the chat and tap the pencil at the top.

    Open a photo in the chat and tap the pencil at the top.
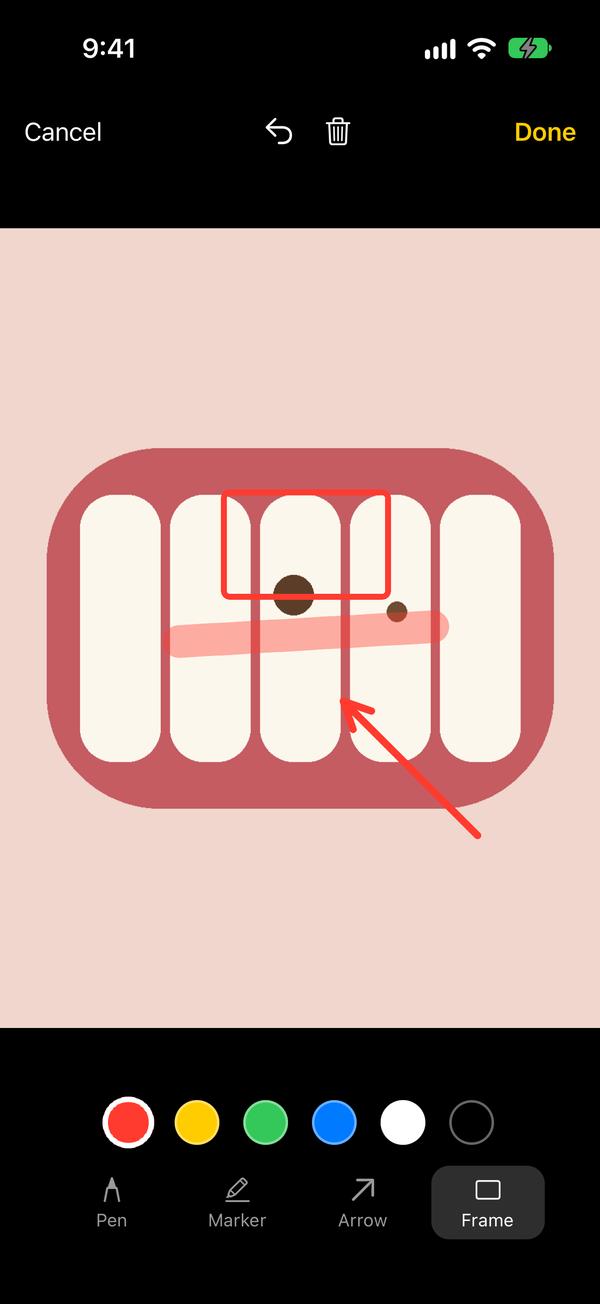
  2. At the bottom, choose a colour and a tool: pen, marker (semi-transparent, for highlighting), arrow, frame. The arrow at the top undoes the last mark, the bin clears everything. Then tap "Done".

    At the bottom, choose a colour and a tool: pen, marker (semi-transparent, for highlighting), arrow, frame. The arrow at the top undoes the last mark, the bin clears everything. Then tap "Done".
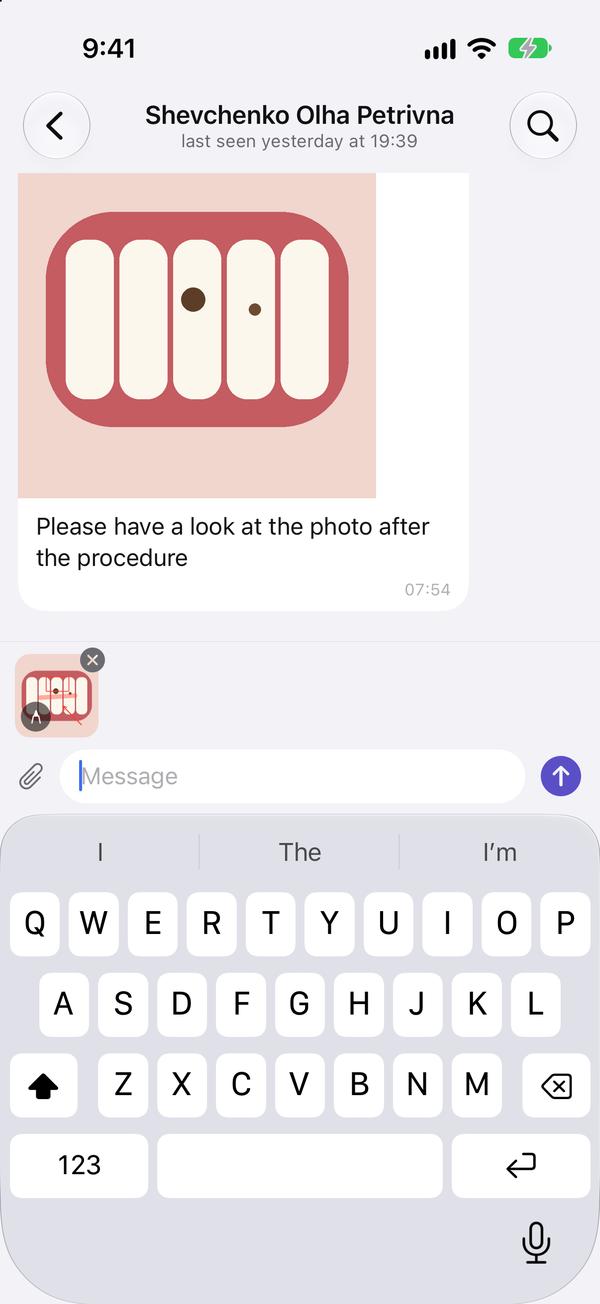
  3. The marked-up photo goes into the message field: add some text and send.

    The marked-up photo goes into the message field: add some text and send.
  4. Screenshot: in Photos tap "Copy" (or "Copy and Delete"), go back to the chat, and "Copied photo" → "Paste" appears above the field.

You can also mark up a photo before sending: tap its thumbnail above the input field.

The same is in the paperclip menu: "Paste copied photo".

The iPhone may ask "Allow Paste?": tap "Allow" (or once and for all: Settings → Vizi → Paste from Other Apps → Allow).

↑ To the top

The Telegram bot for patients

Connecting to the bot

The patient gets a link and confirms it is them

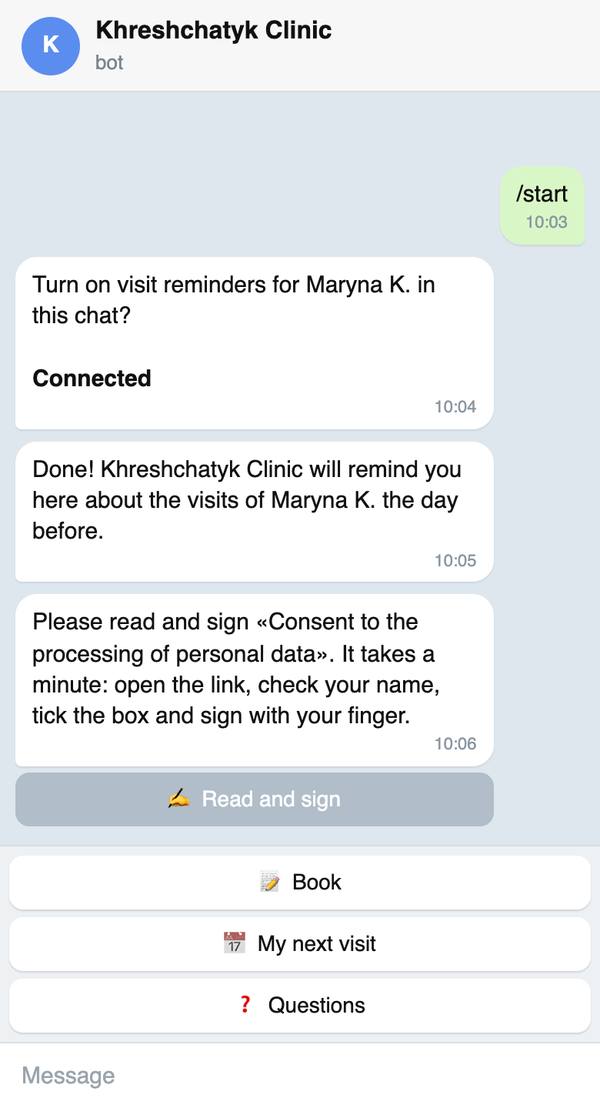
  1. On the patient's card press «Telegram» (in the web or the app): the bot's link and a QR code. Send the link in a message or let the patient scan the code.

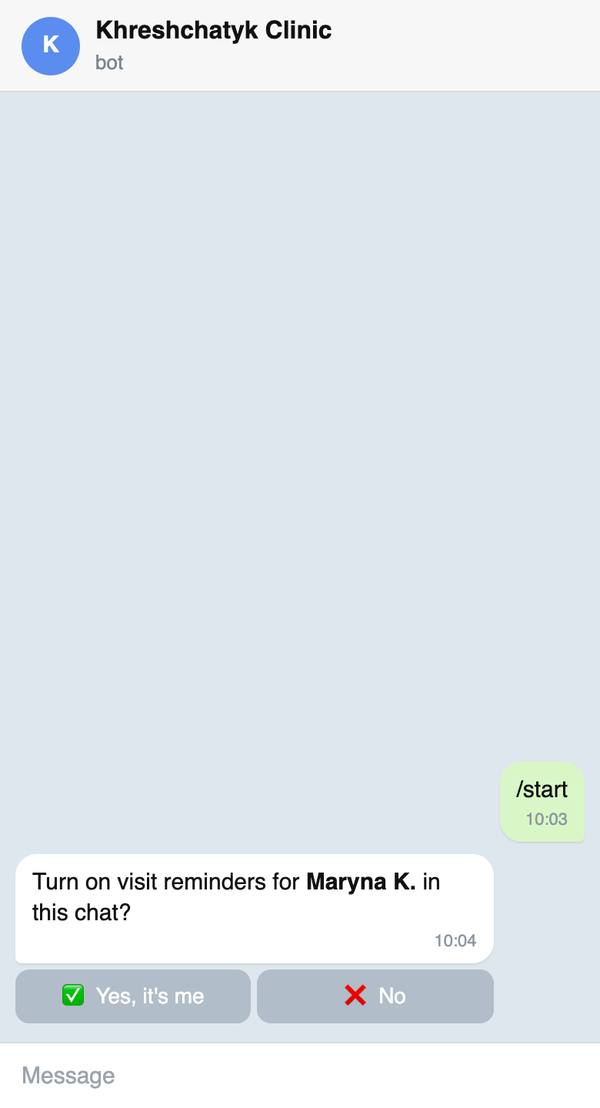
  2. The patient opens the link: Telegram opens your bot. They press the start button at the bottom of the chat, and the bot asks whether this person's reminders should come to this chat.

    The patient opens the link: Telegram opens your bot. They press the start button at the bottom of the chat, and the bot asks whether this person's reminders should come to this chat.
  3. «Yes, it's me»: the bot confirms it and shows its menu under the input field. If the patient has not signed the consent yet, the bot sends it at once with «Read and sign»: they read it and sign with a finger on the phone, and the bot thanks them.

    «Yes, it's me»: the bot confirms it and shows its menu under the input field. If the patient has not signed the consent yet, the bot sends it at once with «Read and sign»: they read it and sign with a
  4. «No»: nothing is connected, and the patient's card notes that the link was opened by someone else. The link keeps working.

The link works once: a forwarded link cannot connect anyone else.

One chat can get the reminders of several people, e.g. a parent and the children: open each one's link in the same chat.

The card shows whose Telegram account gets the reminders and since when.

↑ To the top

Visit reminders

The day before, with «I'll come» and «Reschedule»

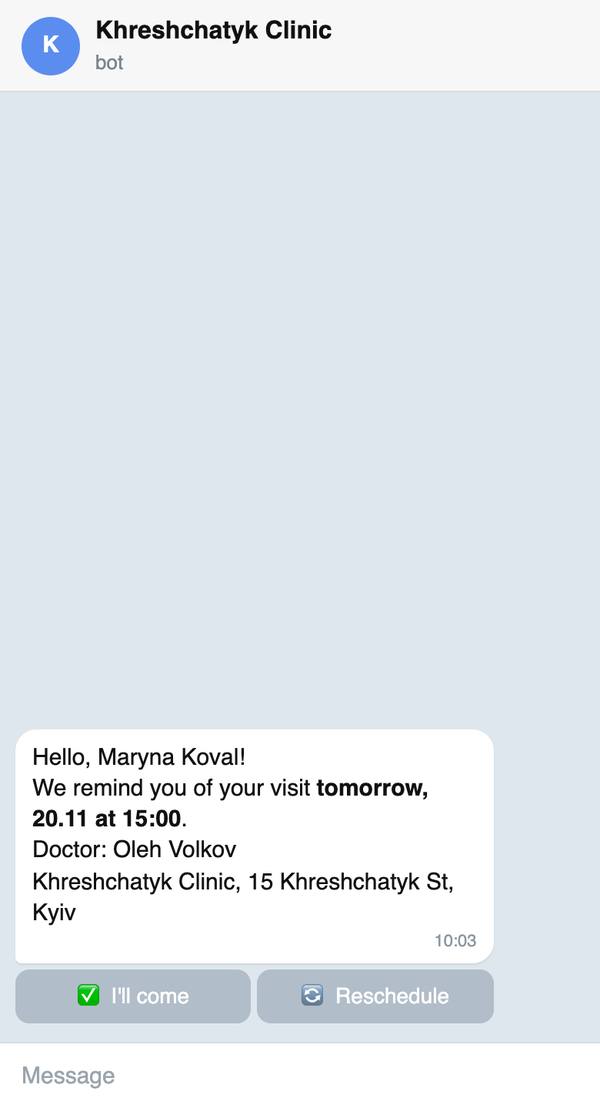
  1. The day before the visit, in the daytime, the bot sends a reminder: the date and time, the doctor, the address, and the buttons «I'll come» and «Reschedule».

    The day before the visit, in the daytime, the bot sends a reminder: the date and time, the doctor, the address, and the buttons «I'll come» and «Reschedule».
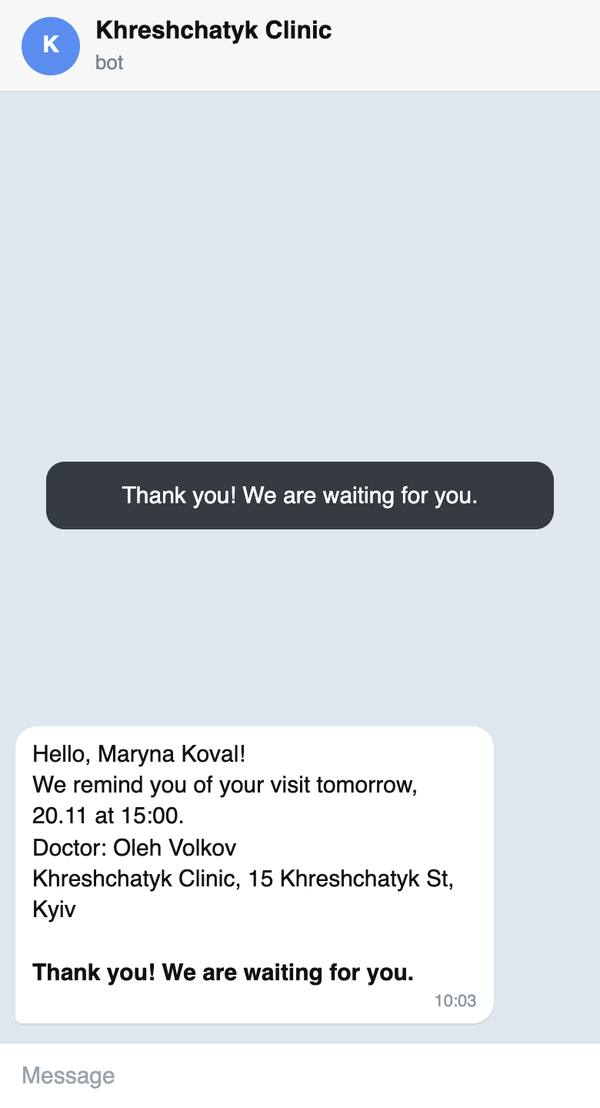
  2. «I'll come»: the bot thanks them, and the visit shows that it is confirmed.

    «I'll come»: the bot thanks them, and the visit shows that it is confirmed.
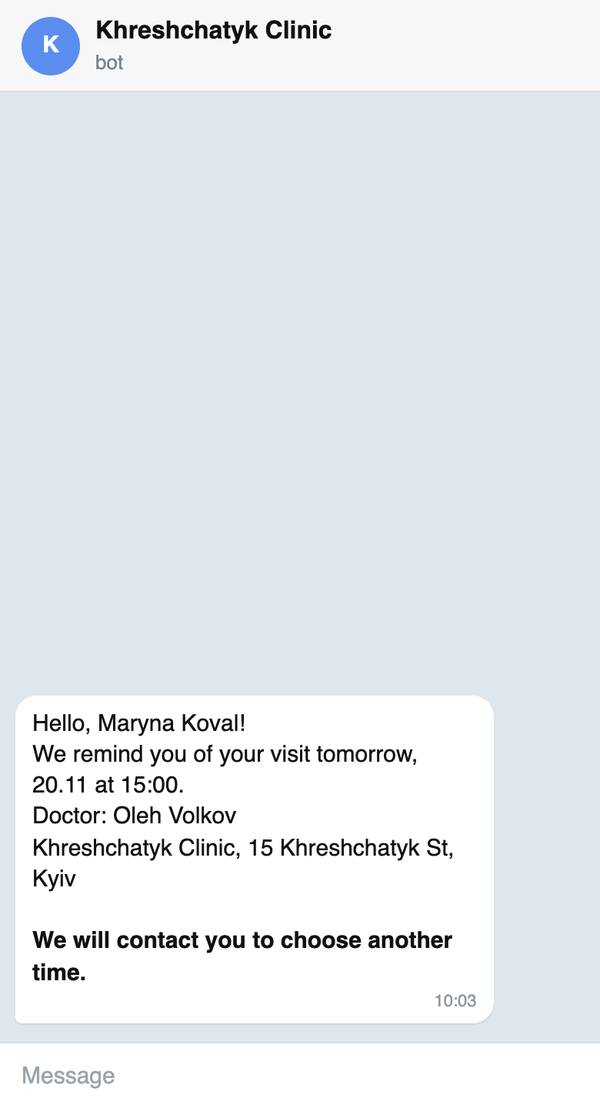
  3. «Reschedule»: if patients may move their visits themselves, the bot offers free days and times (see «Moving a visit»). Otherwise, or when the visit is too close, the bot answers that you will call, and the doctor and the branch's administrators get an assignment to call the patient.

    «Reschedule»: if patients may move their visits themselves, the bot offers free days and times (see «Moving a visit»). Otherwise, or when the visit is too close, the bot answers that you will call, an

«Configuration → General Settings» → Telegram: «Reminders From (hour)» and «Reminders Until (hour)» (10 and 21 by default, the branch's time). Nobody gets a message at night.

A visit booked online that the branch has not confirmed yet gets no reminder.

A moved visit gets a new reminder for its new day.

With SMS reminders on, a patient connected to Telegram gets the SMS only when they have not answered in Telegram: «SMS If Telegram Unanswered For (hours)» (3 by default).

↑ To the top

«My next visit»

When and where the patient is expected

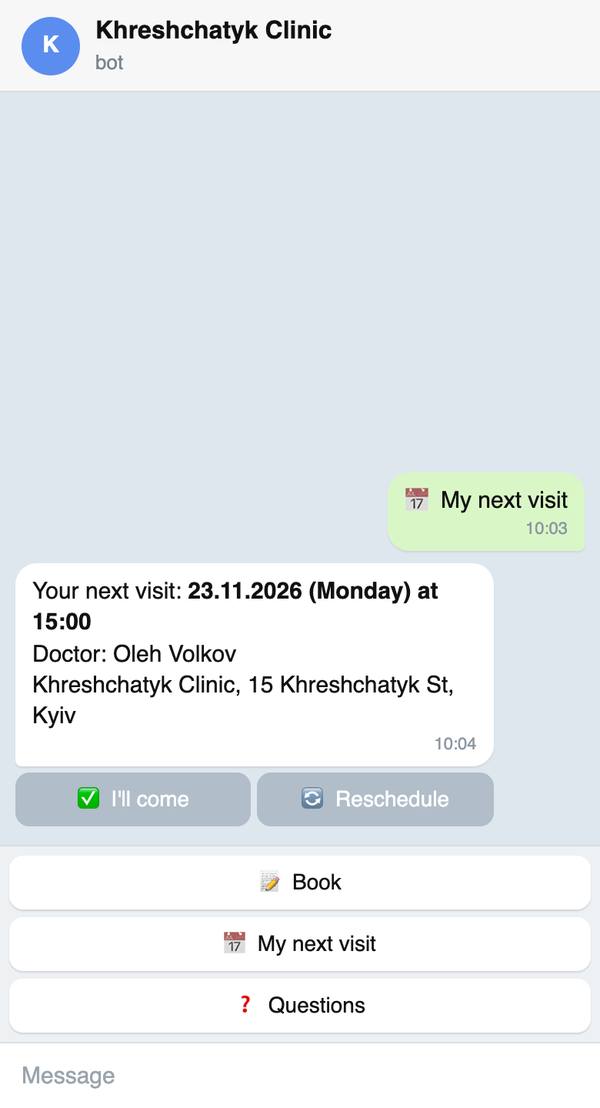
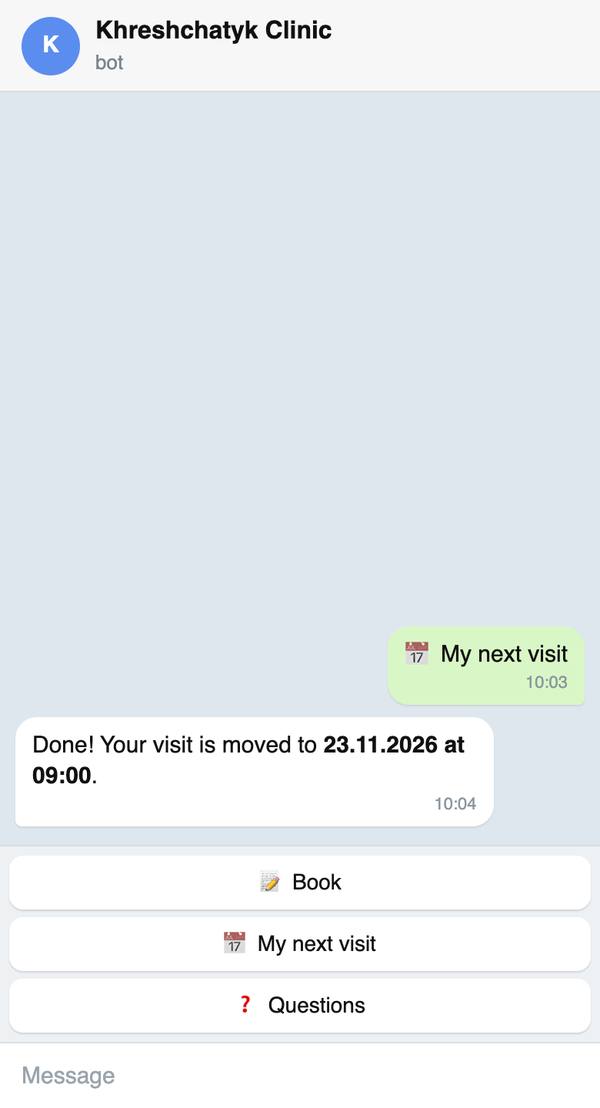
  1. «My next visit» in the bot's menu: the date, the weekday and the time, the doctor and the address, with «I'll come» and «Reschedule» until the patient answers.

    «My next visit» in the bot's menu: the date, the weekday and the time, the doctor and the address, with «I'll come» and «Reschedule» until the patient answers.
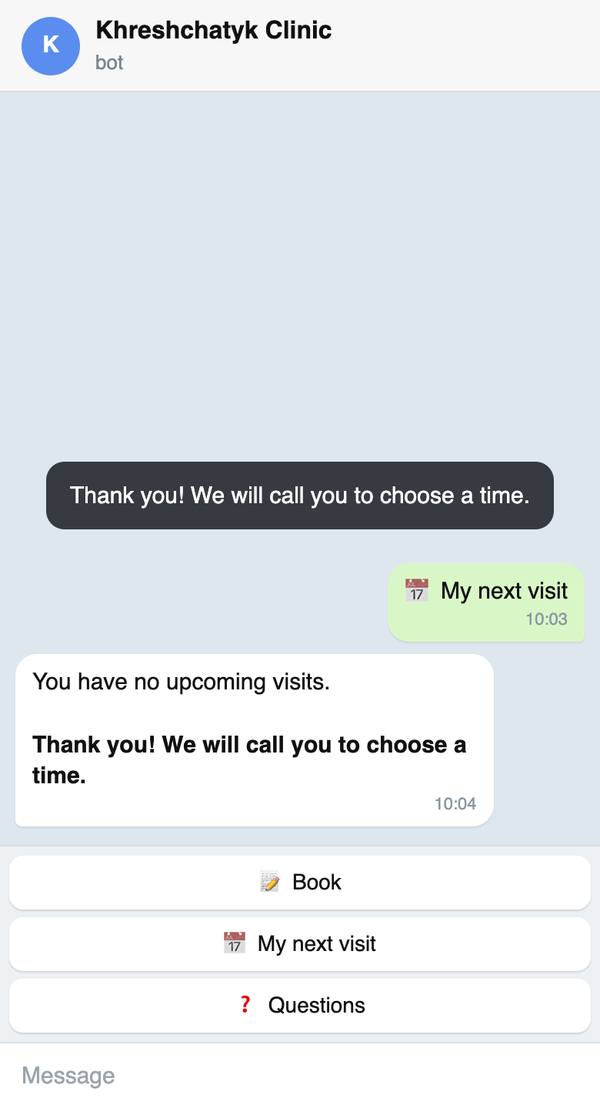
  2. No visit ahead: the bot says so and offers «Ask to book me»: the doctor and the administrators get an assignment to call and choose a time.

    No visit ahead: the bot says so and offers «Ask to book me»: the doctor and the administrators get an assignment to call and choose a time.
↑ To the top

Moving a visit

The patient picks another free time

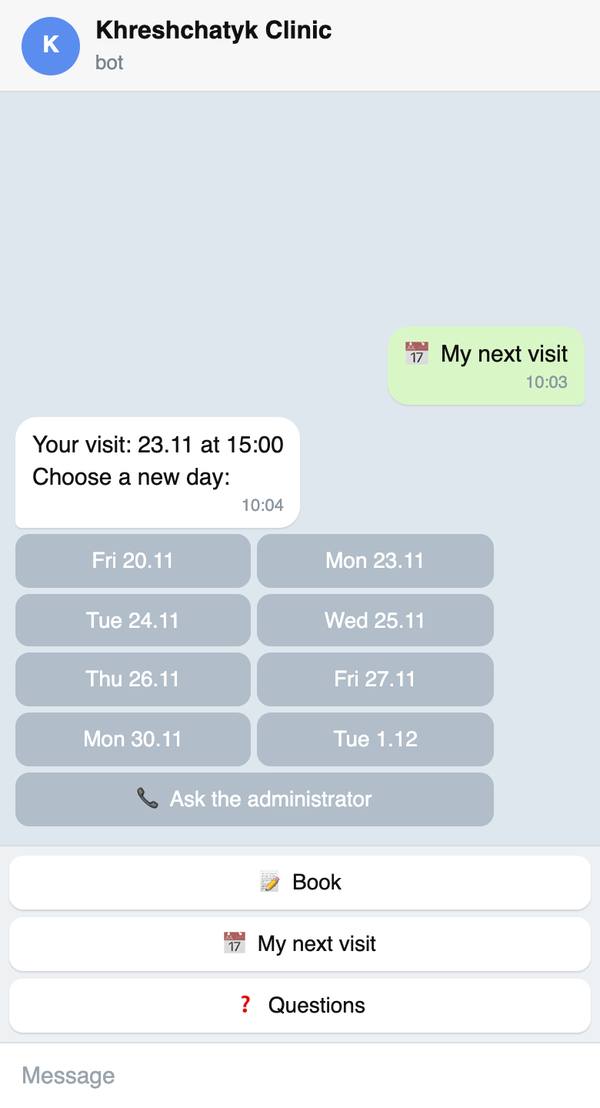
  1. «Reschedule» under a visit: the days of the next three weeks when the same doctor has free time for a visit this long.

    «Reschedule» under a visit: the days of the next three weeks when the same doctor has free time for a visit this long.
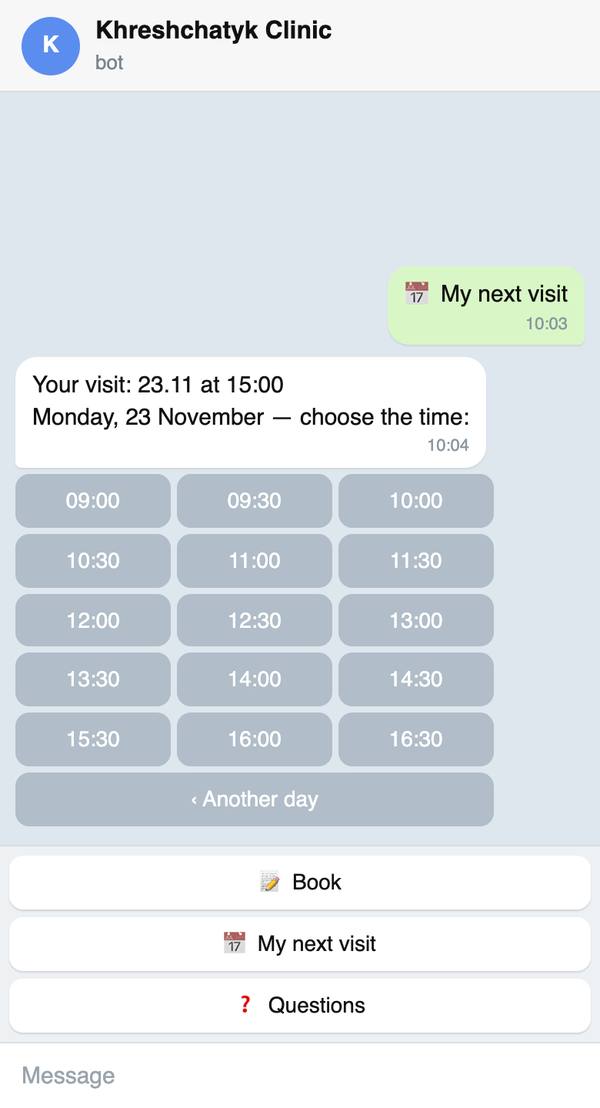
  2. A day: its free times. «Another day» goes back to the days.

    A day: its free times. «Another day» goes back to the days.
  3. A time: the visit moves at once and the bot confirms it. The doctor and the administrators get a notification in the app, and the visit's history keeps the old and the new time.

    A time: the visit moves at once and the bot confirms it. The doctor and the administrators get a notification in the app, and the visit's history keeps the old and the new time.
  4. «Ask the administrator» under the days: the administrator calls instead.

«Configuration → General Settings» → Telegram: «Patients Move Their Visits» and «Moving At Least (hours before)» (24 by default). Closer to the visit the bot passes the request to the administrator.

If someone has just taken that time, the bot says so and offers another day.

↑ To the top

Booking in the bot

A new visit from Telegram

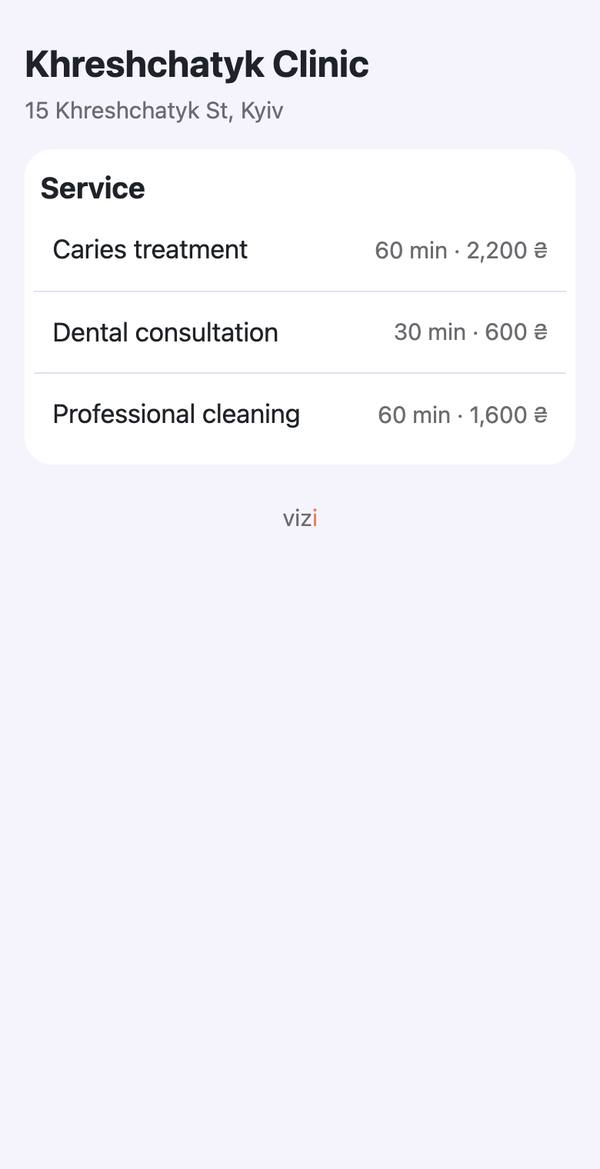
  1. «Book» in the bot's menu opens your online booking page inside Telegram: the service, the doctor and the time. Telegram tells Vizi who the patient is.

    «Book» in the bot's menu opens your online booking page inside Telegram: the service, the doctor and the time. Telegram tells Vizi who the patient is.
  2. After a visit with the next one recommended (e.g. in six months), the bot writes when the doctor recommends coming, with «Ask to book me».

    After a visit with the next one recommended (e.g. in six months), the bot writes when the doctor recommends coming, with «Ask to book me».
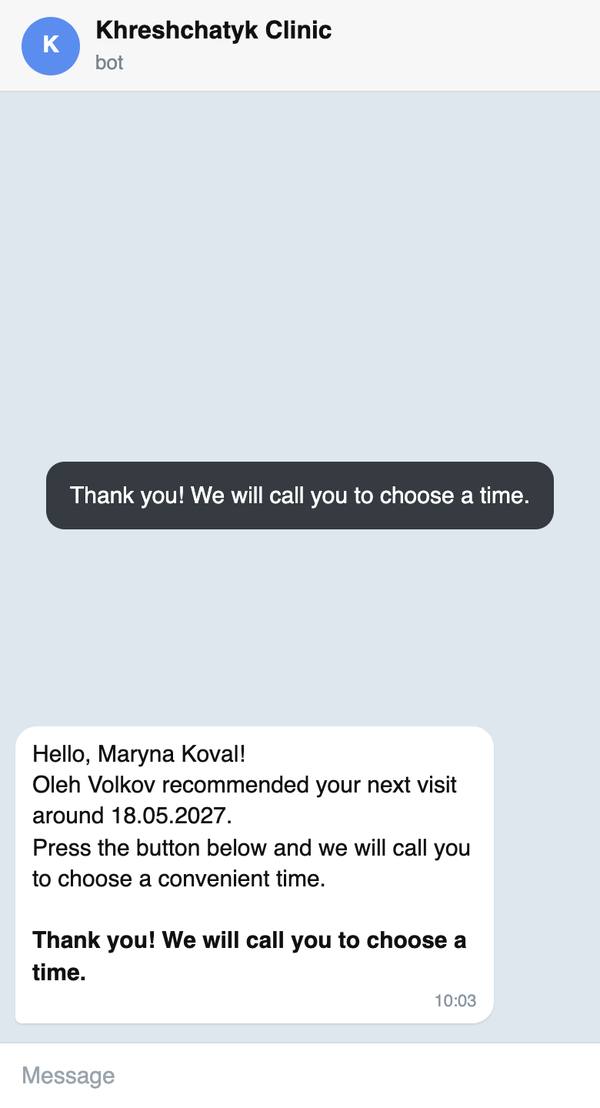
  3. «Ask to book me»: the bot thanks them, and the doctor and the administrators get an assignment to call and choose a time.

    «Ask to book me»: the bot thanks them, and the doctor and the administrators get an assignment to call and choose a time.

«Book» is in the menu when «Booking in Telegram» is on in «Configuration → General Settings» → Telegram, online booking is on and Vizi opens at an https address.

↑ To the top

Questions

Ready answers, and questions to the administrator

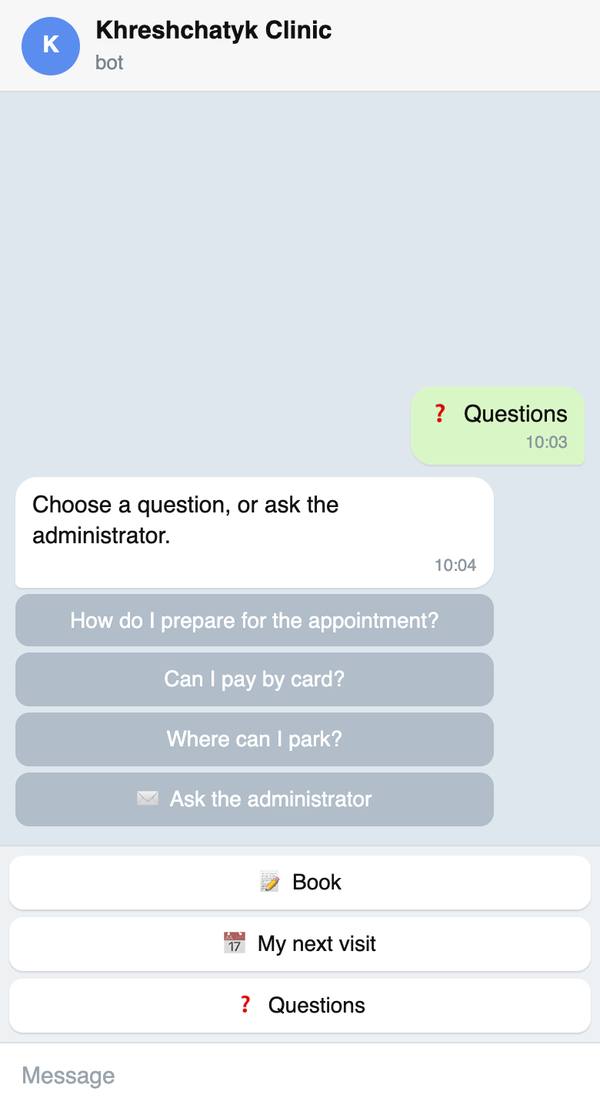
  1. «Questions» in the bot's menu: your ready answers as buttons, and «Ask the administrator».

    «Questions» in the bot's menu: your ready answers as buttons, and «Ask the administrator».
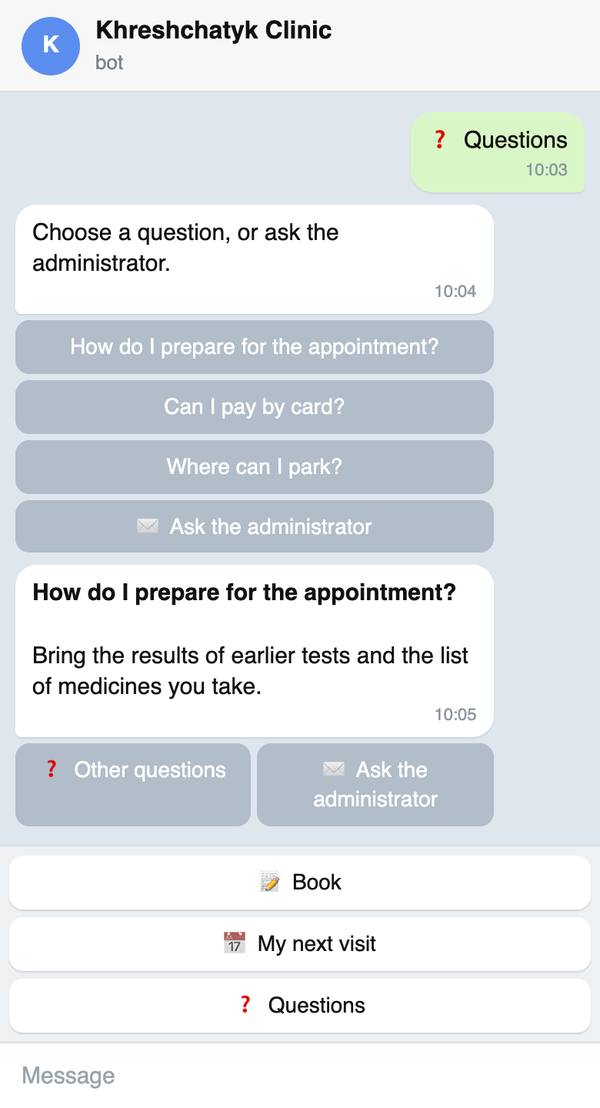
  2. A button: its answer, with «Other questions» and «Ask the administrator».

    A button: its answer, with «Other questions» and «Ask the administrator».
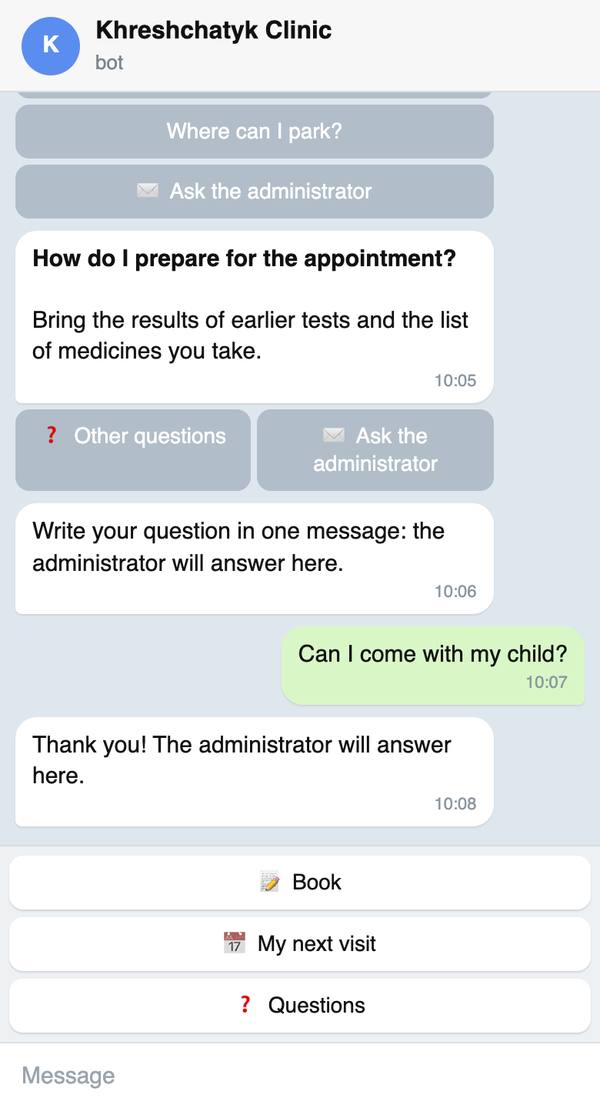
  3. «Ask the administrator»: the patient writes the question in one message, and the bot says the administrator will answer here.

    «Ask the administrator»: the patient writes the question in one message, and the bot says the administrator will answer here.
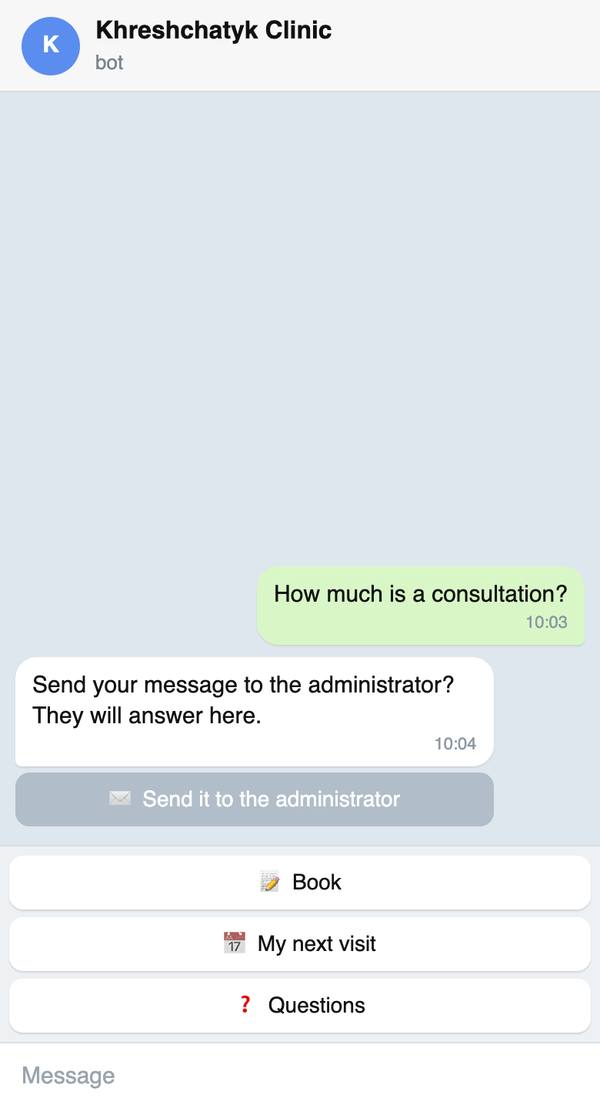
  4. Something in their own words: the bot offers the answers that match, and «Send it to the administrator».

    Something in their own words: the bot offers the answers that match, and «Send it to the administrator».
  5. Your side: the question comes to the doctor and the branch's administrators as a to-do and a notification in the app. Answer in «Patients → Questions from Telegram» with «Send the Answer», or right from the notification: the patient gets the answer in the chat, with their question quoted.

The ready answers: «Configuration → Telegram: Questions and Answers». Keywords help the bot find an answer by other words.

↑ To the top

Turning reminders off

By the patient or by you

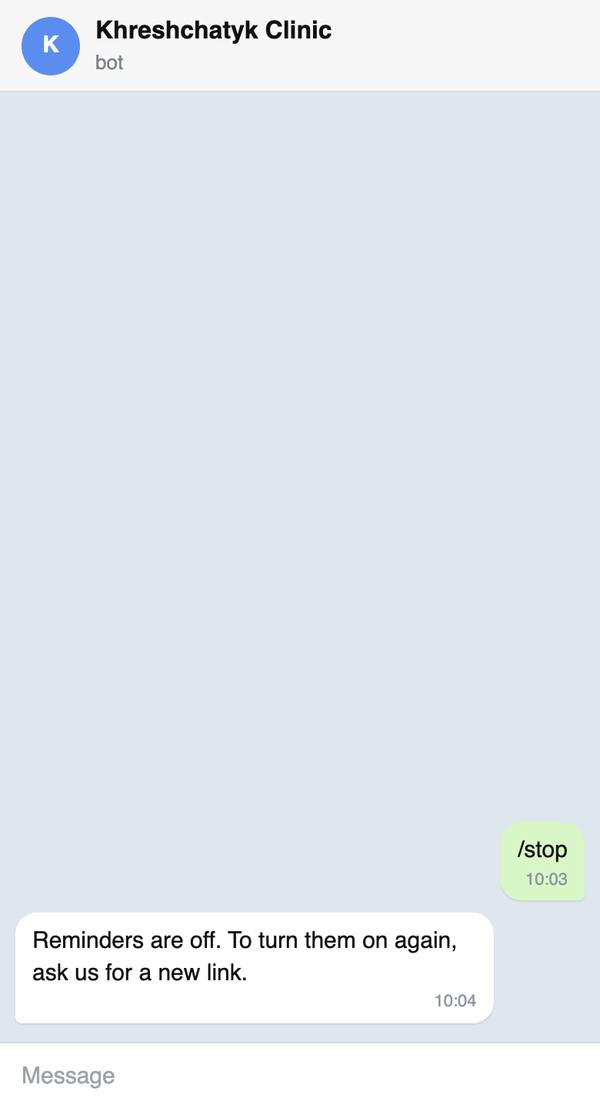
  1. The /stop command (in the bot's list of commands): the bot stops writing, and the card notes it. To get reminders again the patient needs a new link.

    The /stop command (in the bot's list of commands): the bot stops writing, and the card notes it. To get reminders again the patient needs a new link.
  2. You can disconnect too: on the card «Telegram» → «Disconnect». The chat gets a message that the reminders are off.

If the patient blocks the bot, Vizi disconnects the chat by itself, and reminders go by SMS again (when SMS reminders are on).

↑ To the top

Integrations

Telegram, SMS and the cash register are connected once, in the settings. The owner does it: only they see «Configuration» → «General Settings».

What you can connect

Telegram, TurboSMS and Checkbox: what each is for and what you need.

  1. Telegram is free. The clinic's own bot sends patients visit reminders and takes «I'll come» / «Reschedule»; on the Premium plan it also books and moves visits and answers questions. All you need is a Telegram account.

  2. TurboSMS: SMS and Viber for those who don't use Telegram. Messages are paid (TurboSMS prices), from your TurboSMS balance. SMS reminders are in the Business and Premium plans.

  3. Checkbox: a software cash register (PRRO) — a fiscal receipt for every payment, the shift and the Z-report. You need a cash register and a cashier registered with the tax office in the Checkbox cabinet.

  4. Everything is set in «Configuration» → «General Settings», the «Clinic Features» block, and on the branch card (the «Checkbox» tab).

↑ To the top

Telegram: the clinic's own bot

Create a bot with @BotFather, paste its token, and reminders go to Telegram.

  1. Open @BotFather in Telegram, send /newbot, then a name (your patients see it, e.g. «Khreshchatyk Clinic») and a username in Latin letters ending in bot (e.g. khreshchatyk_clinic_bot).

  2. BotFather answers with the token, a line like 123456789:AA… Copy it. Never forward it: whoever has the token controls the bot. Telegram's guide.

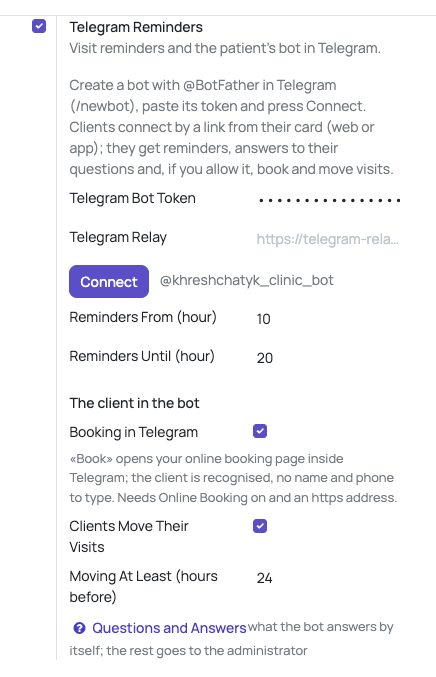
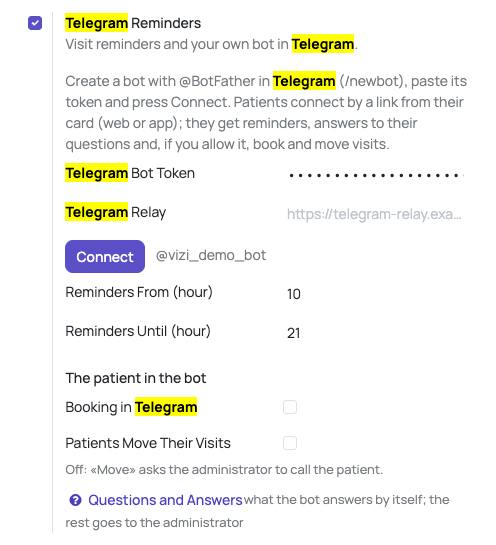
  3. In Vizi: «Configuration» → «General Settings», the «Clinic Features» block, switch on «Telegram Reminders». Paste the token into «Telegram Bot Token» and press «Connect». Your bot's @username appears beside it: the bot is connected.

    In Vizi: «Configuration» → «General Settings», the «Clinic Features» block, switch on «Telegram Reminders». Paste the token into «Telegram Bot Token» and press «Connect». Your bot's @username appears
  4. «Reminders From (hour)» and «Reminders Until (hour)»: the hours when reminders go out the day before the visit, in the clinic's time.

  5. Leave «Telegram Relay» empty: only a server that cannot reach Telegram needs it.

  6. Premium, the «The client in the bot» block: «Booking in Telegram» adds «Book» to the bot's menu, the online booking page opens right in Telegram; «Clients Move Their Visits»: the button under a visit shows the free times and the visit moves at once. Later than «Moving At Least (hours before)», the choice goes to the administrator to confirm. «Questions and Answers»: the answers the bot gives by itself (address, parking, how to prepare); other questions go to the administrator.
  7. Patients connect themselves: the «Telegram» button on their card gives a link and a QR code. Send the link (or show the code): they open the bot and confirm «Yes, it's me». What happens in the bot next: the Telegram bot guide.

The bot's picture and description are changed in @BotFather: /setuserpic, /setdescription.

↑ To the top

TurboSMS: SMS and Viber

Sign up, an API token, a sender name, and reminders go by SMS or Viber.

  1. Sign up at turbosms.ua and top up your balance (prices).

  2. Add a sender name: what your patients see instead of a number (up to 11 characters: Latin letters, digits, space, . & -). Mobile operators activate it, which takes a few days; until then SMS go with TurboSMS's common name. Sender name rules.

  3. Viber needs a contract with TurboSMS and a Viber sender with a monthly fee (contract). Viber is cheaper and shows the clinic's name and logo.

  4. The token: in the TurboSMS cabinet open the API settings and tick «HTTP API» under the connection methods: a key appears. Copy it. API documentation.

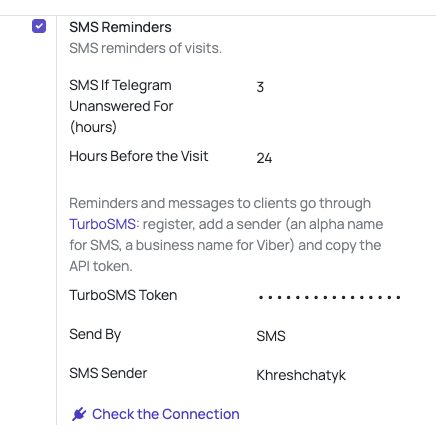
  5. In Vizi: «Configuration» → «General Settings», the «Clinic Features» block, switch on «SMS Reminders». Paste the key into «TurboSMS Token», choose «Send By» (SMS, Viber or «Viber, then SMS if not delivered») and type «SMS Sender» / «Viber Sender» exactly as in TurboSMS.

    In Vizi: «Configuration» → «General Settings», the «Clinic Features» block, switch on «SMS Reminders». Paste the key into «TurboSMS Token», choose «Send By» (SMS, Viber or «Viber, then SMS if not deli
  6. Press «Check the Connection»: Vizi saves the settings and shows your TurboSMS balance, so the key works.

  7. «Hours Before the Visit»: when the reminder goes. With Telegram connected too, patients get the SMS only when they have not answered in Telegram within «SMS If Telegram Unanswered For (hours)».

No SMS go out at night: the message waits for the morning.

Cyrillic takes more room: one SMS is 70 Cyrillic or 160 Latin characters; longer ones are split into parts.

↑ To the top

Checkbox: fiscal receipts

A cash register and a cashier in Checkbox, the key and PIN in Vizi, and every payment gets a receipt.

  1. Sign up in the Checkbox cabinet. Add the point of sale, the cash register (guide, in Ukrainian) and a cashier (guide). The cabinet registers them with the tax office using your e-signature.

  2. Copy the cash register's license key (Checkbox cabinet → «Каси») and the cashier's PIN code (→ «Касири»). A cashier's login and password work instead of the PIN.

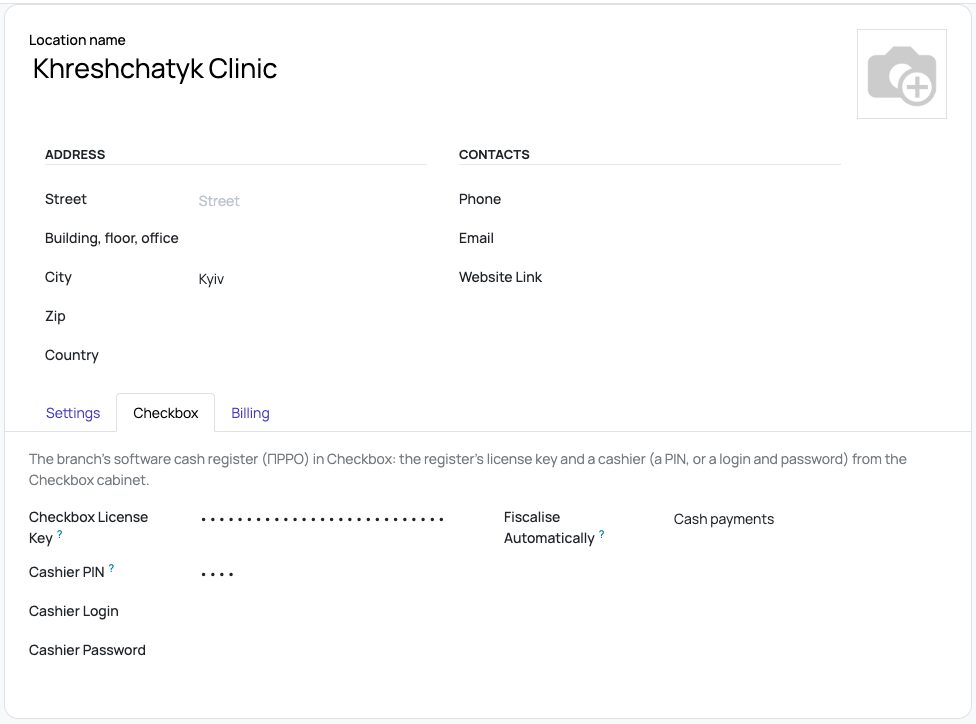
  3. In Vizi: «Team» → «Locations» → your branch → the «Checkbox» tab. Fill in «Checkbox License Key» and «Cashier PIN» (or «Cashier Login» and «Cashier Password»).

    In Vizi: «Team» → «Locations» → your branch → the «Checkbox» tab. Fill in «Checkbox License Key» and «Cashier PIN» (or «Cashier Login» and «Cashier Password»).
  4. «Fiscalise Automatically»: «Cash payments» gives a receipt for every cash payment, «Cash and card payments» for card payments too. Others are fiscalised with «Fiscalise» on the payment.

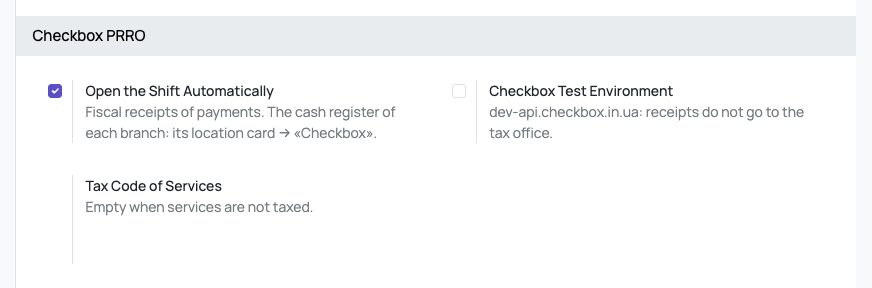
  5. «Configuration» → «General Settings», the «Checkbox PRRO» block: «Open the Shift Automatically» (the day's first receipt opens the shift), «Checkbox Test Environment» and «Tax Code of Services», the rate's letter or digit from the Checkbox cabinet (tax rates); empty when services are not taxed (most sole proprietors).

    «Configuration» → «General Settings», the «Checkbox PRRO» block: «Open the Shift Automatically» (the day's first receipt opens the shift), «Checkbox Test Environment» and «Tax Code of Services», the r
  6. Every day: «Finance» → «Checkbox PRRO»: «Open the Shift», «Cash In» / «Cash Out», and «Close the Shift (Z-report)» at the end of the day. Every receipt is in «Receipts Archive».

    Every day: «Finance» → «Checkbox PRRO»: «Open the Shift», «Cash In» / «Cash Out», and «Close the Shift (Z-report)» at the end of the day. Every receipt is in «Receipts Archive».
  7. In the app: «Profile» → «Cash register» opens and closes the shift from the phone (administrators).

«Checkbox Test Environment» is for trying out with Checkbox's test data: receipts do not go to the tax office. Switch it off for real work.
Each branch is its own Checkbox cash register.
↑ To the top

Didn't find the answer? Write to support@vizi.com.